Mennonite Girls Can Cook is a collection of recipes which were posted daily for a period of ten years from 2008 to 2018. We have over 3,000 delicious recipes that we invite you to try. The recipes can be accessed in our recipe file by category or you can use the search engine.

Recipe Search

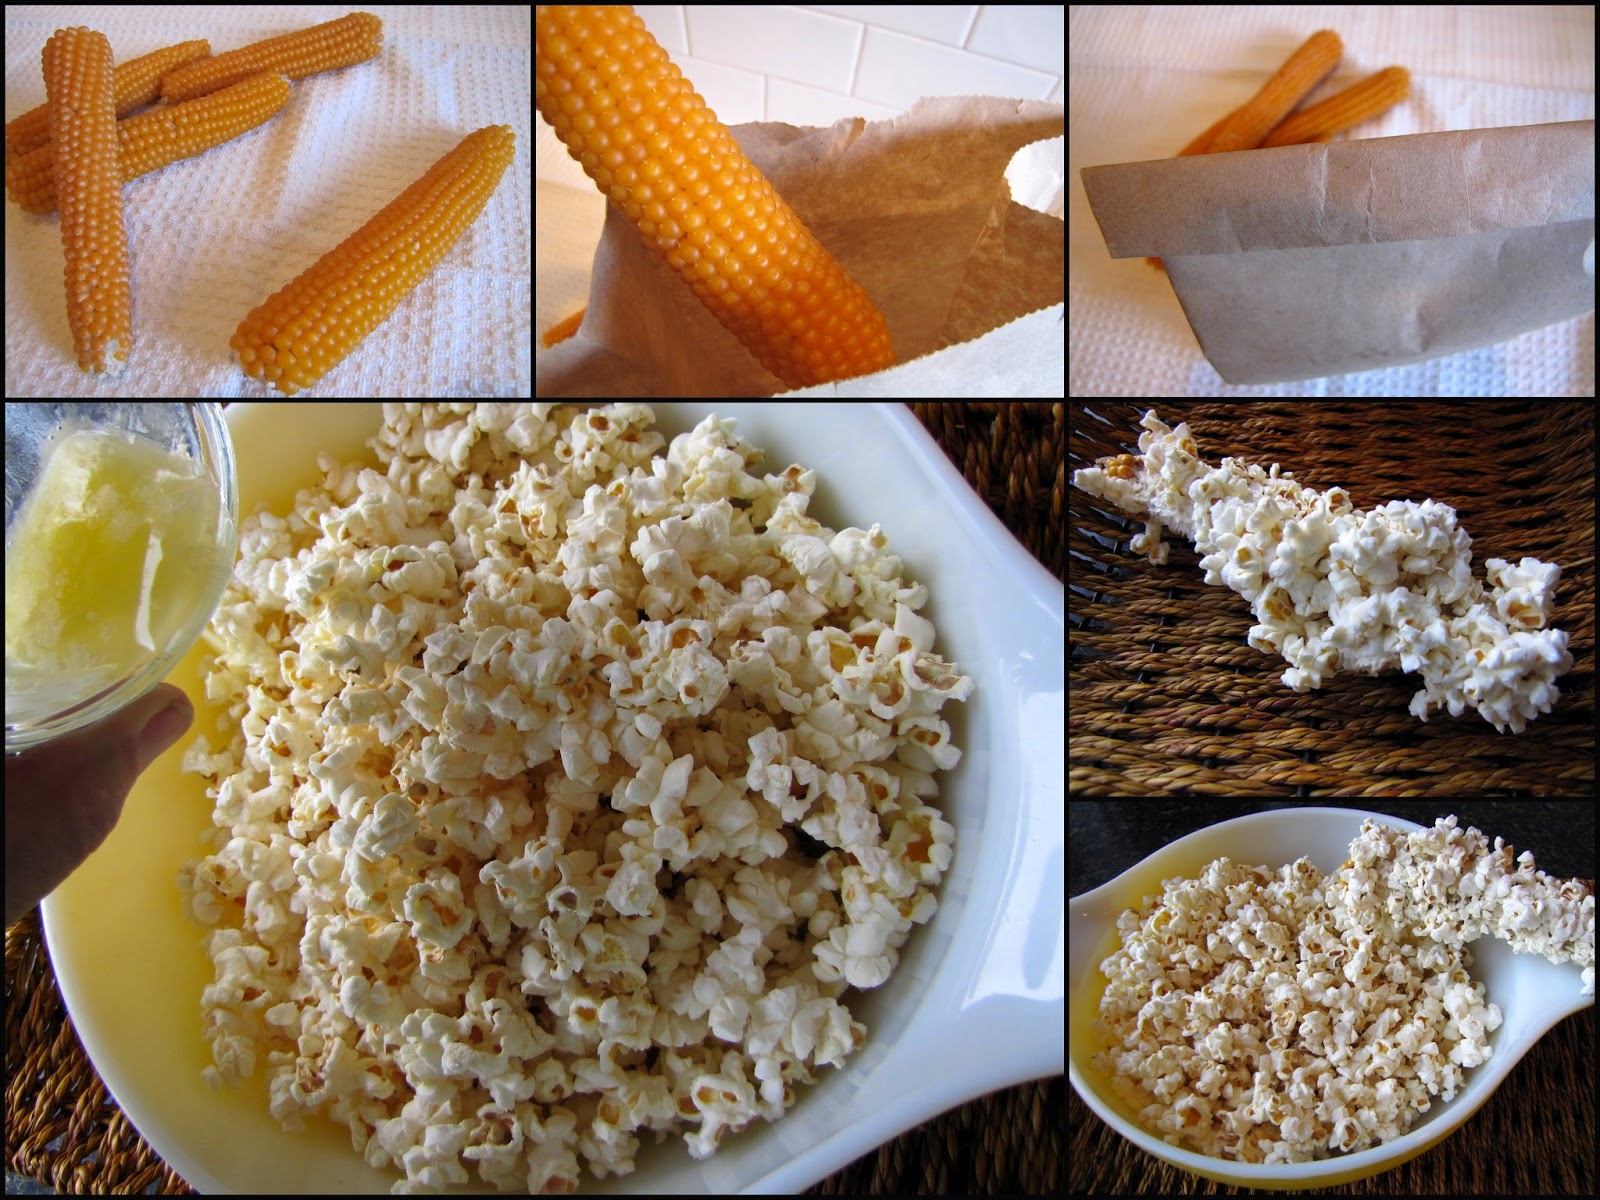
Popping Popcorn on the Cob

Have you ever met anyone who doesn't like popcorn?  I think they are few and far between!  We quite enjoy popcorn over here...and happen to have a brother-in-law who grows popcorn in his garden...and shares the cobs with us.  He grows most anything and everything...often from seeds he has saved from the previous year's produce.  Apparently I could save the seeds from a cob of popping corn and start growing my own next year.  I think I will leave the growing to him.  But the eating is good over here!  And it couldn't be easier to pop. 


Here's how:
  • Place one cob in a brown lunch bag (or medium sized paper bag). 
  • Fold bag over twice (just to be sure the popped corn stays in the bag!)
  • Place the bag on its side in the microwave oven.
  • Microwave on high for two minutes. (If the popping slows to several seconds between pops before that time, remove to prevent burning.)
  • Remove the bag from the microwave carefully, and empty contents into a bowl  (some kernels will remain attached to the cob).
  • Drizzle with butter.  
  • Season with salt.
  • Enjoy!
Place the bag in the microwave for two minutes on high. Listen for the kernel popping to slow down. Remove the bag as soon as the popping slows down to avoid burning the popcorn even if the two minutes are not up.

Read more : http://www.ehow.com/how_7879419_make-popcorn-corn-cob.html
Place the bag in the microwave for two minutes on high. Listen for the kernel popping to slow down. Remove the bag as soon as the popping slows down to avoid burning the popcorn even if the two minutes are not up.

Read more : http://www.ehow.com/how_7879419_make-popcorn-corn-cob.html
It is amazing how much popcorn comes from one wee cob! 
Place the bag in the microwave for two minutes on high. Listen for the kernel popping to slow down. Remove the bag as soon as the popping slows down to avoid burning the popcorn even if the two minutes are not up.

Read more : http://www.ehow.com/how_7879419_make-popcorn-corn-cob.html


In case you ever come across popcorn-on-the-cob at your local market...or are gifted some by a brother-in-law who grows it...you will know what to do with it!  Or maybe...just maybe...you will trying growing some in your garden this year.

 

Flashback Fridays / Quick Garlic Spread


I love baking French bread and my recipe is almost identical to Annelieses,  but if you don't have time to bake a bought one will do. I must say the homemade is worth the effort and one of the easiest yeast breads to make if you are just starting out.
This recipe for the garlic spread just brings garlic bread to a whole new level. It is simple and quick, you may never buy store bought garlic bread again.

Quick Garlic Spread:
  • 1/2 c. butter
  • 1/2 c. mayonnaise (don't use Miracle Whip it is too sweet) 
  • 1/2 grated Parmesan cheese
  • 4 cloves garlic minced
  • 3 tbsp. freshly chopped parsley
One large french bread loaf cut lengthwise, spread liberally on cut side and broil til brown and bubbly. Or wrap in foil and bake at 375 for 20 min. We like ours broiled. If you want it to be more cheesy then just add some grated Mozzarella Cheese on top before broiling. Enjoy!

Brined Chicken Grilled with BBQ Sauce


Don't save the grilling season for summer. Any time of year is a great time to enjoy something off the grill and here I brined a half chicken, added a coating of spices, grilled it and near the end of the grilling mopped it with a home made BBQ sauce. Tender and tasty! 

  • half roasting chicken
Brine:
  • 8 cups cold water
  • 1/3 cup brown sugar
  • 1/2 cup coarse salt
  1. Whisk together water sugar and salt in a glass or plastic bowl. 
  2. Add chicken making sure it is fully immersed in the brine. Cover and place in refrigerator for a minimum of 3 hours or over night.
  3. Half hour before meat is ready to grill, drain brine and rinse chicken well under cold water. Pat dry with paper towel.
  4. Rub outside of chicken on all sides with the following rub and allow to sit for about 20 minutes. 
  5. Have grill pre heated to 350-375º. Place chicken on grill beginning with cut side down. Grill for 15 minutes. Turn chicken over and grill 10 minutes. 
  6. Mop under side of chicken generously with BBQ sauce (recipe below). Continue grilling for another 10 minutes. Turn chicken again so skin side is up. Mop generously with BBQ sauce and grill another 10 minutes. Check meat in the thickest spot for internal temperature. It should be approximately 160º for breast meat and 180º for dark meat. Remove and tent with foil for 8-10 minutes before slicing. Serve with any remaining BBQ sauce heated up slightly.
Spice rub:
  • 1 tsp paprika
  • 1 tsp garlic powder
  • 1 tsp chili powder
  • 1 tsp onion powder
  • 1/2 tsp course salt
  • 1/2 tsp fresh ground pepper
  • 1/2 tsp cumin
  • 1 tbsp corn starch (this ingredient insures that the outer skin crisps up a bit) 
  1. Mix spices together and rub on rinsed and patted dry chicken. 
BBQ Sauce:
  • 2/3 cup tomato paste
  • 1 tbsp garlic powder
  • 1 tbsp onion powder
  • 1 tbsp paprika
  • 1 tbsp chili powder
  • 1 tbsp brown sugar
  • 1/3 cup apple cider vinegar
  • 1 tbsp maple syrup
  • 1 tbsp agave syrup
  • 1 tbsp Worcestershire Sauce
  1. Stir together all ingredients until well mixed. 


Mini Mexican Pizzas


Serve them as appies...or as the main event.  Any which way, they'll be a hit!  
  • 3–4 large flour tortillas
  • 1 pound lean ground beef, cooked
  • 1/2 cup salsa
  • 1/2 package taco seasoning mix plus water (according to directions) 
  • 1/2 cup refried beans (optional)
  • 1/4 cup chopped green pepper or 1/4 cup corn
  • 3/4 cup shredded Mexican blend cheese

Optional Toppings: sliced black olives, shredded lettuce, sour cream, chopped tomatoes

  1. Preheat oven to 475F. 
  2. Spray muffin tin with non-stick cooking spray.
  3. Lay each tortilla out on a flat surface, and using a large cookie cutter or empty can, cut 3-4 circles (close to 4") out of each tortilla.
  4. Press each circle into muffin tin.
  5. Cook and drain hamburger meat.
  6. Add taco seasoning and water and continue to cook for several minutes (as indicated on package).
  7. Add salsa and re-fried beans and stir to combine well.  Heat through; then remove from heat. 
  8. Scoop meat mixture into muffin cups, dividing evenly among twelve.
  9. Top with shredded cheese. 
  10. Bake in pre-heated oven for 10-12 minutes, or until cheese is melted.
  11. Remove from oven and let pizzas cool in tin for 5 minutes.
  12. Remove pizzas from muffin tin using a fork or knife. 
  13. Serve with sliced black olives, sour cream, chopped tomatoes, and shredded lettuce , as desired!
 Makes 12.

Enjoy!

Savory Snacking Bread


When I saw this idea, using a sourdough bread, I decided to try our no-fail French bread to make this savory snack, appetizer or soup accompaniment. Why not try it this weekend? This recipe will make two loaves. 

Ingredients:
  • 2 Tbsp oil
  • 2 Tbsp sugar
  • 2 tsp salt
  • 2 cups hot (tap) water
  • 4 - 5 cups flour, divided (can be half whole wheat)
  • 2 Tbsp instant yeast
  • sesame seeds (optional)
Method:

  1. Put sugar, oil, salt and hot water in a large mixing bowl. You can also use a mixer that has a dough hook attachment or your bread machine.  
  2. Add 1 cup of the flour mixed with the yeast, then the rest of the flour, 1/2 cup at a time. Add flour until dough comes away from side of bowl or easily holds together in a ball shape and is not too sticky if you handle it with floured hands. Cover bowl with wax paper and tea towel.
  3. Let rise until double, about 1/2 hour. Divide in half.
  4. Roll out on a slightly floured surface to dinner plate size, just to roll out any bubbles. Roll up, tuck in ends well and rotate on counter while pushing sides under to shape into a ball. Place on greased or parchment paper lined pan. Cut diagonal slits on top. Cover.
  5. Let rise about 30 - 45 min. Brush with cream and sprinkle with sesame seeds. (optional)
  6. Bake at 400 F for 20 min, or until golden. Remove to rack to cool. Can be frozen for future use.
Savory Filling for one loaf:
  • 2 cups shredded cheese (I used a mix of cheddar, Colby and Monterrey Jack)
  • 1/4 cup melted butter
  • 1/4 cup green onions and /or 1 jalapeno, chopped fine

 Method:

  1. Cut bread in one inch sliced (both directions) to within half an inch of the bottom)
  2. Fill cuts with cheese, drizzle with butter and sprinkle with chives.
  3. Wrap in parchment and foil to hold together well.
  4. Bake at 350 F for 15 minutes. Open foil and bake about 10 minutes longer, until cheese is melted. 


Flashback Friday - Maple Dijon Salmon


My husband enjoys fishing and each year goes up to the Queen Charlottes (Haida Gwaii) on the
west coast of Vancouver Island to fish for salmon.
For Flashback Friday I thought I'd repost the first recipe I posted to the Mennonite Girls Can Cook Blog.  It's still a favourite recipe with our family and friends.
This time, I forgot to add the pistachio nuts but it was just as good.


  • 1-1 1/2 pounds filleted salmon (will serve about 4-6)
  • 3 tablespoons pure maple syrup
  • 3 tablespoons Dijon or Grainy mustard
  • 1/2 cup shelled and chopped pistachio nuts (if desired)

  • *The amount of maple syrup and mustard will depend on how big your piece of salmon is. Just remember to use equal amounts of each.
    1. Lay salmon skin side down on a pan covered in heavy foil and lightly sprayed with oil.
    2. Mix maple syrup and mustard together in a bowl.
    3. Spread about half over the salmon before baking. (Baste halfway through with the remaining mixture)
    4. Sprinkle with pistachios (if desired) and bake in oven at 350 F or on grill until fish is done. It should flake easily with a fork but not be too dry. (Depending on the thickness of the fish, this will take about 20 minutes.)
    5. Lift the salmon off of the skin and place on serving plate.

    A happy man with his catch!


    Mac n Cheese Muffins


    If you are looking for a great little muffin that your children will love, this is it. You can't go wrong with mac n cheese can you? They were still warm from the oven when my granddaughter dropped by and she deemed them delicious. They are good hot or cold, wonderful for packing in lunches or as a snack.
    • 2 cups elbow macaroni
    • 2 tablespoons butter
    • 1 egg, beaten
    • 3 cups cheese, shredded, I used a blend of cheddar and mozzarella
    • 1 cup milk
    • 1/2 cup bacon, fried and crumbled
    • 1/4 teaspoon salt 
    • 1/4 teaspoon pepper
    • 2/3 cup bread crumbs
    • 2 teaspoons butter, melted
    • Paprika
    1. Cook macaroni until done but still a bit firm, drain and pour macaroni back in the pot. Stir in 2 tablespoons butter and beaten egg until macaroni is completely coated.
    2. Stir in cheese, milk, and bacon, reserving 1/2 cup of cheese for the topping.
    3. Spoon into well greased muffin tins.
    4. Mix together bread crumbs and 2 teaspoons melted butter until crumbly.
    5. Top muffins with reserved cheese and the crumbly bread crumbs.
    6. Sprinkle paprika on top.
    7. Bake in a 350º oven for 25 minutes, until tops are browned.
    8. Remove from oven and allow muffins to cool 5 minutes before removing them from pans.
    9. Yield: 18 regular size muffins

    Almond Blueberry Muffins (Gluten, dairy free)


    If you need gluten free  dairy free options, I can highly recommend this recipe. Whether you have an alergy or not they taste delicious!
    • 2 cup Ground Blanched Almonds (also known as Almond Flour)
    • 1/2 teaspoon baking soda
    • 1/8 teaspoon of sea salt
    • 2 Eggs
    • 2 Egg Whites 
    • 1/4 cup of Maple Syrup
    • 1 tablespoon Apple Cider Vinegar
    • 1 teaspoon Vanilla Extract
    • 2 tablespoons oil (I used Coconut Oil)
    • 1 cup Blueberries

    1. Mix all the liquid ingredients into a bowl and whisk together. 
    2. Stir the dry ingredients together in a separate bowl to incorporate the baking soda. 
    3. Add the dry and liquid ingredients together, and mix well.
    4. Fold in the blueberries.
    5. Spray 24 mini muffins tins well with cooking spray.
    6. Fill the tins completely full. 
    7. Bake at 350 for 20-25 minutes. 
    8. Cool in the tins for 5-10 minutes. Loosen the edges carefully and remove from pan to cool completely.

    Lemon Blueberry Loaf

    Tangy lemon and sweet blueberries are always a great combination. This recipe bakes into one large loaf, or you can bake it in a 9"round or square pan, or bakes into 12 large muffins. 
    • 1 1/2 cups flour
    • 1 cup sugar
    • 1 tsp baking powder
    • 1/2 tsp salt
    • 1 tsp vanilla
    • 3 eggs
    • 2 tsp lemon rind
    • 1 cup plain full fat plain yogurt OR sour cream, (or a mixture of the two)
    • 1/2 cup vegetable oil
    • 1 1/2 cups blueberries, fresh or frozen
    1. Stir together first 4 dry ingredients.
    2. In a large mixing bowl, beat together eggs, vanilla, lemon rind, yogurt (OR sour cream) and oil. 
    3. Add dry mixture and mix just until dry ingredients are well incorporated. Don't over mix.
    4. Gently stir in blueberries.
    5. Pour batter into well greased and floured loaf pan, Bake in 350º oven for 50-55 minutes. (adjust time accordingly if using alternate pan sizes) 
    6. Once baked allow to rest in pan for 10 minutes then remove to cooling rack.
    Lemon syrup:
    • 1/3 cup sugar
    • 2 tbsp fresh lemon juice
    1. Heat together until sugar is dissolved. 
    2. Poke warm lemon loaf with small fork and brush lemon syrup over loaf. Allow to cool completely.
    Glaze:
    • 1 cup powdered sugar
    • 2-3 tbsp fresh lemon juice
    1. Stir together and drizzle over cooled loaf. Allow to set. 

    Bread for the Journey


    While visiting my daughter in Saskatchewan this past summer, the boys and I saw this amazing cloud on the way home from swimming. We commented on how it reminded us of the cloud that God sent to lead the Israelites through the wilderness.
    Then recently, I came across this picture in my files that reminded me of the pillar of fire that led them by night.


    In Exodus 13:21 and 22 we read:

    And the LORD went before them by day in a pillar of cloud to lead the way, 
    and by night in a pillar of fire to give them light, so as to go by day and night.
    He did not take away the pillar of cloud by day or the pillar of fire by night from before the people.

    After years of being enslaved to Pharaoh, the Israelites fled Egypt into the wilderness, 
    They had lived all their lives in the cities of Egypt with its streets and pathways and familiar neighbourhoods.  They knew nothing else. Now they were in the midst of  a featureless desert without roads or signs to guide them. They must have felt lost, directionless, very fearful of the dangers that lurked in these unknown lands and uncertain as to what the future held,
    However, they were God's people and He knew their need and so He provided direction and comfort for them in the pillar of cloud by day and the pillar of fire by night.   Exodus 14:19 and 20 recounts how God  also used the pillar of cloud to hide the Israelites from the pursuing Egyptians as they approached the Red Sea.
    Seeing those pillars in front of them must have provided much reassurance to
     Moses and to all the people.

    GOD'S WORD
     takes the place of  those pillars of cloud and fire in today's world.
    It provides direction when we are uncertain of our way forward. 
    It illuminates truth and dispels the darkness in our souls
    It reminds us of God's incredible love and care for us.

    Psalm 119: 105
    Your Word is a lamp to my feet and a light to my path

    Psalms 32:8-9
    I will instruct you and teach you in the way which you should go; I will counsel you with My eye upon you.
    Psalms 43:3
    O send out Your light and Your truth, let them lead me; Let them bring me to Your holy hill and to Your dwelling places.