Mennonite Girls Can Cook is a collection of recipes which were posted daily for a period of ten years from 2008 to 2018. We have over 3,000 delicious recipes that we invite you to try. The recipes can be accessed in our recipe file by category or you can use the search engine.

Recipe Search

Blueberry Cream Pie


I brought this pie to our friend's cabin on the weekend.
It's light and fluffy and, oh so full of blueberry goodness.
I made it using fresh local blueberries but I'm sure it would be good using frozen blueberries as well.

For the blueberry topping:
  • 4 cups fresh blueberries
  • 3/4 cup cold water, divided
  • 1/2 cup sugar or more if you like it sweeter
  • 3 tablespoons cornstarch
  • 1 1/2 teaspoons lemon juice
For the crust:
  • 2 cups graham wafer crumbs
  • 1/4 cup sugar
  • 1/2 cup melted butter
For the Cream Filling:
  • 1/1/4 cups heavy cream
  • 6 ounces cream cheese, softened
  • 1/2 cup sour cream
  • 1/3 cup sugar
  • Zest from one lemon
  • 2 teaspoons lemon juice
  1. Make the blueberry topping first, then the crust and lastly the cream filling.
  2. Mix blueberries, 1/2 cup cold water, sugar and lemon juice in a pot over medium heat.
  3. Cook until mixture boils.
  4. Mix together the cornstarch, remaining 1/4 cup water and lemon juice in a small bowl until blended.
  5. Add slowly to blueberry mixture, stirring until mixture boils and is no longer cloudy.
  6. Set aside and cool completely.
  7. For the crust, Mix all ingredients in a bowl.
  8. Press crumbs on bottom and up sides of a 10 inch pie plate.
  9. Refrigerate until filling is made.
  10. For the filling, whip cream until stiff.
  11. In another bowl, blend cream cheese and sugar, lemon zest and lemon juice until smooth
  12. Add sour cream and beat again.
  13. Fold cream cheese mixture into whipped  cream until incorporated.
  14. Pile filling into graham crust and smooth top.
  15. When the blueberry topping is cold, carefully spoon evenly over filling.
  16. Refrigerate at least 3 hours.

White Boxed Cake Plus

When I want a 'super moist' white cake my favourite is using a boxed mix and adding to it. It's fool proof and you can cheat a little. I've had ladies ask how I get such a good tasting and textured white cake....and I don't mind telling all. I have used this for lemon or yellow mixes too but pretty much stick to total scratch for chocolate cakes.
Yields 32 cupcakes. See below for other baking pan options.
  • 1 boxed white cake mix
  • 1 cup flour
  • 1 cup sugar
  • 3/4 teaspoon salt
  • 1 1/3 cup water
  • 2 tablespoons vegetable oil
  • 1 teaspoon vanilla
  • 1 cup sour cream
  • 4 egg whites
  1. Place dry ingredients in mixing bowl and stir to combine. 
  2. Add remaining ingredients and beat well.
  3. Pour batter into greased pans or line cupcake pans with liners and fill. 
  4. If baking cupcakes, use liners for your pans. 
  5. Here's a trick I learnt from my friend Elly, owner of Elly's Cake Studio. To get a nice 'dome' on the top of your CUPCAKES, preheat oven to 400º. Bake cupcakes in oven for 6 minutes at 400º, leave them in oven and don't open the door, but turn oven down to 325º for the remaining time as stated on the boxed mix which would typically leave you with another 12 minutes. Try it! 
***Baking time for each size of pan will vary. Check the baking times and temperatures on the boxed mix you buy and use that as your guide. As for temperature, a cake mix typically bakes at 350º so go with that unless you want to use the baking idea in step 5 above when baking as cupcakes.***

Note: As this mixture yields more than what comes from one boxed mix I will often divide the batter between a few different style of pans and freeze to use in different desserts. Several rounds and a few cupcakes. This also is the perfect size mix for a large sheet cake. 
Here I divided the mix up to make a few different sizes of cupcakes and used part of the batter to bake a long narrow fluted cake that I split and filled with lemon curd and cream, topped with whipped cream and a thickened berry sauce. 


Elly has also taught me a few decorating techniques. The finishing touch was a dusting of disco dust and a candy pearl and a pretty cupcake liner.


And then I delivered a wee sweet under a glass dome fit for a princess. 

Dill Pickles

Homemade dill pickles just like the ones my mother used to make are on my 'to do' list every summer. There's just something about homemade dills that can't be found on the store shelf! This is my mom's recipe...the same pickles I grew up with.


Ingredients:
  • 10 pounds of pickling cukes (yield about 8 jars)
  • 5 cups white vinegar used for pickling
  • 13 cups water
  • 1 cup sugar
  • 1 cup pickling salt…coarse
  • garlic pieces (peeled and cut in half)…two pieces per jar
  • fresh dill
  • small dried red chili peppers…one or two pieces for each jar

Method:
  1. Wash cucumbers well and leave in tub of cold water while packing jars.
  2. Mix vinegar, water, sugar and the salt in a large pot. Stir the mixture well. Heat to a rapid boil on medium-high, then keep simmering while filling jars.
  3. Prepare wide-mouth 1-quart jars. In each jar, put 1 piece of garlic, one head of dill, two small chili peppers and then enough cucumbers to fill the jar. Then add one more garlic piece and another sprig of dill.
  4. Fill jars slowly with the hot brine and seal (being sure to clean all residue from the top of the rim of the jar first).
  5. Place the lidded jars in boiling water bath for about 15 minutes…water in canner should cover the tops of the jars.
  6. The pickles should be stored in a cool place for two months before serving. (So they say...I’m not sure we ever waited that long!)

    *If your water is hard, high in mineral content or has chlorine added, use bottled water.
    ** Pack the cukes into the jars really tight. They shrink as they are processed.
If you like a little zip to your pickles...be generous with the red chili peppers!


Enjoy!

Cherry / Raspberry Coffee Cake


There's nothing not to like about this coffee cake/dessert! You can change up the fruit to your liking. It's easy to make . . . a combination between a Platz and a cobbler. Another recipe from my mom.

Ingredients:
  • 2 ¼ cups flour
  • ¾ cup sugar
  • 1 teaspoon baking powder
  • 1 teaspoon soda
  • ¾ teaspoon salt
  • ¾ cup butter
  • 2 eggs
  • 1 cup buttermilk
  • 1 teaspoon vanilla
  • 1 can cherry pie filling
  • 1 - 6oz pkg raspberries (frozen)

    Crumb Topping
  • ¾ cup sugar
  • ½ cup flour
  • ¼ cup butter
Method:
  1. Grease 9x12 or 10 inch round spring form pan. If you want to be able to lift out rectangular shaped cake, line pan with parchment paper.
  2. Mix dry ingredients and cut in butter with pastry blender, till crumbly.
  3. In a separate small bowl, beat eggs with fork, stir in buttermilk and vanilla.
  4. Add wet ingredients to dry ingredients, stirring to moisten.
  5. Divide batter, spreading just over half of it (about 2/3) into greased pan.
  6. Spread with cherries and then raspberries. (frozen raspberries are easy to crumble by hand)
  7. Using a teaspoon, dot the rest of the batter over the fruit.
  8. Make crumb topping, using pastry blender, and sprinkle over cake.
  9. Bake at 350° F for 45 - 50 minutes.
  10. Serve plain, with whipped cream or ice cream.
for the visual learner - click to enlarge

Raspberry Custard Pie

Raspberries are ready for picking. Our favorite Raspberry Pie has a combination of silky custard that the raspberries lay on with a tender flaky crust.

Dorothy's Pastry 
  • 2 1/2 cups of all purpose flour
  • 2 teaspoons of brown sugar
  • 1 teaspoon of salt
  • 1/2 teaspoon of baking powder
  • 1/2 pound of lard
  • In a one cup measuring cup  beat one small farm fresh egg
  • add 2 teaspoons of vinegar or 1 tablespoon to double the recipe
  • and fill to the 1/2 cup line with ice cold water.
  1. In the food processor, put all the dry ingredients.
  2. Add the cut up lard, pulse this until the big pieces are all gone.
  3. Add the liquid quickly while the machine is going.
  4. Stop it as soon as it starts to come together.
  5. Turn it out onto a counter and knead it a few times until it comes together.

If you don't have a food processor, put the dry ingredients into a large bowl. 
  1. Cut the lard into tablespoon pieces and then cut into the flour mixture until it looks like oatmeal. Add all the wet ingredients and stir with a fork until it just comes together.
  2. Divide the pastry into 3 equal pieces, flatten into round discs, wrap in plastic wrap and refrigerate for about 30 minutes.

Preheat oven to 425 F.

  1. Roll one disc of pastry onto a floured counter. Roll pastry out about 1/8 inch thick and line your pie plate. This recipe will do two 9 inch crusts. 
  2. Roll the pastry onto the rolling pin and unroll it onto the pie plate. Trim the edges and prick the bottom and sides of the pastry. 
  3. Put a piece of foil over the crust, pressing it slightly onto the crust. Put it into the oven and bake 10 minutes. Remove the foil and bake a few more minutes until lightly browned. Let cool.
  4. Refrigerate the remainder pastry discs a few days or freeze.


Custard (enough for one 9 inch pie)
  • 1/3 cup sugar
  • 2 1/2 tablespoons cornstarch
  • 1/4 teaspoon salt
  • 2 1/2 cups milk
  • 3 egg yolks
  • 1 teaspoon vanilla
  1. Blend the sugar, cornstarch, and salt in the medium saucepan.
  2. In a measuring cup, measure the milk and then add the egg yolks and stir.
  3. Add to sugar and cornstarch mixture.
  4. Cook over medium heat stirring constantly until bubbling and thickened.
  5. Remove from heat and add vanilla.
  6. Cool for 5 minutes.
  7. Pour into cooled pastry crust.
Add one layer of berries on top of the cooled custard.
Glaze
  • 2 tablespoons raspberry jam
  • 2 tablespoons water
  • 1 teaspoon cornstarch
  1. In a small saucepan, stir together the jam, water, and cornstarch. Heat until just bubbly and clear. Drizzle over the berries. You don't need much .. just a bit to add a bit of sweetness.
Whip 1 cup of heavy cream with 2 tablespoons sugar until soft peaks form. Slice the pie and top with whipped cream.

Bumbleberry Jam


We quite enjoy throwing several kinds of berries together to make a pie or a crisp.  Why not combine a few varieties of berries to make bumbleberry jam?  I used blackberries, blueberries and raspberries...equal amounts of each...and we quite enjoyed the combo.
  • 6 cups berries, crushed with a potato masher or pulsed in the food processor or blender
  • 1/2 cup water
  • 4 cups sugar, divided
  • 1 box Certo Light pectin crystals  (If you prefer a runnier jam, use only half the package of pectin.)
  • 1 teaspoon butter, optional  (prevents jam from foaming)
  1. Place crushed berries and water in a large pot.  (Add water to berries when processing in blender.)
  2. Combine pectin crystals with 1/4 cup of the measured sugar.  Add to prepared fruit.
  3. Bring mixture to a boil over high heat, stirring with a long wooden spoon.
  4. Add remaining sugar and 1 teaspoon butter.
  5. Return to a hard boil; boil while stirring for one minute.
  6. Remove from  heat.  Stir for several minutes to prevent fruit from floating.
  7. Pour into warm sterilized jars* to 1/4" from top.
  8. Cover with lids and screw rings on tightly.
*Wash jars and lids in hot soapy water and rinse well. Sterilize jars, lids and rings by placing in a large baking pan and placing in oven at 225ºF for 10 minutes. Keep warm until filling time.  By using warm jars and hot lids, the jam jars will seal without processing in a hot water bath. (According to the Kraft Certo guidelines.)  Cooked jams and jellies can be stored on the shelf unopened for 6 to 8 months.


Triple berry preserves on a thick slice of fresh bread is a delightful combo!

No-Can Bread and Butter Pickles


Bread and butter pickles are so simple to make...and a perfect accompaniment for sandwiches. The fresher the cuke...the better the pickle!

  • Cucumbers, unpeeled and cut into thin slices ( a mandolin slicer works great)
  • 1 or 2 small onions, sliced and separated into rings
  • 3 cups white sugar
  • 2 cups white vinegar
  • 1/4 cup pickling salt
  • 1 teaspoon turmeric
  • 1 teaspoon celery seed
  • 1 teaspoon mustard seed
  1. Fill an empty 1 gallon bucket with cucumber and onion slices.
  2. Combine remaining ingredients and bring to a boil. Simmer for several minutes.
  3. Pour over cucumbers and onions.
  4. Stir and let cool.
  5. Cover and store in refrigerator. (Will keep for months, if they last that long!)
  6. They are ready to eat when they change colour.


They are the best addition to sandwiches! Cuke season is upon us...a good time to try these simple bread and butter pickles. And even when the fresh garden cukes are no longer available...these pickles can be made year-round using long English cucumbers.

 Anneliese and Lovella will be at the Berean Christian Bookstore in Lancaster, PA tonight at 7 pm ... and would love to meet you if you live in that vicinity. 


    Print

    Coffee Cake


    This is my favorite coffee cake recipe which I asked for politely and received from my daughter Alison. Then I went and tweaked it a bit.  I made it often for our staff and found it disappearing real quick when coffee break rolled along. I miss those days, maybe I should find another coffee room to supply with baked treats.
    • 1/2 cup butter, softened
    • 1 cup sugar
    • 2 eggs
    • 1 1/2 cups sour cream
    • 1 teaspoon vanilla
    • 2 cups flour
    • 2 teaspoons baking powder
    • 1 teaspoon baking soda
    • 1/2 teaspoon salt
    Topping:
    • 1/2 cup brown sugar
    • 2 tablespoons cinnamon
    • 2/3 cup walnuts, chopped
    1. Cream butter and sugar, add eggs and mix well.
    2. Whisk in sour cream and vanilla.
    3. Combine flour, baking powder, baking soda, salt, and stir into the creamed mixture until blended.
    4. Pour half the batter in a greased bundt or angel food pan. Sprinkle with half the topping.
    5. Spoon the rest of the batter over the topping and sprinkle with the rest of the topping.
    6. Bake in a 350º oven for 45 to 50 minutes, or until toothpick poked into cake comes out clean.

    Quick Blueberry Streusel (Platz)

    It's blueberry season, or soon will be, for those of us living in this part of the country. As a child I reluctantly used to go picking in the summer to make some spending money, but now I find it very relaxing to get out there among the rows and rows of berries. Especially with some good company, to eat, enjoy the sun and anticipate the desserts that will come.
    This delicious crumb cake is the easiest and quickest you will ever make, with the base and crumb topping made of the same mix.

    Ingredients:
    • 2 cups flour
    • 1 cup sugar
    • 3/4 cup butter (room temperature)
    • 2 teaspoons baking powder
    • 1/2 teaspoon baking soda
    • 1 egg beaten with fork in meas. cup, then filled to 1 cup with buttermilk
    • 2 cups blueberries
    Method:
    1. Mix butter into flour and sugar with pastry blender until well blended and crumbly. 
    2. Set 1 1/4 cups aside for topping. 
    3. To the first, bigger part of the mix, add baking powder and soda, then stir in combined egg and buttermilk 
    4. Spread into greased or parchment paper lined 9 x 13 pan. Sprinkle with 2 cups blueberries and reserved crumb mixture. Squeeze to make crumb clusters as you drop them by handfuls.
    5. Bake in upper part of oven (important)  at 375F for 35 - 45 min. Cool or serve warm with ice cream.

    Strudel


    Have you ever made your own Strudel Pastry? It was fun sharing recipes at a recent reunion.  Today I'm sharing with you a new favorite. And the beauty of this is that it's simple and quick to make and the results are delicious. Use any kind of fruits and you have fresh strudel.

    Strudel Dough
    • 2 cups flour
    • 1 cup butter
    • 1 cup sour cream
    1.  Grate butter into flour and use a pastry blender to mix ingredients together.
    2. Then add your sour cream and form a ball.
    3. Divide the ball into two halves and refrigerate for 30 minutes.
    4. Roll out one ball into a rectangular shape 12x9 (thinking in thirds)
    5. The dough should be thin enough and yet pliable enough to fold over.
    6. Fill with fruit mixture.
    7. Place on parchment-lined cookie sheet and bake at 400 degrees for 25 minutes.
    8. Leave it cool on the parchment paper prior to transferring to a serving plate.
    9. This dough is enough for 2 strudels. You can store the other ball in the fridge until needed.
    Fruit Options
    • sliced apricots, peaches, apples or any fruit in season
    • blackberries are my favorite...you can mix and add and adjust your sugar mixture.
    Sugar Mixture/Thickening
    • 2 cups sugar
    • 1/4 cup flour 
    • 1/4 cup cornstarch
    • Only use about 3/4 cup of this mixture for one strudel.
    TIP use a 1/4 cup more flour or cornstarch when using berries.
    1. Prepare the fruit first and you can leave the peel on when using transparent apples.
    2. Prepare Sugar mixture in a bowl.
    3. Sprinkle  1/4 cup sugar mixture over the center of dough.
    4. Top with fruit and add 1/2 cup sugar mixture along the strip/top of fruit.
    5. Fold dough over half of the fruit mixture and then fold the other half.
    6. Seal pastry edges by simply dabbing your fingers with water.
    7. Store extra sugar mixture in container.
    I have used Anneliese's sugar mixture  which is also featured in our first book Mennonite Girls Can Cook, page 174.   Sometimes I double this mixture and keep it on hand so that whenever I want to make a quick strudel or perishky it's always ready to go.

     Icing (optional)
    • 1/2 cup icing sugar
    • 1 tablespoon cream
    • 1/4 teaspoon almond flavor.
    1. Mix ingredients together to make a smooth consistency.
    2. Drizzle over strudel when cool and add a few toasted slivered almonds. 

    You can garnish it with some icing and almonds or you can leave it as is.
    Once again, the beauty of this dough is that you can use any fresh fruit that you have at your local market. I made one strudel with apples and one with apricots. Mix the flavors with fresh blackberries.

    You always know that when the last piece is taken, it must have been really good.

    Raspberry Cream Cheese Coffee Cake


    More than 80% of Canada's raspberries are grown right here in the Fraser Valley. And since it is the season, there are a lot of raspberry recipes happening around here these days.   Here is a moist raspberry coffee cake that we enjoyed yesterday.

    Raspberry Cream Cheese Coffee Cake

    • 2 1/4 cups flour
    • 3/4 cup white sugar
    • 3/4 cup butter
    • 1 teaspoon baking powder
    • 1/2 teaspoon baking soda
    • 1/4 teaspoon salt
    • 1/2 cup sour cream
    • 1 large egg
    • 1 teaspoon vanilla
    • 8 oz./250 ml cream cheese, softened
    • 1/4 cup sugar
    • 1 large egg
    • 1 tablespoon grated orange zest
    • 1 1/2 cups fresh raspberries
     
    Method:

    1. Preheat oven to 350°F.  Butter a 10" spring form pan and line the bottom with parchment paper.
    2. With a pastry blender or electric mixer, combine flour, sugar and cool butter until well blended and mixture resembles a fine streusel.  Measure out 1 cup of crumbs and set aside.
    3. To remaining streusel mix, add baking powder, baking soda and salt and mix.
    4. Add sour cream, egg and vanilla and beat only until the batter is smooth. 
    5. Spread the batter onto the bottom and slightly up the sides of the prepared pan.
    6. Using a clean mixing bowl, combine cream cheese and sugar.  Add egg and orange zest and beat until light  and fluffy.
    7. Next, spread the cream cheese filling over the cake batter.
    8. Scatter the fresh raspberries over the filling.
    9. Top with reserved cup of streusel.
    10. Bake for 50-60 minutes or until the streusel is golden and toothpick inserted in centre of cake comes out clean.
    11. Place on a rack to cool.  Remove ring and slide cake onto a dessert plate.
    12. Serve slightly warm or at room temperature. 


    Peach Upside Down Cake


    I used individual ramekins to bake these upside down cakes in.
    Every one gets a perfect amount of peaches and the crust on the bottom remains a bit crispy. It is the perfect warm summer night dessert.
    When they came out of the oven. . I flipped them over a dessert dishes and the serving was done.


    • 3/4 cup brown sugar
    • 1/4 cup butter, melted
    • 2 cups peeled, and chopped peaches
    • 1/2 cup soft butter
    • 1/2 cup sugar
    • 2 eggs
    • 1 teaspoon vanilla
    • 1 1/4 cup flour
    • 1 teaspoon baking powder
    • 1 teaspoon baking soda
    • 1/2 teaspoon salt
    • 3/4 cup buttermilk
    1. Spray 6 - 8 ounce ramekins with cooking spray and set on a cookie sheet
    2. In a small saucepan, combine the 3/4 cup sugar and 1/4 cup butter and bring to a simmer over medium heat. Simmer several minutes until the sugar dissolves.
    3. Using a gravy ladle, divide the sugar butter mixture between the ramekins, divide the chopped peaches between them and set aside.
    4. Heat the oven to 350 F.
    5. In a medium sized bowl, beat the 1/2 cup butter and 1/2 cup sugar until creamed and then add the eggs and the vanilla, and beat until combined.
    6. Add all the dry ingredients at one time and pour the buttermilk over all and beat until combined.
    7. Using an ice cream scoop, divide the batter evenly over the peaches.
    8. Bake until a toothpick comes out clean ..about 35 minutes.
    9. Use two thinner potholders, turn serving dishes over the hot ramekins and flip them over together to release the upside down cakes.
    10. Serve warm with ice cream.

    Potato Salad

    This past weekend we, like many others, headed down to the lake for a celebration and I was asked to bring the potato salad. This recipe is a "wanna-be" Oma Janzen's potato salad that she has never written down the exact measurements for. What makes this one different from other good potato salads is that it has no mustard, no sweet taste, but rather a little "sour-ish" flavor. If you like pickles, you'll probably like this salad. Now, to decide how many potatoes to cook, I usually count 1 small -medium potato per person. But if it's a potluck with many salads, then half a potato per person should be enough.

    Ingredients:
    • 6 medium sized red potatoes
    • 3 - 4 hard boiled eggs
    • 2 tablespoons finely chopped onion, green onion or chives
    • 3 pickles
    • 1/4 cup mayonnaise
    • 1/4 cup sour cream
    • 2 tablespoons vinegar
    • 2 tablespoons pickle juice
    • 3/4 teaspoon salt (according to taste)
    • 1/2 teaspoon pepper
    Method:
    1. Cook potatoes with a little salt until just done (approx 25 min). Easy to peel while still warm. (I like to keep some with the peel on for color) Boil eggs about 8 - 10 minutes. Allow potatoes and eggs to cool completely. Cube potatoes and eggs (use egg slicer for eggs), and slice pickles.
    2. Mix dressing ingredients and pour on potatoes mix, stirring gently to mix.
    Mix the dressing according to taste. Add less or more vinegar and pickle juice, depending on how sour you like it. You can also make the salad more dry with less dressing or juicy with more dressing. Refrigerate before serving. Decorate with sprinkled paprika and parsley.

    Lazy Napolean Torte


    I had this dessert at my aunt's house many years ago, and was thrilled to know that it was made with unsalted soda crackers, I have also tasted this with social tea biscuits. I couldn't say if I prefer the tea biscuits over the soda crackers, they are both good. It is a very quick and super easy dessert to make and the bonus is it taste like Napoleon Torte with out the effort of making all the thin wafers by hand if you don't have time. When you are making dessert for a crowd it can easily be doubled and tripled. A single recipe makes a 9x9 pan. If you do not have any Dr. Oetker's custard where you live, I suppose any custard could work. I should of paid careful attention to how many soda crackers were used, but if you have a box, just layer til your done.
    I think about 1 1/2 to 2 packages should do.
    • unsalted soda crackers
    • 2 eggs
    • 1 cup sugar
    • 3 cups milk
    • 1 tablespoon butter
    • 1 teaspoon vanilla
    • 1 package of Dr. Oetker's Vanilla Pudding
    1. Beat eggs with a wooden spoon, add the sugar mixed with the pudding mix and beat again.
    2. Stir in the milk and cook over medium heat til the pudding thickens. It can also be done in the microwave.
    3. Take off the heat and stir in the butter and vanilla.
    4. Put a bit of pudding on the bottom of a 9x9 pan.
    5. Now begin layering the crackers with the pudding using enough pudding to cover the crackers. It should give you about 6 or 7 layers.
    6. Top the last layer off with some whipped cream or whipped topping.
    7. Let sit in the refrigerator over night or several hours so the pudding soaks through the crackers and softens them.

    Apricot Jam

    This jar of sunshine contains no packaged pectin of any kind. Cooked with more fruit than sugar, gives this jam a fresh taste of apricots. It is simple to make, you just need a bit of time.


    • 12 cups of finely chopped apricots (save the pits)
    • 8 cups of sugar
    • 1/4 cup of lemon juice (the lemon juice prevents the fruit from browning and just enhances the flavor of the fruit).
    1. Combine the chopped apricots, sugar, lemon juice and let sit in the pot for 1 hour.
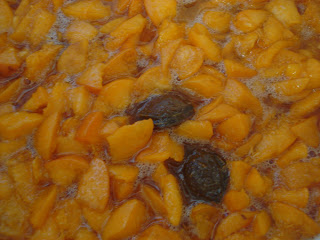
    2. Add a handful of pits to the pot. Don't ask why, it is just one of those things you don't question, it is just always done that way:) At least that is what I was told, Oma did it that way, mom does it that way, so I do it that way...is that a good enough reason, I sure hope so. Actually I think it adds to the natural flavor.  (I am told it is a natural pectin).

    3. When the fruit comes to a boil it fill develop a foam on top. Skim of the foam and put it into a bowl. Do not discard until cool, because it has a beautiful syrup under it and can be used on pancakes.

    4. Once the mixture is boiling and the foam has been skimmed off, boil on medium low for about 40 minutes or so, stirring often with a wooden flat bottom spoon to get into the corners of the pot.

    5. Pour into sterilized jars with a wide mouth funnel, leaving about an inch or more of head room. I always freeze my jam instead of sealing them so you need to leave more room at the top of the jar for that.
    Serve on fresh scones, toast or homemade buns. I love apricot jam, it just reminds me of home.

    Raspberry Cake


    I love Flashback Fridays...it's fun to see how things have changed over the years and we get to post yet another tried and true recipe.  This will be one of those that is seasonal and you will want to try it this month while we have the fresh raspberries. This cake is sure to give you the royal raves as you whip it up and share it with a large scoop of ice cream.


    "My walking partner phoned this morning and said she needed a day to catch up. Fair Enough!
    I totally agreed and while we were quickly talking about our activities, I told her I needed a quick fix for coffee. "Do I run to town or make something?" She responded, "Do you have raspberries?"
    "I sure do." Thanks, Laurie for this suggestion."  (July 2008)
    We enjoy this recipe every year during berry season.


    Raspberry Cake
    • 1/3 cup butter
    • 1 cup sugar
    • 2 eggs
    • 1 teaspoons vanilla
    • 2 cups flour
    • 3 teaspoons baking powder
    • 1/4 teaspoon salt
    • 1 cup milk
    • 4 cups fresh raspberries
    Method
    1. Heat oven to 375.
    2. Cream your margarine, sugar, eggs and vanilla.
    3. Sift flour, baking powder, salt and add to creamed mixture.
    4. Mix with hand mixer until texture is light and fluffy.
    5. Add milk and vanilla, beating well after each addition. (enough milk so it is spreadable)
    6. Spread cake batter into greased 9x13 greased pan.
    7. Add about 4 cups of fresh raspberries on top of the cake.
    8. Bake in the oven for 30 minutes.
    9. Remove from oven and cool for 5 minutes
    Glaze
    1.  1 1/2 cup icing sugar
    2. 1 tsp vanilla
    3. 3 tbsp cream or milk.
    4. Mix ingredients together until smooth and drizzle over cake.
    5. Add a scoop of ice cream and you are ready to go! 
     
     Little did I know 8 years later, that  I would have a little princess helping me pick these berries.  Thank you Ivy!

    No Shrink Fool Proof Pie Crust

    It's finally here.  I found the secret to creating a perfect crust.  Back a few weeks, we went to Lepp's Farms to demonstrate pie-making.  I think that I learned more than most of the quests that evening.  So many of the MGCC ladies shared practical hints that totally made sense.   Over the past years, I've been very frustrated at not attaining a perfect pie crust that would not shrink.  I had actually given up until I did a google search and found this wonderful method.  I was ecstatic, as I shared this news with my walking partners the next morning and yet,  they smiled.  Seemingly,  they seemed to know about this method. Then why didn't any of these ladies ever share their secret?
    So later that evening while we were sharing tips about pie making, Judy came to me and said,  "I used that method today to make sure my crust would not fail, only I used teaspoons as weights."  You need to run over and sample Judy's fresh Raspberry Pie.
    Meanwhile, I did some more research and noticed that Lovella also had her own 'No Shrink Fool Proof Pie Crust' method.  Lovella uses aluminum foil.  Check out her favorite Dorothy's Pie Crust recipe and you will see her method.  Anyways, as you all know, there are so many different ways to make or cook pies, but it's always fun when you can find something new that is foolproof.


    Marg's Method:
    • Place a piece of parchment paper the size of the pie plate inside the pie shell, 
    • Scatter pie weights, or spoons, or beans or split peas, over the parchment paper. (in other words, a weight  that will not burn in 5 minutes).  This helps the shell to retain its shape.  
    • The shell should be baked at 400 degrees for 8-10 minutes or until the fluted edge is a golden brown.
    • The weights and parchment should be removed after 5 minutes of baking, and then continue to bake the remainder of time or until golden brown. 
    • One word of caution, don't spill the beans/peas when you try to lift out the parchment paper.
     Lovella's Method:
    • Heat your oven to 400. Roll your dough out to fit a 9-inch pie plate.
    • Ease it in without stretching, and to bake it empty,  just line with aluminum foil pressing it against the edges,  and bake it for 10 minutes.
    • Remove the foil and bake until brown. Cool.

    Hopefully, this will be helpful for some of you and don't forget to share these tips with your friends.


    Rollkuchen Meatpockets


    I remember the years when I was a teenager, we lived close to the church and my parents would often invite company home for lunch. My mom usually had a pot of soup ready and quickly made Rollkuchen to go along with the soup. It was pretty much the same, Sunday after Sunday, but she never stressed and everyone loved the meal. This recipe yields about 24 meatpockets or regular Rollkuchen ... you may want to double it. 

    Ingredients:
    • 2 eggs
    • ¾ c milk
    • 2 tablespoons vinegar
    • 2 tablespoons oil
    • 2 cups flour - could be more
    • 1 teaspoon salt
    • 2 generous teaspoons baking powder
    • 3 - 4 cups oil for frying
    Filling:
    • 1 - 2 cups left over sloppy joe sauce or chili


    Method:
    1. In a small bowl, mix eggs with fork and then mix in the rest of the wet ingredients.
    2. In another larger bowl, mix flour, salt and baking powder, make a well and add the wet ingredients. Stir with wooden spoon, adding in the dry, until all ingredients are mixed well.
    3. Dust with flour and knead slightly jsut to gather and smooth. Add flour as needed so it is not sticky. (Can be wrapped and refrigerated at this time to roll and fry later.) Roll out quite thin on floured board or counter. 
    4. Place a rounded teaspoon of filling about one to one and half inches apart in a row, along one end.
    5. Fold dough over top of filling and press with a cup (dipped in flour) to form a perogie like crescent. No need to pinch. Lay on floured cookie sheet until all done before proceeding to fry. (If making regular Rollkuchen, simply cut into two inch strips and cut five inch lengths.  Cut a slit and flip one end through it to make a bow tie)
    6. Heat oil – test with a little dough to make sure it fries quickly, or throw in a few kernels of popcorn. Oil is ready when they pop. The trick to not have deep fried food soak up too much oil is to fry quickly in very hot fat. A cast iron works great. Use 2 forks or tongs and have a paper towel lined pan ready.


    Glazed Yeast Donuts


    Who doesn't like a yeast donut with a sticky yummy glaze?
    A family favorite, our children and grandchildren love them. They were also popular with a friend and her children many years ago. When I knew they were coming for an afternoon visit I would often make these donuts. I remember us all sitting around the table munching away on donuts with a couple of wet wash cloths on the table for face and hand wiping. I think I need to plan another donut day this summer and invite them all down again.
    • 1 cup milk
    • 1/4 cup plus 2 tablespoons butter
    • 1/2 cup sugar
    • 2 teaspoons salt
    • 1 1/4 cups water, lukewarm
    • 3 eggs, room temperature
    • 2 tablespoons instant yeast
    • 8 - 8 1/4 cups flour
    1. Scald milk, stir in butter, sugar, salt, and lukewarm water. Whisk till butter is melted and sugar dissolved.
    2. Whisk eggs till foamy and add to the warm milk mixture.
    3. Add 4 cups flour, yeast, and mix well.
    4. Add the rest of the flour one cup at a time and knead until dough is smooth, it will still be slightly sticky.
    5. Place in a covered bowl in a warm place and let rise until doubled in bulk. Punch down.
    6. Divide the dough into 3 balls. Roll out each ball to 1/4" to 3/8" thick on a floured surface, using just enough flour so dough doesn't stick to the surface. I don't re-roll the scraps, instead just let them rise along with the 'donut holes' and fry them like the donuts. (The fried donut 'scraps' are often grabbed first)
    7. Using a donut cutter, cut donuts and place on a cookie sheet sprayed with oil, leaving space between each donut for rising. Let rise until almost doubled in bulk, approximately 25 to 30 minutes.
    8. Deep fry in hot oil on medium high heat (375º) till donuts are golden on one side, flip over and fry till golden or done. Cut into the first one to give you the timing for when they are done or poking a toothpick into the donut and it comes out clean it's done.
    9. Glaze while warm.
    Sticky Syrupy Glaze:
    • 1/2 cup butter
    • 1 3/4 cups sugar
    • 1/2 cup water
    • 1 teaspoon vanilla
    1. Boil first 3 ingredients for 4 to 5 minutes, till glaze is syrupy.
    2. Stir in vanilla.
    3. Dip warm donuts in glaze and enjoy.
    I only glaze as much as I want to serve, as they are best eaten fresh.
    The leftover glaze and unglazed donuts freeze well.
    Reheat frozen donuts in oven and glaze with reheated glaze.

    Flash Back Friday ~ Summer Borscht


    Summer Borscht is a soup made with Sorrel as it's main flavour.   Fresh sorrel will instantly lose it's beautiful bright green as soon as it hits the hot broth but don't let that put you off from trying this soup.  It is truly delicious.  If Sorrel is not available where you live, you can also use Beet leaves.

    Sorrel is one of the first herbs ready to pick from the garden in spring along with chives.


    Summer Borscht 
    • 1 smoked ham bone or ham hock
    • 4 cups  slivered sorrel leaves or beet leaves 
    • 1/2 cup of chopped green onions
    • 1/2 cup of chopped dill
    • 4 - 6 potatoes, cubed
    • 8 cups of water
    • salt and pepper to taste
    • 1/2 cup of sour cream
    • hard boiled eggs
    1. Put the water and the ham in a large pot and bring to boil.
    2. Simmer for a few hours. Remove the bone.
    3. Add the vegetables and cook until tender.
    4. Add the meat back into the pot.
    5. Taste and season with salt and pepper.
    6. Before serving, take a bowl of soup out of the pot, and slowly add the sour cream, then add it all back to the pot or let everyone put their own sour cream into their bowls.
    7. Chop up hard boiled eggs into soup. 


    Hamburger Relish


    It's summertime!  If you haven't already been grilling burgers, you will be very soon. This burger relish is a bit savoury and a bit sweet.  It is perfect on burgers but try it on other grilled meats as well.   I wanted to get this burger relish out to you early because it needs a few weeks for the flavours to blend before you get it onto your burgers.  I make my own hot dog and hamburger relish and once you try it, you will want to always keep a few jars ready too.  

    • 4 small cucumbers, diced to make three cups ( I use mini cucumbers which I don't peel) 
    • 1 yellow onion
    • 1 large orange bell pepper, diced
    • 1 large red bell pepper, diced
    • 1 large stalk celery, diced
    • 3 tablespoons kosher salt
    • 1 teaspoon turmeric (divided)
    • 2 cups cold water
    • 1 cinnamon stick
    • 15 cloves
    • 2 cups cider vinegar
    • 2 cups diced grape tomatoes
    • 1 cup sugar
    • 2 teaspoons mustard seeds
    • 2 tablespoons tomato paste
    1. Combine the chopped cucumbers, onion, peppers, and celery in a large glass bowl. 
    2. Sprinkle with salt, 1/2 teaspoon turmeric and stir.
    3. Cover with 2 cups cold water. Press down vegetables and add a bit more water if necessary to cover.  
    4. Let sit overnight.
    5. In the morning, pour vegetables into a colander and allow to drain for 10 minutes.
    6. Prepare jars by washing them in hot soapy water, rinse and drain.  Sterilize them by boiling them in water for 10 minutes.  Keep in hot water until you are ready to fill them.  
    7. Bring the drained vegetables and cider vinegar to a simmer in a  large stainless steel or enamel pot.
    8. Tie cloves into a piece of cheesecloth and add to pot along with the cinnamon stick, mustard seeds and diced tomatoes.
    9. Simmer 30 minutes.
    10. Add sugar and tomato paste and continue to simmer and stir until the relish reduces, about another 20 minutes.
    11. Ladle the relish into 5 - 250 ml canning jars. Leave 1/2 inch space at the top.  Wipe the rims clean and cover with lids that have been boiled for 10 minutes. 
    12. Process jars in a hot water bath for 15 minutes. 
    13. Allow the relish to develop the flavours for 2 weeks before using.  Refrigerate after opening.