Mennonite Girls Can Cook is a collection of recipes which were posted daily for a period of ten years from 2008 to 2018. We have over 3,000 delicious recipes that we invite you to try. The recipes can be accessed in our recipe file by category or you can use the search engine.

Recipe Search

Quick Blueberry Streusel (Platz) - Flashback Friday


This Friday I want to take you back to one of the earliest posts, a Quick Blueberry Streusel that you can't go wrong with. If you need some reviews, check out the comments there. I'm assuming someone will ask about other fruit and I don't see why not, but I have to be honest and say this one always wins big time with blueberries.

Ingredients:

  • 2 cups flour
  • 1 cup sugar
  • 3/4 cup butter (room temp)
  • 2 tsp baking powder
  • 1/2 tsp baking soda
  • 1 egg beaten with fork in meas. cup, then filled to 1 cup with buttermilk
  • 2 cups blueberries

  1. Pre-heat oven to 375 F. 
  2. Mix butter into flour and sugar with pastry blender until well blended and crumbly. 
  3. Set 1 1/4 cups aside for topping. 
  4. To the first, bigger part of the mix, add baking powder and soda, then stir in combined egg and buttermilk 
  5. Spread into greased 9 x 13 pan. Sprinkle with 2 cups blueberries and reserved crumb mixture. Squeeze to make crumb clusters as you drop them by handfuls.
  6. Bake on rack in upper third part of oven (important) for 35 - 45 min. Cool or serve warm with ice cream.
Tips:
Light colored (aluminum) pans/sheets are prefereable for when you want to keep the pastry (or cookies) from getting too dark on the bottom. If you have to use a glass pyrex pan, lower the oven temperature by 25 degrees and/or if you see the bottom getting too dark. place aluminum foil on rack under the pan.
Dark pans/sheets are good for when you want to get a nice dark/crisp bottom. They are good for roasting.

Waffles with Vanilla Custard


As a young bride I searched the Mennonite Treasury Cookbook for any recipes that would impress my husband and his large extended family. I did not realize at that time how special this particular meal would become to our kids and now even our grandkids. It begins with a hot, light and fluffy Belgian waffle, gets smothered with a runny, warm vanilla sauce and drizzled with raspberry syrup. I have long felt at ease about the vanilla sauce (as opposed to the usual syrup) because it is not very sweet and is made with milk and eggs. Good for growing kids! I like to think that some Mennonite family brought the original recipe  from Holland or Belgium to Russia and to North America, where it has become quite Canadian/American. Since I end up tripling this recipe for our family now, I place the cooked waffles in the oven ( 175°F) right on the racks, to keep warm and crispy until they are all done.


Waffles (makes about 5 round deep Belgian Style)
  • 1 1/2 cups flour
  • 1/2 teaspoon salt
  • 1 tablespoon baking powder
  • 1 teaspoon baking soda
  • 1 egg and
  • 2 egg whites - save yolks for sauce
  • 1 3/4 cups buttermilk
  • 5 tablespoons oil
  1. Preheat waffle iron.
  2. Mix dry ingredients in a medium bowl.
  3. Add buttermilk, oil and eggs; mix until smooth (with hand held mixer). It will rise as it sits for a minute. Do not stir down as you scoop out and into the waffle iron.
  4. Spread onto hot waffle iron. (leave room around edge for batter to spread) You may want to spray or wipe the Teflon with an oily paper towel, just before cooking the first waffle. It should be fine then for the batch.
Vanilla Sauce
  • 2 1/2 cups milk, divided
  • 4 tablespoons flour
  • 2 tablespoons sugar
  • 1/8 teaspoon vanilla powder or 1 teaspoon vanilla extract
  • 2 egg yolks
  1. In a small pot, heat 2 cups milk until it begins to boil. (medium heat)
  2. While you are doing this: mix dry ingredients in a small bowl, add just a little of the reserved 1/2 cup of milk, blend the egg yolks in well, and then the rest of the 1/2 cup milk.
  3.  Stir mixture into the milk in the pot just as it begins to boil up (you will see skin forming) and stir with whisk until the sauce begins to bubble and thicken. 
Raspberry Sauce/Syrup
I buy half a flat of raspberries when they’re in season, put them in a blender and measure them out. For each cup of berries I mix in 1 cup of sugar. Stir that for about 5 minutes and let it sit for a few hours, stirring several times. Pour into small jars and freeze. Thaw just before serving. Keeps a week or two refrigerated. Sliced strawberries with a sprinkle of sugar are also a great topping.

Rhubarb Cheesecake


I have made this cheesecake a number of times and I made it yet again for my daughter's birthday by request. Brought it to her work place, I'm hearing it went over quite well. This is not what you would call low cal by any means but rather a delicious treat during fresh rhubarb season.

Crust:
  • 1 cup flour
  • 3 tablespoons sugar
  • 1/2 cup butter, softened
Rhubarb layer:
  • 3 cups rhubarb, chopped
  • 1/2 cup sugar
  • 2 tablespoons flour
Cream cheese layer:
  • 2 packages (250 grams/8 oz) cream cheese
  • 1/2 cup sugar
  • 2 eggs
Topping:
  • 1 cup sour cream
  • 2 tablespoons sugar
  • 1 teaspoon vanilla
Method:
  1. Mix together crust ingredients and pat into a 9" baking dish, should be at least 2" deep. You can use a 9" spring form pan.
  2. Bake in a 425º oven for 10 to 12 minutes or just until it starts to brown. Remove from oven.
  3. Reduce oven to 350º.
  4. Mix together rhubarb layer ingredients and spread over crust.
  5. Beat cream cheese and sugar until creamy. Add eggs one at a time and beat until well combined. Spread over rhubarb layer.
  6. Return to oven and bake for 35 minutes, until filling is set.
  7. Whisk together topping ingredients until well combined and spread on cheesecake while still hot. 
  8. Allow to cool completely in fridge before serving.
  9. Keep refrigerated.

Banana Oatmeal Muffins


Adding  oatmeal and walnuts into muffins  adds additional nutritional value and keeps us satisfied longer.  If I am serving muffins for a coffee break...
I sometimes pipe some soft butter on top and set out some knives. 
  • 2 large  ripe bananas
  • 3/4 cup low fat unflavored yogurt
  • 1 egg
  • 1/3 cup canola oil
  • 1/2 cup brown sugar
  • 3/4 cup quick oats
  • 2 cups flour
  • 2 teaspoons baking powder
  • 1/2 teaspoon baking soda
  • 1/4 teaspoon salt
  • 1 cup finely chopped walnuts
  1. Preheat oven to 375.
  2. Mash the banana in a large bowl and then add the remaining wet ingredients and whisk until well combined.
  3. Add the oatmeal and allow it to sit while you combine your dry ingredients in a medium bowl.
  4. Add in 3/4 cup of the walnuts (reserve some to sprinkle on top)
  5. Using a large spatula, fold the wet and dry ingredients together just until the dry ingredients no longer visible.
  6. Spray a 12 cup muffin tin with cooking spray and divide the batter evenly between them.
  7. Sprinkle with the remaining walnuts and bake about 30 minutes or until toothpick tests clean and they are nicely browned.
  8. Allow to cool a few minutes and then let them finish cooling on a cooking rack.


Sweet Chili Chicken with Wontons

Not long ago I ordered an appetizer at Earl's restaurant that I really enjoyed and knew I could come home and make it.
Here's my version of  the tender chicken pieces and crunchy wontons covered in a Sweet Thai chili sauce. Perfect as an appetizer or simple supper served with a side of rice and broccoli cole slaw.

Ingredients:
  • 2 chicken breasts, cut into bite sized pieces
  • 1 tablespoon olive oil
  • 8 wonton wrappers, cut into 1/2" strips
  • vegetable oil
  • 2 cups Sweet Thai chili dipping sauce ( I used a brand called VH from Safeway)
  • 2 tablespoons thin slices green onions
  • 1 tablespoon sesame seeds, toasted
Method:
  1. Cut chicken into bite sized pieces.
  2. Place oil in non stick skillet. Turn to medium hot heat and add chicken. 
  3. Stir fry chicken in oil until light golden brown and no pink remains and is fully cooked. This will not take long. Once done remove from heat as you complete the following steps.
  4. While chicken is cooking, pour vegetable oil into a pot to a 2" depth. Place over heat and once hot deep fry 8-10 wonton strips at a time. They will only take about 15-20 seconds to crisp up. With a strainer spoon remove to a plate lined with paper towel to absorb any excess oil. Deep fry remaining wonton strips until they are all done.
  5. Heat Sweet Thai chili sauce in a small sauce pan or microwave. 
  6. Once chicken and wontons are done, place together in a large bowl. Pour hot sauce over and gently stir to coat.
  7. Turn out onto a serving platter and garnish with green onions and toasted sesame seeds.

Bread For The Journey


We are encouraged in the Psalms to exalt the Lord together.

During the week, while I walk I listen to praise and worship music and I listen to podcasts where God's word is proclaimed but on the weekend, I go to church with other believers to worship the Lord.

I'm glad that I can view my church messages online when I occasionally am not able to physically be with our church but something is missing when I view it alone.  

The church is the people who come together to greet one another, encourage one another, serve one another, pray with one another, love one another,  study God's word with one another, sing with one another, have communion with one another, instruct one another and even hold one another accountable.  These are things I can't do alone.  I need .... "one another".

God gave us a precious gift when he gave us the church!

May you be blessed today as you worship with one another! 

Oatmeal Whole Wheat Malt Syrup Pan Rolls


I am always interested in trying new products.  When I was in a gourmet kitchen store recently I saw Malt Syrup which is made from Barley extract.  I used it in this recipe but you could easily substitute honey as well.  The buns can be put close together in a springform pan for a table presentation or can be baked on a cookie sheet.  The result is a nice soft good for you bun.
  • 2 tablespoons active dry yeast
  • 1/2 cup sour cream
  • 1/3 cup canola oil
  • 3 tablespoons malt syrup (or honey)
  • 1 egg
  • 1 teaspoon salt
  • 2 cups warm water
  • 3 cups whole wheat flour
  • 1 1/2 cups large flake oatmeal (do not use instant oatmeal.  the kind you pour water over and let sit.  I think that quick cooking oatmeal would be fine but not as distinct looking as the topping when it is baked)
  • 2 cups white flour (approximately)
  • (1 cup additional oatmeal for the bun topping)
  1. Combine the wet ingredients  and the salt in a large mixing bowl.
  2. Sprinkle the yeast over the wet ingredients and stir and then allow to rest 10 minutes.
  3. Add the whole wheat flour and the oatmeal and stir well.
  4. Add enough additional white flour to make a soft dough. 
  5. Knead a few minutes and then allow to rest 10 minutes.
  6. Knead another 5 minutes and then cover the bowl and let rise until doubled in bulk. .about an hour.
  7. Form into small egg sized buns and dip the smooth tops in water and then press into oatmeal.
  8. Allow rising until doubled in bulk.
  9. Preheat oven to 375 F.
  10. Put a loaf pan in the bottom rack of the oven and pour boiling water up to a half inch from the top.
  11. On the rack directly above the loaf pan with boiling water bake the buns for 15 minutes or until golden brown.
  12. Remove loaf pan from oven once your oven has cooled completely to avoid scalds.

Hazelnut Cake


This cake may just look like you have gone the extra mile for someone. In actuality, the only extra mile may just be finding ground hazelnuts. Almost gluten free, low fat and low sugar, a slice of this is too good to pass up.
 
Ingredients for cake:
  • 4 Tbsp flour
  • 4 tsp baking powder
  • 8 eggs
  • 1/2 cup sugar
  • 2 cups ground hazelnuts
  • 1 tsp almond extract
 
Method:
  1. Grease 2 - 8 inch round or square cake pans. Line with wax paper cut to size of bottom and grease again.
  2. Mix flour and baking powder. Set aside.
  3. Using hand mixer, blend eggs and sugar well until pale yellow in color.
  4. Add ground hazelnuts and almond extract. Beating well, then stir in flour and baking powder.
  5. Pour into prepared pans and bake until cake tests done, about 30 minutes at 350 F.
  6. Invert onto cooling rack, peel off wax paper and allow to cool.
  7. Fill with whipped cream frosting, cover sides and top and decorate with toasted nuts as desired.
 
Frosting:
  • 2 cups whipping cream
  • optional choices of flavoring in whipped cream - (1) hazelnut spread to taste (2) caramel flavored sweetened condensed milk, to taste  (3) 2 Tbsp of instant chocolate pudding mix OR instant vanilla pudding mix
  • 1 cup toasted, sliced almonds or chopped hazelnuts
Beat whipping cream until stiff, adding a Tbsp of sugar or any of the optional flavorings. A small amount of instant vanilla pudding mix helps stabilize the cream for piping it. I added an extra layer of hazelnut spread in the cake as seen on the photo. Photo below was taken when cake was partially frozen.


Posted by Picasa

Boston Brown Bread


This fruit filled loaf is not a traditional "Boston Brown Bread" but it's what my Aunt Emmy called it when she shared the recipe with me years ago.  
It's moist and keeps well in the fridge or freezer. 
 Spread lightly with butter or eaten plain, it's a favourite of mine.

  • 2 cups water
  • 1 lb. ( 3 cups) sultana raisins, rinsed well
  • 3 tablespoons butter

  • 1 cup sugar
  • 1 cup chopped maraschino cherries
  • 1/4 cup maraschino cherry juice
  • 1 egg, well beaten
  • 1 cup chopped walnuts or pecans

  • 2 3/4 cups flour
  • 2 teaspoons soda
  • 1/2 teaspoon salt
  1. Place 2 cups water and raisins in a saucepan and bring to a boil.
  2. Cook for 5 minutes, add butter and set aside to cool.
  3. Preheat oven  to 325º and line 2 loaf pans with parchment paper or foil.  Set aside.
  4. When raisin mixture is cool to touch, add sugar, cherries, juice, beaten egg and nuts.  stirring well with a wooden spoon.
  5. Add remaining ingredients and stir again until dry ingredients are incorporated.
  6. Spoon batter into pans and smooth tops.
  7. Bake at 325º oven for 45-55 minutes or until cake tester comes out dry.
  8. Remove loaves from pans but leave the foil or parchment paper on until they are completely cold.
  9. This loaf slices best the second day.  Store loaves in refrigerator or wrap and freeze.


Lemon Fluff Cheesecake


Light and fluffy and full of lemony goodness, this is the perfect spring dessert.  It is actually a new twist on a very old recipe.  I'll share the recipe with you as we have enjoyed it recently and then I'll tell you the story of its origin...my first-love with cheesecake.

  • 1 (3 ounce) package lemon Jell-O
  • 1 cup boiling water
  • 1 package (8 ounces) cream cheese
  • 1 cup sugar
  • 1/4 cup lemon juice
  • 1 can 12 oz / 354 ml evaporated milk, well chilled (Carnation)
  • 1 1/3 cups graham wafer crumbs
  • 1/4 cup butter, melted
  1. Combine cracker crumbs and cutter.  Press into bottom of a 9" x 13" pan. Refrigerate until needed.
  2. Dissolve Jell-O in boiling water. Cool until slightly thickened.
  3. Beat cream cheese, sugar and lemon juice with mixer until smooth and creamy. Add thickened Jello and beat well.
  4. In a separate bowl, beat the chilled evaporated milk until it is thick and forms soft peaks. Add cream cheese/Jell-O mixture and beat until combined.
  5. Spread filling over graham wafer crust.
  6. Chill overnight.
  7. Serve with fresh fruit of your choice.
 

Now let me tell you about my introduction to this delightful dessert. Cheesecake was not something that appealed to me when I was a teenager. But after going to our local Woolworth's store with friends and trying the famous lemon dessert in their restaurant, that all changed. It was not your typical cheesecake, but a light and fluffy ice-box dessert. Hubby remembers me dragging him there to sample this dessert as well, and he decided he could learn to like cheesecakes too. Woolworth's stores across North America closed several decades ago and their cheesecake is all but forgotten.  I have a friend who once worked at the Woolworth's restaurant, and gave me a copy of their cheesecake recipe many years ago.  I was recently reminded of that recipe, and thought I would try it...for old times' sake! Woolworth's served it without fruit and sprinkled with additional wafer crumbs. Their famous cheesecake got a 'thumbs up' review from all those around our table. Do any of you have memories of having this dessert at Woolworth's back in the day?  It's throw-back Thursday.  Feel free to share your memories.


Queen Victoria Sponge Cake

Sponge Cake was apparently Queen Victoria's favorite. In 1855 Queen Victoria enjoyed afternoon tea with formal dress and cake . . . .and so of course, I made it for our Victoria Day long weekend in Canada which is held in May. Another important note about cakes that are baked with butter. They really are best-served room temperature. Once the butter hardens in the cake. . it seems dry. .but served fresh the day it is made. .the crumb is tender and moist. Put the cake together with custard and cream. .no more than an hour before serving. Refrigerate until serving. Of course, you could impress your guest by completing it while they watch. . .


  • 2 cup all-purpose flour
  • 1 1/2 teaspoons baking powder
  • 1/4 teaspoon salt
  • 1 cup confectioners sugar or berry sugar. .or caster sugar (UK recipes all call for caster sugar which is a cross between North American white granulated sugar and icing/confectioners sugar. . .a quick blitz in the blender would probably reduce the granulated sugar to caster sugar perfectly)
  • 1 cup of soft butter. .(with my experimenting. . I found that the butter should be very soft. . .not melting. . but soft enough to be starting to slump)
  • 4  large farm fresh eggs 
  • 2 tablespoons milk
  • 1 teaspoon vanilla
  1. Preheat oven to 400 F. Trace around your cake pan. . .and cut out parchment paper to line the bottom. The recipe called for an 8-inch pan. I used a 6 so experiment with what you have.
  2. Sift the flour and baking powder onto a piece of waxed paper. (I use this so I can funnel it into the batter)
  3. In your mixer bowl, cream the butter and then add the sugar and whip till light.
  4. Add the eggs one at a time until each egg is completely beaten in.
  5. Add 1/3 of the flour and then 1/3 milk until both are added in and then the vanilla.
  6. Pour the batter into the prepared pan.
  7. Bake the cake for 20 minutes and then test. Mine took longer because it was a higher pan. I turned my oven down to 375 for another 10 minutes and tested it with a toothpick until it came out clean.
I then let the cake cool in the pan upside down for 10 minutes and removed it to cool completely on a wire rack. I split the cake in half, filled with a simple custard that I've used for years.
  • 1/3 cup sugar
  • 2 tablespoons cornstarch
  • 1 1/2 cups milk
  • 2 egg yolks
  • 1 teaspoon vanilla
  1. Blend dry ingredients in a medium saucepan or microwave-safe mixing bowl. Add the egg yolks and the milk, whisk and heat until it comes to a boil and thickens.
Whip 1 cup of cream and 2 tablespoons sugar and pop it into a piping bag with a large star tip and then pretend you are an artist and have fun swirling on top of the cake. Garnish with some fresh berries.

Rhubarb Coffee Cake


In April I visited the Skagit Valley Tulip festival and after I walked through the beautiful tulip fields I stopped at a fresh road stand market in the valley on my way back home. They had fresh rhubarb from their fields available so I decided to buy some to take home. I ended up making a Rhubarb Coffee Cake.

I'll admit that I had never used rhubarb in my kitchen before but was pleased with the lovely color and result.

Rhubarb Coffee Cake

Filling:
  • 3/4 cup sugar
  • 1/3 cup cornstarch
  • 4 cups fresh washed and chopped rhubarb
  • 2 tablespoons fresh squeezed lemon juice

Optional: 
You can add 1 cup fresh blueberries and 1 cup fresh strawberries or 2 cups fresh strawberries and then cut down on the rhubarb to 2 cups.

Cake:
  • 3 cups flour
  • 1 cup sugar
  • 1 teaspoon baking powder
  • 1 teaspoon baking soda
  • 1 cup cold butter
  • 2 eggs
  • 1 cup buttermilk (I used powdered buttermilk mix)
  • 1 teaspoon vanilla

Topping:
  • 3/4 cup sugar
  • 1/4 cup flour
  • 1/4 cup quick cooking oatmeal
  • 1/4 cup cold butter

For the filling:
  1. Combine the sugar and cornstarch in a sauce pot and add in the rhubarb. 
  2. Cook over medium heat until the sugar and cornstarch dissolves with the liquid that is extracted from cooking the rhubarb. 
  3. Cook for at least 2 minutes. This helps the cornstarch break down. 
  4. Remove from heat and add the lemon juice. Allow to cool.

Preheat oven to 350 degrees and prepare a 9 x 13 baking pan by lightly greasing it.

Method for Cake and Topping:
  1. Combine flour, sugar, baking powder and baking soda together in bowl.
  2. Cut in the butter.
  3. Beat eggs, buttermilk and vanilla in small bowl and add to the the other ingredients until moistened.
  4. Put 2/3 of this batter into prepared pan.
  5. Spread the filling on top of this layer.
  6. Add the remaining batter on top spreading it as evenly as you can. Don't worry if you can't cover it all. Also the batter will be sticky to deal. You can grease your fingers with a little butter to help spread the batter.
  7. In a small bowl combine the dry topping ingredients.
  8. Cut in the butter until crumbly.
  9. Spread the topping over the top of the last layer of batter as evenly as possible. 
  10. Bake in preheated oven for 50 minutes or until tester comes out clean and top begins to become golden brown. Ovens vary, so check after 45 minutes and don't worry if it takes longer than 50 minutes.


Cottage Cheese Blintze

I'm bringing back these blintzes for Flashback Friday. They are an old favorite of ours. I know there are other ways of making them but this is how I make them. Sometimes I roll them up instead of these bundles..the taste is the same. I use the recipe for German pancakes to make the blintzes. I changed it up a wee bit.

German Pancakes:
  • 1 3/4 cups flour
  • 3/4 tsp salt
  • 3 eggs
  • 2 cups milk
  1. Mix flour and salt, add eggs and milk. Beat until free of lumps, this makes a thin batter.
  2. Heat up a cast iron frying pan, works in other pans but I like my well seasoned cast iron pan the best and when 'almost smoking hot' brush with butter and pour approx 1/4 cup batter in the pan tilting the pan till a thin layer covers the bottom of the pan.
  3. Cook on med high until dough is set. Turn and cook until golden brown underneath. Watch carefully as these brown up fast.
  4. Pile up on a plate and keep warm in oven.
Cottage cheese mixture for the blintzes:
  • 1 375g tub dry cottage cheese
  • 1 egg
  • salt and pepper to taste
  1. Mix well and start making the blintzes.
  2. Place a spoonful of cottage cheese mixture in center of pancake, fold in the edges and place folded side down in well buttered cast iron frying pan.
  3. You may now just pile them all up in the pan as I did and bake them covered at 350 for 15 to 20 min OR brown the blintzes in the frying pan and serve immediately. They are delicious served with cream gravy.
Cream gravy:
  • Melt 3 tbsp butter in frying pan, add 1 cup whipping cream and salt and pepper to taste and bring to a boil over high heat. I also add a pinch of sugar.
  • Turn oven down to medium heat and cook until gravy thickens, stirring frequently. 
  • Pour over blintzes and enjoy. These are good served with farmer sausage and coleslaw.


Chilliwack Schmoo Cake gluten free


I guess I was craving a decadent dessert the day Charlotte posted her recipe for Schmoo Torte.  K
Needing it be gluten-free I did some googling research 
and learned that this dessert is truly credited to Winnipeg,Manitoba. 
I can understand that a place that still has snow in May 
might need to be comforted with dessert !  

Since I 'designed' this recipe to be gluten-free I took the liberty to rename my version of Schoo Cake  after my own city ....Chilliwack....   This cake is on my favorite dessert list and judging from the complements from friends and family to whom it was served I will definitely be making it again !

Cake 

  • 10 lg. egg whites 
  • 10 lg egg yolks 
  • 1 1/2 cups white sugar (divided)
  • 2 tsp vanilla 
  • 1/2 tsp cream of tartar 
  • 1/2 cup Julie's Flour Mix 
  • 1/3 cup white rice flour 
  • 1/2 tsp xanthan gum 
  • 1 1/2 tsp baking powder
  • toasted pecans, filling and Caramel Sauce
  1. Beat egg whiltes with the cream of tartar until foamy, then add 1/2 of the sugar beating until stiff peaks form.  Set aside. 
  2. Beat egg yolks with remaining sugar and vanilla until thick and creamy (will take 3-5 minutes) 
  3. Mix dry incredients well and add to egg yoks 
  4. Using a spatula fold egg whites into the batter. (folding some of the mixture into the egg whites first and then adding the mixture into the remaining egg whites helps to mix evenly) 
  5. Spoon batter into a tube pan that has the bottom lined with parchment paper.
  6. Bake for about an hour at 350 degrees. 
  7. Invert to cool 
  8. When completely cooled cut into three layers. Spread filling on layers and reassemble.   Frost cake with remaining filling and decorate with toasted pecans and drizzle with warm Caramel Sauce --
  9. Serve each slice with extra Caramel Sauce !!!!  
Filling 
  1. 3 cups whipping cream 
  2. 3 tsp instant vanilla pudding 
  3. 1/4 cup icing sugar 
Beat whipping cream with pudding powder and icing sugar until stiff 

Caramel Sauce 
  • 3/4 cup butter 
  • 1 1/2 cups brown sugar 
  • 1 cup whipping cream 
  • 1 tsp vanilla 
  1. In saucepan on medium heat melt butter 
  2. Add the sugar and bring to a boiling point
  3. Stir in the whipping cream and vanilla 
  4. Turn heat to low and simmer for about 20 minutes 
  5. Cool sauce (it will thicken more as it cools) and  store in fridge until needed. 
  6. It can be reheated in microwave for serving if desired. 

Rhubarb Chantilly Cream Pie


This is a nice light, slightly tart Rhubarb dessert.  Pour the filling in a ready made Graham Crust it becomes a Pie, or pour the filling in a Parfait Glass and it becomes a Mousse.  Either way it is a nice summer treat. This is enough filling for two pies or one night serve the dessert as a Parfait (served this way it is gluten free as well), next night bring the the pie to a potluck.
  • 8 cups if Rhubarb, chopped
  • 1 1/2 cups sugar (more if you like it sweeter)
  • 1 large 8 serving package of Strawberry flavored Jello
  • 4 cups of chopped Strawberries
  • 2 cups of whipping cream, whipped
  1. Combine the Rhubarb and sugar in a pot.
  2. On medium heat cook until the Rhubarb is soft about 15 minutes.
  3. Remove from the heat, add the Jello, stirring well until all the crystals are dissolved.
  4. Put in the refridgerator until it begins to set and is the consitancy of raw egg whites.
  5. Add the chopped Strawberries.
  6. Fold in the whipped cream.
  7. Pour into graham wafer crust.
  8. This is enough filling for two pie crusts.
  9. Top with additional whipped cream and decorate with Strawberries.

Fruit Crisp

Crisps are such a quick dessert to throw together when company walks in the door. If you have some fruit on hand and basic pantry ingredients, you will never be in a pinch for something to serve. Rhubarb is one of our favorite crisps. I love to serve individual crisps. It makes serving a cinch and everyone gets the perfect amount of fruit and crispy topping.
To make it easier yet. . .I am providing the ingredients. . .per person. . . do a little math. . and you can make it for four. . .or two. . .or eight.
Fruit Crisp
Ingredients per person
  • 3/4 cup of chopped fruit. . .I've used rhubarb in these pictures
  • 1 tablespoons butter
  • 3 tablespoons brown sugar. . .( I like it not too sweet. . so increase sugar to four tbsp. if you do)
  • 1 tablespoon flour
  • 2 tablespoons rolled oats ( I use a hearty hot breakfast cereal that has rolled oats, rye flakes, sunflower seeds, barley flakes, and flax seed. . .why not add a bit of nutrition to the mix?)

Method

  1. Spray your individual small gratin dishes or 8 ounce ramekins with cooking spray. . or use a square pan for four people.
  2. Divide the rhubarb into each dish.
  3. In a food processor. . . (not at all necessary). . combine your butter, brown sugar and flour.
  4. Dump the butter mixture in a bowl. .. and crumble in your oats with your fingers. . .until well mixed and crumbly.
  5. Evenly divide the crumb mixture over each gratin dish.
  6. Preheat oven to 375. . .and bake until the top is crunchy and well browned. . and the bottom has formed a thick bubbly sauce.. . .about 35 minutes. I pop these in the oven while we are eating dinner. They can be put together in the afternoon and left to sit covered with plastic wrap on the counter.

Whipped Strawberry Dessert

This whipped, frozen strawberry dessert is a cool treat for a warm summer day. I've been making it for decades, ever since I tasted it at a summer barbecue. It is from a local church cookbook, submitted by a Bev K. That happens to be the same Bev that is also a contributor to this very blog. With local strawberries now available, it's the perfect time for trying this flavourful frozen delight.


Crust:
  • 1/2 cup melted butter
  • 1 cup flour
  • 1/4 cup light brown sugar
  • 1 cup chopped pecans (or walnuts)
Preparation:
  1. Place flour, brown sugar, chopped pecans and melted butter into a 9" x 13" pan.
  2. Mix well.
  3. Bake in a preheated oven at 350º for 20 minutes...stirring occasionally.
  4. Pack crumbs firmly into the bottom of the pan with a fork.
  5. Cool.

Strawberry Filling:
  • 2 egg whites*
  • 1 cup sugar
  • 2 cups sliced fresh strawberries or 1 box (10 oz.) frozen strawberries, partially thawed
  • 2 tablespoon lemon juice
  • 1 cup whipping cream
  • fresh strawberries (optional)
Preparation:
  1. Combine egg whites, sugar, berries and lemon juice in large, deep mixing bowl.
  2. Beat on high speed until stiff...about 10 minutes.
  3. Whip the whipping cream in a separate mixing bowl....and fold into the strawberry mixture.
  4. Spoon over the cooled crumb crust in the pan.
  5. Place in the freezer and freeze for at least 6 hours or overnight before serving.
  6. Remove from the freezer about 10 to 15 minutes before serving.
  7. Cut into squares and serve partially frozen.
  8. Top individual servings with a dollop of whipped cream and sliced fresh strawberries (if desired).
* Editorial note:  Pregnant women, children and people with compromised immune systems should not consume raw eggs because of the possibility of salmonella.  Pasteurized egg whites are readily available in the egg section of the grocery store. 


    Enjoy!

    Cream Filled Puff Pastry Cones


    Here's a sweet and pretty idea to serve on Mother's Day.
    The china I've used today were my mom's. Royal Albert, Lavender Rose.

    For the pastry cones:
    Molds can be purchased at cake decorating stores or kitchen shops. They are very inexpensive. You can also make your own which will end up being quite a bit larger. Take boxed waffle ice cream cones and wrap them in foil. Then wrap in parchment and use as directed below. Discard cones after use.

    • 1 397 gram box puff pastry -this is found in the frozen food section of the grocery store (I use Tender flake brand)
    • 1 egg
    • 1 tsp water
    • raw sugar, optional
    1. Thaw pastry as directed on package. There are 2 blocks of pastry in a box. Take one out at a time.
    2. Lightly flour a pastry mat. Place block of pastry onto map and gently roll block out into a 10x12 sheet. 
    3. Whisk together egg and water. 
    4. Lightly brush pastry with egg wash. (you will not nearly use it all)
    5. Cut pastry into long strips 1/2" wide. 
    6. Wrap parchment paper around cone molds and then take one strip of pastry at a time and wrap around molds overlapping as you work from bottom point to the top. The pastry will stick together well.
    7. Lightly brush a little more egg wash over the pastry wrapped around the cone and then sprinkle with sugar.
    8. Place pastry wrapped molds on parchment lined baking sheet. 
    9. Bake pastry cones in 375º oven for 12-15 minutes, until golden brown.
    10. Pastry will be very flaky and fragile. Carefully pull baked pastry off cones and remove parchment. Cool on a rack. 
    11. Once cooled store in airtight container until ready to fill. Best used the same day.
    For the filling:
    • 1 cup whipping cream
    • 1 tbsp powdered sugar
    • 1 tsp vanilla OR almond extract
    • 1 package Whip It, (this is a whipping cream stabilizer, or you can use 1 tbsp instant vanilla pudding powder)
    • fresh raspberries
    • fresh mint leaves
    1. Whip cream until it just begins to thicken.
    2. Add sugar, flavouring and Whip It. Continue to whip cream until cream is thick.
    3. Fill a piping bag fitted with a tip with whipped cream.
    4. Just before serving fill cones with cream, adding a few fresh raspberries as you fill the cones. 
    5. Make a nice swirl at the top of the cone with the cream and garnish with a fresh raspberry and mint sprig.
    NOTE: The cones can be made earlier in the day and once cooled keep in an airtight container until ready to fill. The pastry is so delicate, so it's best if you can have your cream ready to go in the pastry bag in the fridge and fill as near to the time they will be served as possible insuring that your cone is crisp and flaky and do not become soft.

    For a savoury version of Puff Pastry Cones see this recipe.


    Rhubarb Meringue Pie


    I remember as a young girl pulling out long stocks of pink rhubarb from the garden, washing it and then asking for a little dish of sugar to dip it in.  A wonderful treat.

    Rhubarb is the first fruit you can find coming up in the spring. If you have always wanted a rhubarb plant, but don't have the room in your yard, plant it in a big barrel or planter. I have had great success that way. Add lots of compost and you will have rhubarb to share.

    When I only have enough dough for a single crust pie, I add a crumble or meringue topping.
    There are many good pie crust recipes to choose from here on the blog. I use the one on the Tenderflake box. The nice thing with that recipe is it makes enough for a number of pies. I make the whole recipe, use what I want, divide the rest, flatten pieces into discs, wrap and freeze. When you need a pie crust all you do is thaw a disc roll it out and you are ready for another pie.

    Ingredients:
    • 1 unbaked pie crust
    • 6 cups fresh or frozen rhubarb (if using frozen allow to sit until almost thawed)
    • 1/3 cup flour
    • 3/4 cup sugar
    • 1/2 tsp nutmeg
    • 2 eggs -separated
    • 2 tbsp sugar (for meringue)
    • 1/4 tsp cream of tartar
    • 1/2 tsp vanilla

    Method:
    1. Prepare and roll out pastry for a single crust pie.
    2. In a large bowl mix sugar, flour, and nutmeg together. Separate the eggs and add the yolks to sugar mixture. Using a fork blend together and then stir in rhubarb.
    3. Transfer rhubarb into the pastry shell and bake at 375º for 35-45 minutes.

    Meringue:
    1. Beat room temperature egg whites until they begin to get frothy. Gradually add sugar, cream of tartar and vanilla and beat until mixture is thick and glossy. Once fruit pie is cooked, pile the meringue on top of hot fruit creating peeks with the back of a spoon.
    2. Return pie to oven and bake meringue until golden. About 8-10 minutes. Stay with it so it doesn't get too brown.

    Tips for perfect Meringue:
    1. Let egg whites stand at room temperature for 30 minutes before beating. This will allow for better volume.
    2. Make sure your bowl and beaters are clean and dry.
    3. Add the sugar gradually as soon as mixture begins to froth.
    4. To prevent the meringue from weeping, top the pie while it is still very hot. This helps the underside of the meringue to cook at the same rate as the top of it.


    Mason Jar Lid Pies


     Everyone loves mini-pies, it seems...
    but not everyone has mini-pie pans at their disposal.
    Or do they?
    Who doesn't have Mason jar lids in their cupboard?
    They work fabulously as a wee pie pan.
    The mason jar lids are like a little spring-form pan...
    and the wee pies pop right out.
    They are the perfect little hand-pie!

    The rhubarb in the garden is ready for the picking...
    so I decided do see for myself if the Mason jar lids really doubled as pie pans.
    And yes, they do!

    Ingredients:
    • 6 Mason jar lids and rings, wide-mouth size
    • 1 box refrigerated pie crust or pastry for a double-crusted pie.
    • 2 cups rhubarb, chopped
    • 1/2 cup sugar
    • 1/4 cup flour
    • 1/8 teaspoon nutmeg
    Instructions
    1. Wash and chop rhubarb quite fine
    2. Combine rhubarb, sugar, flour and nutmeg. Set aside.
    3. Preheat oven to 350 degrees. Line a large baking sheet with parchment paper.
    4. Place 6 wide-mouth mason jar rings on the baking sheet. Place 6 lids inside the rings with the rubber seal facing down and the top of the lid facing up. Spray the lids and rings with non-stick cooking spray.
    5. Roll out pastry for one pie crust (or use refrigerated pastry). Using a mason jar ring as a guide, create a bottom crust by cutting a circle about 1/2 inch around the lid.
    6. Carefully fit the crust inside a jar lid on the prepared pan. The crust should hang over edge of ring a bit.
    7. Repeat until you have 6 bottom crusts. (You will need to re-roll the scraps.)
    8. Place filling into each crust.
    9. To make the top crusts, roll out the second sheet of pastry and use a jar ring to cut 6 more circles.
    10. Place the top crusts over the filling. Try to pinch the top and bottom pastry together to seal. (As you can see, my seal never quite held!)
    11. Prick upper crust with fork in several places.
    12. Bake the pies in the preheated oven for 30-35 minutes or until the filling is bubbly and the crust is golden.
    13. Cool on a wire rack. 
    14. Run a knife along the edge of the mason jar ring to release the pie.
    Serves 6

    * The mason jar lids wash up beautifully in the dishwasher!


    Homemade Yogurt


    Homemade yogurt is easy to make, and so much cheaper than the commercial varieties.
    Here is how I make it.

    • 4 cups whole milk 
    • 2 tbsp commercial yogurt (Greek is good) 
    • candy thermometer 
    • double boiler 
    1. Pour 4 cups of milk into the top of a double boiler and place over the bottom pot that has a couple of inches of boiling water in it --  the top of the double should not touch the water, but keep the water boiling.  
    2. Cook, stirring every few minutes and check the temp. of the milk.  You want to bring it to just below the boiling point , do NOT let it boil.   Take it to about 200F or 90C.  It takes about 20-30 minutes to get it there. A layer of foamy bubbles will form over the top as it cooks.  
    3. Remove from heat, skimming off any top 'skin'  and let cool to lukewarm  100F or 37C  Hint - if you don't want a skin to form over the milk as it cools,  place plastic wrap over the top of the milk - yes, touching it. 
    4. Stir in the 2 tbsp commercial yogurt -- make sure you are using one with a  live active bacteria.(after you make your first batch, you can save a couple of tbsp for your next batch.  It is easiest to mix some of the lukewarm milk into the 2 tbsp prepared yogurt and then stir if back into the rest of the milk.  
    5. Now cover the bowl with a clean cloth and set it in a warm place.  I find putting it into my oven with the oven light left on is perfect.    
    6. Leave it there for about 10-12 hours -  overnight is nice when you don't use your oven!  You can leave it up to 24 hours if you wish.  The longer you leave it the stronger the flavour will be.  
    7. It will set up very nicely with a smooth, creamy  texture. 
    8. After it is thick you can stir in flavouring if you wish  --  Stirred Yogurt is a little thinner -- so the choice is yours.   Leave it thicker and add fruit or granola when you serve it or add flavoring before you refrigerate.   
    9. If you want to make Stirred Yogurt remember to first take out the 2 tbsp. for your next batch.
    My husband and I like our yogurt flavored --  our favourite is the following . 
    • juice and grated rind of 1 lemon 
    • 2 or 3 tablespoons honey (or to taste)   
    1. Mix together and stir into set yogurt before refrigerating. 
    2. The gentle lemon flavour adds a tang that is lovely with fresh strawberries ! 


    Bodentorte (Fruit Flan)

    In the 1930’s there were two little boys, living in Russia, who loved to play together. Through difficult circumstances, they were separated when one of them, my dad, moved across the country and later across the ocean. My dad was a young adult when he found out that his friend, Abram - back in Russia, was really his half brother, having been given to an aunt when his mother died. (Even though the father remarried, his firstborn had stayed with the aunt while my father was born to the second wife, my Omi) Years later now, connecting with his half brother in any way was impossible, but in time they found each other and my dad began his mission to get him out of Russia.

    By a miracle this "uncle of mine," along with his family, arrived at Vancouver airport in 1978. I cannot explain in words, the emotions of such a re-union, one that requires getting to know each other, even though you are family. At first we had trouble communicating because of language barriers, but eventually they all learned English. I am so proud of my Tante Lena, who now so easily translated her recipe from Russian to English for me, as she read it to me. She is one of the bravest and most gracious women I know.


    Ingredients:
    • 3 egg yolks
    • ¾ cup sugar
    • ¼ cup water
    • 1 teaspoon vanilla
    • ¼ cup oil
    • 1 cup flour
    • 1 1/2 teaspoons baking powder
    • ½ teaspoon salt
    • 3 eggs whites
    • ½ teaspoon cream of tartar (optional)
    Filling:


    Berries or a combination of fruit with a package of fruit glaze OR
    1 quart canned peaches along with syrup and 1 1/2 Tablespoons cornstarch.

    Method:
    1. Prepare 11" flan pan by greasing, being careful to get into all the creases. Sprinkle with flour and tap to get it evenly all over.
    2. Using a wooden spoon, beat egg yolks and sugar until pale yellow.
    3. Stir in liquids and then combined dry ingredients.
    4. Beat egg whites with cream of tarter and gently fold into batter until just blended. Do not beat.
    5. Pour into prepared pan. Bake at 350° F for 25 minutes, or until a nice golden color.
    6. Allow to cool for 15 minutes. Pull away the edges gently by hand or slide a butter knife along the edges to make sure they come loose. Invert onto cooling rack. You may have to peek under the pan and gently slide the knife across part of it. If part of the cake remains in the pan, just gently loosen it and the sponge-like cake will easily patch up the spot.
    7. Allow to cool and fill with favorite fruit and top with glaze, following pkg directions. If using drained canned peaches, mix up 1 1/4 cups of the juice/syrup with cornstarch and heat, stirring until it comes to a boil. Cook, stirring a few minutes. Cool slightly and pour over fruit.
    8. Beat 1 cup whipping cream, adding 1 - 2 tsp sugar, until it begins to thicken and soft peaks form if beaters are raised. Do not over-beat. Spread on cake, forming soft peaks with back of spoon.

    Rhubarb Cream Pie


    This Rhubarb pie is cool, creamy and satisfying 
    and serving it in mason jars shows off the pretty colours.

    • 5-6 cups chopped fresh rhubarb
    • 2 tablespoons water
    • 1/2 - 2/3 cup sugar or to taste (remember that the gelatin powder will add some sweetness)
    • 2 tablespoons strawberry gelatin powder
    • 3 cups graham wafer crumbs
    • 1/2 cup melted butter
    • 2 tablespoons sugar
    • 1 package (4 serving size) white chocolate or vanilla instant pudding
    • 1/2 cup milk
    • 2 cups whipping cream
    • Slightly sweetened Whipped Cream and fresh strawberries for garnish
    1. Combine rhubarb and water in a medium saucepan and bring to a boil, stirring well.
    2. Turn heat down to simmer and cook until rhubarb is soft, stirring once or twice.
    3. Add sugar and gelatin powder and continue to simmer, stirring, until gelatin granules are completely dissolved.
    4. Remove from heat and let cool until cold.
    5. Combine graham wafer crumbs, sugar and melted butter to make crumbs.
    6. Divide crumbs evenly between 6  half pint mason jars, spooning them lightly into the bottom of each jar. Set aside while you make the filling
    7. Combine pudding powder, milk and cream in a large mixing bowl
    8. Beat until thick.
    9. Spoon 1 cup of the cold rhubarb sauce into a small dish and set aside.
    10. Fold 1 cup sauce into pudding/cream mixture, until sauce is completely incorporated. (Save any remaining sauce as an ice cream topping.)
    11. Place 1/2 cup rhubarb/cream filling over crumbs in each mason jar.
    12. Divide the reserved 1 cup rhubarb sauce among the 6 mason jars, spreading the sauce evenly to the edges of each jar.
    13. Divide remaining cream filling among jars spreading carefully over rhubarb sauce.
    14. Screw tops on jars and refrigerate until serving time.
    15. To serve, open jars and top each with a dollop of whipped cream and a fresh strawberry.

    Coconut Prawns


    We first tasted Coconut Prawns years ago on the Island of Roatan, Honduras
    when our oldest son was working there as a missionary.
     They were truly memorable and I asked Tim to get the recipe for me.
     The first time I made them was in our camper on a trip to the Maritimes.
     Each town on the Gaspe' Peninsula had it's own fresh fish shop and we treated ourselves to fresh shrimp and lobster at every opportunity.
     If you make these once, I guarantee you'll make them again.
    • 2 lb. large, raw prawns, deveined*
    • 1 cup flour
    • 3/4 teaspoon seasoned salt
    • 1/4  teaspoon ground pepper
    • 1/2  teaspoon ginger (optional)
    • 3 egg whites
    • 2 cups coconut - I used fancy flaked coconut
    *I use the largest prawns or shrimp I can find. Using the raw ones ensures that they will not be overcooked and rubbery.
    1. Remove shells from prawns, leaving tail shells intact
    2. Mix seasonings with flour in shallow bowl
    3. Beat egg whites just until they are foamy and soft peaks form. Do not overbeat as the egg white will not stick to the prawns if they are too dry.
    4. Place coconut in another shallow bowl.
    5. Coat each prawn with seasoned flour, then dip in egg white until well coated, then transfer to coconut and coat gently on all sides.
    6. Fry in 1 inch of oil over medium heat, turning once. They are done when the coconut is golden brown and the prawns have turned pink. (I usually check one by cutting in half.)
    7. Drain on paper towel and serve.

    Make Ahead Roast Beef

    This is a great way to serve a Roast Beef Dinner with lots of gravy, for Sunday (or any time) without having a lot of work when company walks in. Roast Beef served this way goes far, because the trick lies in slicing it thinly, which is easier once it’s cooled.
    When shopping for a roast, look for one that is not too big, sort of shaped like a loaf. It should be lean and look like it would slice nicely. (Imagine slicing it like a loaf of bread) It’s okay if it has fat along one side, but it doesn’t have to. Boneless top sirloin, inside round roast and cross rib roasts are good. A 3 pound roast will serve 6 – 8 people. It’s also great as a left over.


    Ingredients:
    • 3 pounds roast beef
    • Lawrys seasoning salt
    • 2 – 3 garlic cloves
    • 1 can cream of mushroom soup
    • 1 can sliced mushrooms


    Make ahead Method: (On the morning of or day before serving)
    1. Season roast with Lawrys seasoning salt.
    2. Place roast in a roasting pan that has been sprayed with Pam.
    3. Bake uncovered at 350° F for ½ an hour.
    4. Take roaster out of oven and place a couple of cloves of garlic under the twine or on top.
    5. Cover with lid, turn oven down to 300° F and continue baking for another 1 ½ hours or until meat thermometer registers at 155° F.
    6. Cool completely. (You can leave it in the roaster and put it in the fridge after 1 hour.)
    7. Once, roast is cooled, slice it as thinly as possible, using a sharp knife.
    8. Put your roaster with the drippings from the roast on medium heat on the stove. Stir in 1 can cream of mushroom soup and 1 can sliced mushrooms. Stir until it cooks. Taste for flavor - if it's too salty, shake up 1-2 Tbsp flour and 1 + cup water in a closed container and add, according to taste.
    9. Using a large lifter, add the sliced meat to the gravy, leaving it sort of intact. Scoop some of the gravy on top of the meat.
    10. You can now re-heat it in the oven right away for 15 min or refrigerate it and re-heat it the next day for about ½ hour, during which time you cook and mash the potatoes.
      When it’s time to serve, lift it out with a large lifter to put on a serving platter. Pour a bit of gravy on the meat and the rest into a gravy bowl.

    Rhubarb Cake


    In rhubarb season this year, I bought ten pounds of rhubarb from a lady who grows and sells it from her farm. It was fresh picked just for me and it wasn't long after it was pulled from the plants that it was washed, in my oven or in the freezer.
    One of my aunts shared a tip with me about freezing rhubarb. She said instead of freezing it pre-chopped, it preserved much better left in full stock with part-ends on. So I tried it that way this year - one immediate advantage is that it saved me a lot of chopping time!!

    My husband's mother was known as a good baker and she made a rhubarb cake that my husband loves ... He doesn't like rhubarb pie 😞, which is my favorite pie ... but he does like this rhubarb cake. Especially since his Mom has been gone many years.

    Above is a photo of my mother-in-law's handwritten recipe ...  and the translation below.
    • 2 eggs 
    • 1 cup sour cream 
    • 1 1/4 cup sugar 
    • 1 teaspoon baking soda 
    • 1/2 teaspoon salt
    • 2 cups flour 
    • 2 cups rhubarb (or amount as desired) 
    1. Beat eggs well, add sugar and beat until well mixed.
    2. By hand stir in sour cream.
    3. Blend dry ingredients and stir into egg/sour cream mixture until smooth. 
    4. Pour into 9"x14" baking pan and smooth top with spoon. 
    5. Sprinkle chopped rhubarb over top of batter. 
    6. Follow instructions for crumb topping. 
    7. Bake for 35- 40 minutes in 350 degree F oven. 

    crumb topping 
    • 1 cup sugar 
    • 1/4 cup flour 
    • 1/4 cup butter 
    • 1 package vanilla sugar
    1. Mix sugar and flour.
    2. Rub butter into sugar/flour until evenly crumbed.
    3. Sprinkle crumbs over batter.
    4. Sprinkle contents of vanilla sugar package over the top of crumbs. (This really MAKES the crumb topping!) 

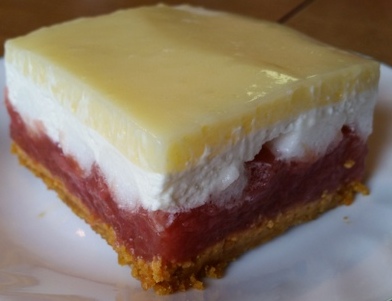
    Tina's Rhubarb Marshmallow Dessert


    There is only one thing better than a yummy Rhubarb dessert in spring and that is when someone else makes it and you get to enjoy it. Thank you Tina for this wonderful dessert and sharing the recipe with us. It was delicious to the last bite. 

    Base:
    •  2 cups Graham Wafer crumbs
    • 2 tablespoons sugar
    • 1/3 cup melted margarine or butter
    1. Thoroughly mix crumbs with margarine and sugar.
    2. Press firmly into a 9x13 inch pan. 
    3. Chill while making the filling. 
    Filling:
    • 1 cup sugar
    • 3 tablespoons cornstarch
    • 1 package of dry strawberry jello
    • 4 1/2 cups chopped Rhubarb*
    • 1/3 cup water
    • 2 cups mini marshmallows
    1. In a sauce pan combine the Rhubarb and water.
    2. Cook for a few minutes to soften.
    3. In a separate bowl mix together sugar, cornstarch and jello
    4. Stir into hot Rhubarb until thickened and clear.
    5. Pour over crust and top with mini marshmallows
    6. Cool in fridge until set. 
    Topping:
    • 2 cups whipped cream (cream is already whipped or use 2 cups whipped topping)
    • 2 packages instant vanilla pudding
    • 2-2/3 cups milk
    1. Add the whipped cream over the rhubarb and marshmallows.
    2. Mix the instant pudding with the milk, let sit for 5 minutes and spread over the entire dessert. 
    *if using frozen Rhubarb thaw it first and omit the water.