Mennonite Girls Can Cook is a collection of recipes which were posted daily for a period of ten years from 2008 to 2018. We have over 3,000 delicious recipes that we invite you to try. The recipes can be accessed in our recipe file by category or you can use the search engine.

Recipe Search

Prune Vinarterta


One year when I baked this Vinarterta for Christmas I decided to send some to my elderly aunt in another province. She sent me a thank you note and said how delicious it had been. It was sometime later when I thought I should ask her if it had arrived in good condition. She admitted it had all been in crumbs but she had enjoyed every crumb. I remember how polite my aunt was every time I make this vinaterta. It still makes me smile although at the time I was embarrassed.
  • 1 cup butter
  • 1 3/4 cup sugar
  • 4 eggs, beaten
  • 4 cups flour
  • 2 teaspoons baking powder
  • 1 teaspoon cardamon
  1. Cream together butter and sugar until light and creamy.
  2. Add beaten eggs and mix until well blended.
  3. Measure 2 cups of flour, add baking powder, and cardamon. Mix into creamed mixture.
  4. Stir in remaining flour.
  5. Divide dough into 7 equal parts.
  6. Roll each part into an 8" square. I rolled right on the parchment paper which I then slid on the baking sheet.
  7. Bake in a 375º oven for 15 minutes or until golden in color. Remove from baking sheet to a cooling rack and allow to cool completely. Spread prune filling between the layers.
  8. Store in a covered container and let sit for 24 hours.
  9. Slice and store in covered freezer containers. Freezes well. 
  10. *I slice off the edges so that you have nice looking pieces to serve. The edges are the bakers treat.
Prune Filling:
  • 2 1/2 cups prunes, chopped
  • 1 cup water
  • 1/2 cup sugar
  • 2 teaspoons cinnamon
  • 1 teaspoon cardamon
  • 1 teaspoon vanilla
  • 2 teaspoons lemon juice
  1. Chop prunes, add water, and cook over medium heat until soft.
  2. Add sugar, cinnamon, cardamon, vanilla, and lemon juice.
  3. Stir until sugar is dissolved and remove from heat.
  4. Allow to cool slightly before spreading.

Bread for the Journey


As I was contemplating what to write for the first Advent I was listening to conversations around me and there seemed to be a general theme. "How did this season creep upon us so quickly? How can I simplify and reduce the stress of unmet expectations? Isn't this a time of preparing in anticipation for Christ's return, how quickly did I lose focus on that?" 
I re-read this devotional that originally was posted a few years ago. It was a good reminder for me now as well to slow down as I prepare for the celebrations of the season and focus on what it the Advent season is really all about - the anticipated coming of Christ. 

" Everybody today seems to be in such a terrible rush, anxious for greater developments and greater riches and so on, so that children have very little time for their parents. Parents have very little time for each other, and in the home begins the disruption of peace of the world." ~~ Mother Teresa~~

This picture reminds me of a day my family had, when we were snowed in. There were no errands to run, no need to bundle the kids for school. No one could go to work, and for a day I felt complete calm. My family was together and there were no outside influences grabbing our attention away from home and family.
The Advent Season and Christmas Preparations are upon us. I know that this is often a very difficult time of year for many. A time that can be filled with loneliness and anxiety. I hold you deep in my thoughts and prayers, even if I don't know your story, God knows, even if He seems distant, He cares about your story and loves you with an unfailing love. I just want to share with you my deep desire to slow down this Season and make it meaningful for those I care about and love.
Do you ever feel that the world and its demands, rushing here, there, striving for bigger, better, more beautiful, more stuff, has left you feeling lonely and empty? Grown children have little time for their aging parents. Parents are so busy trying to make a life for their family to give them opportunities or "stuff" that they think they need, they actually don't have time for them.
I would invite you to find a day, perhaps even today, to just slooow down. Stop. Reflect. Give yourself a "snow day". If you have a family living at home, then play a game or build an indoor or outdoor fort. If you have someone you haven't talked to for a long time, give them a call and let them know that you are thinking of them and that you care. If you need a day for your self to retreat, reflect and rest, then do so. Even Jesus had times in his life that he needed to do just that. Reflect on God's love, grace and mercy in your life, so that this Advent/Christmas season, we are ready to receive God's greatest gift to us, His Son Jesus Christ.

"O come, O come, Emmanuel"


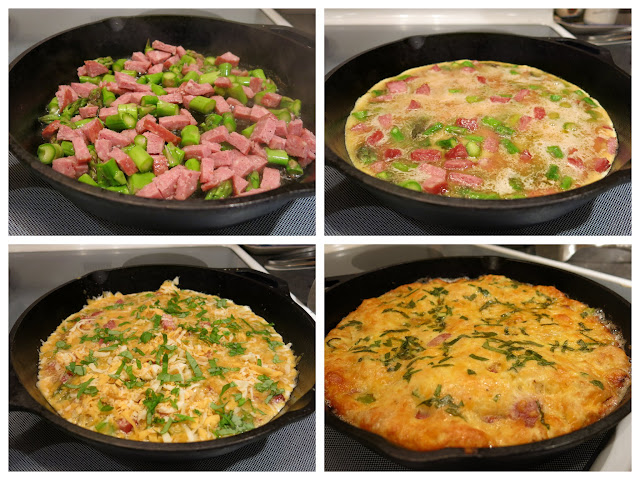
Saturdays ~ Asparagus Frittata


I love my cast iron pan. I always remembered my mom frying potatoes, frying eggs, crepes, or ruhrei.   I don't think she hardly knew what an omelet was, let alone the word 'frittata'  would have been unheard of in our home.  Brunch is a common thing in our home, especially on the weekend.
Frittata is an egg-based classic brunch dish.  It needs a well-seasoned cast iron pan. They are cooked on the stovetop and finished in the oven. It's an inexpensive, cheap, quick cooking and the best way to use leftovers.  It can be used for breakfast, lunch, or dinner.  It can be eaten hot or cold.  Just remember not to overcook it.  While omelets serve only one person,  a frittata can serve many guests.

Asparagus Frittata
  • Six eggs
  • 1/4 tsp. sea salt 
  • pepper
  • 1 tbsp. extra virgin olive oil
  • 1 tbsp. butter
  • 1 cup chopped asparagus
  • 1 cup chopped farmer sausage or bacon
  • 1 cup shredded cheddar cheese
  • 1/4 cup chopped basil
Instructions
  1. Preheat oven to 350 degrees.
  2. Beat eggs and add salt and pepper to taste.
  3. Heat the oil and butter in a cast iron pan at medium.
  4. Saute the asparagus and sausage for five minutes.
  5. Add eggs and cook for 3 more minutes.
  6. Sprinkle cheddar cheese on top and add a handful of fresh basil.
  7. Then transfer the egg mixture in a cast iron pan to the oven and bake for 15-20 minutes.
  8. Optional: drizzle of hot sauce.
Have fun and add something new to your next brunch menu.
Go fetch your old cast iron pans, season them, and bring them to life again.


Oven BBQ Farmer Sausage with Peppers - Flashback Friday


For Flashback Friday , I'm bringing back a wonderful fall supper dish.
The farmer Sausage used in this recipe is a smoked pork sausage made by Mennonites.
 It is made in many communities throughout Canada and the US where Mennonites live. It is also available at our local Safeway and at several other grocery stores.
 Farmer sausage varies in texture and spices from area to area.
 The sausage I buy is made in Abbotsford by Rempel Meats.
I'm sure you could substitute a kiebasa or ham sausage for the farmer sausage.

  • 1 length (about 14") smoked farmer sausage
  • 1 medium onion sliced
  • 1/2 each red and green pepper cut into slices
  • 1 19 ounce can diced tomatoes
  • 1/4 cup brown sugar
  • 2 tablespoons cider vinegar
  • 1 teaspoon dry mustard
  • 1 tablespoons molasses
  • 1/2 teaspoon liquid smoke (found in the aisle with bottled seasoning sauces)
  • 2 tablespoons salsa
  • ground pepper
  • red pepper flakes (optional)
  1. Cut sausage into 1 1/2 inch pieces and place in casserole dish
  2. Saute' onion slices until they begin to soften.
  3. Add peppers and onions to sausage in dish.
  4. Mix remaining ingredients and pour over sausage.
  5. Bake at 350º oven for 45 minutes to 1 hour.
  6. Serve over rice or noodles.

Pumpkin Cream Cheese Muffins


Streusel Crumble Topping

  • 1/2 cup flour
  • 1/4 cup packed brown sugar
  • 1 teaspoon cinnamon
  • 1/4 cup melted butter

Cream Cheese Filling
  • 8 ounces cream cheese
  • 1/4 cup sugar
  • 1 egg yolk
  • 1 teaspoon vanilla

Pumpkin Batter
  • 1 3/4 cup flour
  • 1 teaspoon baking powder 
  • 1 teaspoon baking soda
  • 1/2 teaspoon salt
  • 2 teaspoons pumpkin pie spice
  • 2/3 cup packed brown sugar
  • 2 eggs
  • 1  cup pumpkin puree
  • 1/2 cup vegetable oil
  • 1/3 cup milk
  • 2 teaspoons vanilla
  1. Preheat oven to 425 F.
  2. Prepare a 12 cup muffin pan by either greasing well or lining with paper cups.
  3. Combine crumble ingredients in a food processor or with a fork until small crumbs are formed.
  4. Beat together cream cheese filling ingredients with a hand mixer until smooth. 
  5. In a large bowl, combine dry ingredients of the Pumpkin batter.
  6.  In a medium bowl, whisk together wet ingredients.
  7. Stir wet ingredients into dry ingredients gently until just combined. 
  8. Place a heaping tablespoon of pumpkin batter into each cup, top with a heaping tablespoon of cream cheese filling and top with remaining pumpkin batter to fill cups.  
  9. Sprinkle Streusel Crumble topping over each muffin and press gently. 
  10. Bake for 10 minutes and then reduce temperature to 350 F and bake another 10  minutes or until toothpick poked in comes clean. 

 Yields - 1 dozen large muffins

Roasted Carrots


This recipe was inspired by one I found in Good Housekeeping last year, called spice roasted carrots.
These go well with roast chicken or turkey.

Ingredients:

  • 2 lbs skinny carrots (I used organic, unpeeled for the above photo)
  • 2 - 3 Tbsp olive oil
  • 1 Tbsp freeze dried oregano leaves
  • 1 - 2 tsp fresh ginger, grated
  • 1 tsp paprika
  • 1 tsp salt
  • 1/2 tsp pepper
  • 2 Tbsp balsamic vinegar
  • 1/4 cup roasted salted pistachios, finely chopped (optional)
Method:
  1. Spray roasting pan with oil. Preheat oven to 425 F.
  2. Trim stems and end of carrots. Add to roaster with all the rest of the ingredients except the balsamic vinegar and nuts.
  3. Roast (with lid off) for about half hour. Drizzle with balsamic vinegar and stir or shake pan.
  4. Roast for another 15 minutes or until carrots begin to show some charred tips.
  5. Transfer to serving plate and sprinkle with nuts.
Tip: to easily clean roasting pan, sprinkle with baking soda, add an inch of water and put back in the oven at 300 F for 15 minutes or so. 

Mocha Cheesecake

Chocolate, espresso, creamy, dense, rich, smooth. A tiny sliver goes a long way.
This baked cheesecake is a recipe that I was given from my sister Rhoda who first tasted it when a friend served it at their care group. It's become one of her most requested desserts. I think it may be familiar to some of you as I've seen it on a number of sites. I've changes it up a wee bit by omitting the cinnamon and using espresso coffee to add another depth of flavour.
Crust:
  • 1 1/2 cups chocolate crumbs
  • 1/4 cup butter, melted
  1. To begin, wrap a 9" spring form pan in foil, making sure it comes up the sides.
  2. Place crumbs in pan and add melted butter. Using a fork work crumbs and butter into a crust and press into bottom of spring form. Set aside.
Filling:
  • 3 tablespoons espresso powder
  • 1 tablespoon boiling water
  1. Stir together and set aside to cool.
  • 4 packages cream cheese (8oz each)
  • 1 1/2 cups white sugar
  • 1/4 cup flour (or 1/8 cup corn starch) 
  • 2 teaspoons vanilla
  • 4 large eggs, slightly beaten
  • 2 cups semi sweet chocolate chips, melted and cooled, but don't allow to harden
  1. Beat together cream cheese, sugar, flour and vanilla until smooth.
  2. Add slightly beaten eggs and just beat until incorporated.
  3. Divide this whole cream cheese mixture into half in two bowls.
  4. To the first bowl stir in the 2 cups melted and cooled chocolate. 
  5. Pour this layer over crumbs in spring form.
  6. To the remaining mixture stir in the cooled espresso mixture. 
  7. Pour this over the chocolate layer.
  8. Place foil wrapped spring from with mixture into a large pan and fill with hot water to 1" up the sides of the spring form. 
  9. Carefully place in 325º oven and bake for 60 minutes or until cheesecake is set and dry looking on the top.
  10. Remove from oven and then from the water bath immediately. Remove foil.
  11. Allow cheesecake to stand for 15 minutes and then run a thin knife around the edges to keep the top from cracking. Allow to cool completely at room temperature and then in refrigerator for 8-10 hours. 
  12. Remove from pan onto a serving plate.
Glaze:
  • 1/2 cup semi sweet chocolate chips
  • 3 tablespoons butter
  1. Melt together in the microwave or small pot. 
  2. Pour over cooled cheesecake, smooth, and allow to set.
  3. Garnish with chocolate covered coffee beans. 
This cheesecake freezes well with the glaze. I place it in the freezer uncovered until it's solid and then wrap it well in plastic wrap and into a good freezer container. Make sure it's well sealed. It slices really nicely when frozen or thawed. 

Bread for the Journey

Psalm 19
The Living Bible 1971

The heavens are telling the glory of God; they are a marvelous display of His craftsmanship. 
Day and night they keep on telling about God.
Without a sound or word, silent in the skies, their message reaches out to all the world.
The sun lives in the heavens where God placed it and moves out across the skies as radiant as a bridegroom going to his wedding, or as joyous as an athlete looking forward to a race!
The sun crosses the heavens from end to end, and nothing can hide from its heat.


God's laws are perfect.
They protect us, make us wise, and give us joy and light.
God's laws are pure, eternal, just.
They are more desirable than gold.
They are sweeter than honey dripping from a honeycomb.
For they warn us away from harm and give success to those who obey them.
But how can I ever know what sins are lurking in my heart? 
Cleanse me from these hidden faults. 
And keep me from deliberate wrongs; help me to stop doing them.
Only then can I be free of guilt and innocent of some great crime.


May my spoken words and unspoken thoughts be pleasing even to you, O LORD my Rock and my Redeemer.

Deb's Fleisch Perishky / Meat Buns


I had a fun baking 900 meat buns. Yes, that is right, this is not a typo, we made 900 meat buns for my sister by loves nieces wedding this past fall. 
We used her sister's recipe which I modified just a little. 
It makes 75 Dozen 2" in size.  Personally, I like them a bit bigger.
However, 1 recipe of dough using 3 lbs of ground beef makes about 300 meat buns.  
The recipe can be cut in half easily to make less. But believe me, 300 meat buns get eaten rather quickly. Especially at Christmas time. 
This was not a one person job, I had help from my brother, sister by love and their girls. It is always more fun doing it as a group. I made the dough recipe 3 times, the meat filling recipe 2 times, and 1 recipe of sauerkraut and bacon. 
Now that Christmas is approaching, get your friends and family together and make a batch or two. Put on the Christmas carols and hot cocoa and have fun together. Feel free to half the recipe which is very easily done if you don't need a large quantity. 


Dough
  • 1 cup warm water
  • 5 cups warm milk
  • 1/2 cup margarine
  • 1/2 cup lard
  • 2 tablespoons sugar
  • 1 tablespoon salt
  • 2 tablespoons instant yeast
  • 1 egg
  • about 12 cups of flour divided
  1.  In a large bowl add about 9 cups of flour, sugar, salt and dry yeast. Mix well.
  2. Add the lard and margarine and mix with a pastry blender to cut the fat into pea sized pieces. 
  3. Add the warm water, milk and beaten egg. Place the bowl of dough in a sink of warm water for about 15 minutes until the dough bubbles.
  4. Continue adding the remaining flour until you have a soft dough. You can do this by hand or in a large dough mixer with a dough hook.
  5. Let rise until double in bulk for about 45 minutes.
  6. Take a piece of dough, roll thin, and cut with desired size cookie cutter. 
  7. Fill with the following fillings, pinch the seams together. Using about 1 rounded teaspoon. 
  8. Let rise on greased pans or pans lined in parchment paper for an hour. 
  9. Bake at 400 for 15 minutes or until they are browned to your liking. 
  10. These freeze very well by placing them in zippered plastic bags. Remove as much air as possible.
  11. If you want to use both filling options as written, you have to make 2 recipes of dough. 
Meat Filling
  • 3 lbs of lean ground beef
  • 4 envelopes of onion soup mix
  • 2 tablespoons flour
  • enough water to make a thick gravy
  • 2 cups of dried fine breadcrumbs ( I did not use the full 2 cups)
  • black pepper to taste. No need to add salt since the soup mix is salty enough.
  1. In a very large frying pan, brown ground beef but do not drain. 
  2. Add the onion soup mix and flour. 
  3. Add enough water to make a thick gravy about 2 cups.
  4. Simmer about 40 minutes.
  5. Sprinkle in enough breadcrumbs to absorb the gravy. 
  6. Cool filling. 
Sauerkraut Filling
  • 1 pound bacon, finely diced
  • 2 medium onions, finely diced
  • 2 - 2-litre jars of sauerkraut, drained and rinsed
  1. In a large frying pan, brown the bacon, drain most of the fat but leave a little, maybe 2 tablespoons.
  2. Add the onion and cook until the onions begin to soften.
  3. Add the drained and rinsed sauerkraut and continue to saute until the cabbage takes on a light brown colour. 
  4. Cool.
  5. Follow baking instructions for the meat buns. 


Flashback Friday - Pinwheel Cookies


For flashback Friday I want to bring back my recipe for pinwheel cookies.  Snow has arrived and so my thoughts turn to Christmas baking. These cookies are a favorite at our house and are always on the bake list for Christmas. Store them in airtight containers and they will stay nice and soft. They freeze well.
  • 1 cup butter
  • 1 cup white sugar
  • 1/2 cup brown sugar
  • 2 eggs
  • 1 teaspoon vanilla
  • 3 1/2 cups flour
  • 1 teaspoon salt
  • 1 teaspoon baking powder
  • 1 teaspoon baking soda
  • 8 tablespoons cocoa (for half of the dough)
  1. Cream butter, and sugars, add eggs, and vanilla, mix well.
  2. Whisk together dry ingredients and stir into creamed mixture until blended.
  3. Divide dough in half and stir in 8 tablespoons cocoa to one half of dough. 
  4. Roll out both doughs and put one layer on top of the other one. I roll the dough on waxed paper so I can just turn one layer upside down on the other one. 
  5. Cut dough in half and tightly roll each one up lengthwise ending up with 2 rolls.
  6. Place rolls on cookie sheet and chill thoroughly in the freezer.
  7. Slice 1/4" thick, place on parchment lined cookie sheets, and bake in a 375º oven for 10 minutes.
  8. Cool and store in airtight containers.

Snickerdoodles


My sisters and I used to make these simple cookies when we were young and try to sell them in our neighborhood.

Ingredients:
  • 1 cup unsalted butter, softened.
  • 1-1/2 cups sugar
  • 2 eggs, beaten.
  • 1 teaspoon vanilla
  • 2-3/4 Cups flour
  • 2 teaspoons cream of tartar
  • 1 teaspoon baking soda
  • 1/2 teaspoon salt
  • 3 tablespoons sugar
  • 3 teaspoons cinnamon
Method:
  1. Preheat oven to 350°F.
  2. In bowl of mixer, cream butter and 1-1/2 cups sugar thoroughly, then add eggs and incorporate thoroughly, mix in the vanilla.
  3. Combine flour, cream of tartar, baking soda and salt in a separate bowl.
  4. Add dry ingredients into butter mixture and mix well.
  5. Chill dough, and chill 2 large ungreased cookie sheets for about 10-15 minutes in the fridge.
  6. Meanwhile, mix 3 tablespoons sugar, and 3 teaspoons cinnamon in a small bowl.
  7. Roll dough into small balls about 1 inch in diameter and drop into sugar-cinnamon mixture.
  8. Coat by gently rolling balls of dough in the sugar/cinnamon mixture.
  9. Place on chilled ungreased cookie sheet, and bake 10 minutes - 20 minutes. This varies due to the pan you choose and whether you cook one sheet at a time.
  10. Remove from pan after they cool slightly.
  11. Yield approx. 4 dozen.
 I overloaded my cookie sheets and put two pans in the oven at the same time so it took a full 20 minutes for them to bake. Make sure to leave a good amount of space between the balls of dough.

Pumpkin cheesecake


Pumpkin cheesecake with a gingersnap crust is one of my favourite desserts that can easily be made anytime of year but is saved for special occasions in fall like Thanksgiving.

Crust
  • crisp purchased gingersnap cookies to make 1 1/2 cups gingersnap crumbs 
  • 4 tablespoons melted butter
Pumpkin Filling
  • 3 packages cream cheese, room temperature
  • 1 1/4 cup packed light brown sugar
  • 1 15 ounce /  398 ml can pure pumpkin
  • 4 large eggs
  • 1/3 cup sour cream
  • 2 1/2 tablespoons flour
  • 2 1/2 teaspoons pumpkin pie spice
  • 1/2 teaspoon salt
  • 1 tablespoon vanilla extract
  1. Preheat oven to 500 F.
  2. Place a sheet of parchment paper on the base of a 9 inch springform pan and then add the sides of the pan and tighten, allowing excess parchment paper to be pinched between sides and bottom.  This will make it easy to remove cheesecake from the base to a serving plate once the cheesecake has chilled.  Spray the sides of the pan with cooking spray or grease well. 
  3. Pulse gingersnap cookies in food processor to make fine crumbs. Add melted butter and process to combine.
  4. Press crumbs into the bottom of the springform pan.
  5. In a large mixer, beat cream cheese and brown sugar together on high speed until smooth and light.
  6. In another bowl, beat together pumpkin puree, eggs, sour cream, flour, pumpkin pie spice, salt and vanilla until smooth.  
  7. Add pumpkin mixture to cream cheese mixture and mix on low speed until well combined.
  8. Pour filling into prepared pan. 
  9. Bake for 10 minutes and then reduce heat to 300 F and continue to bake for another hour. 
  10. Remove from oven and if necessary, immediately run a sharp knife around the edge to keep the cake from cracking in the center. 
  11. Allow to cool to room temperature and then chill. 
  12. Serve with whipped cream and caramel sauce. 

Ice-Cream Blizzard Cake

We celebrated birthdays over here on the weekend...with an ice-cream cake for each of the grands that had a birthday last week. A chocolate ice-cream pizza for Micah...a mud-pie for Emme and a 'cookies-and-cream' ice-cream cake for Spencer.  The thing about ice-cream cakes is that they are easy to make ahead and store in the freezer until party-time. 

Today's recipe is an ice-cream cake that I made for the grands 'yesteryear'.  It combines chocolate cake and ice-cream blizzard and is wrapped in whipped topping.


  • 1 chocolate cake mix
  • 1 liter / quart premium vanilla ice-cream, slightly softened
  • 1/2 cup milk
  • Skor bits (1 cup, or to taste)
  • Cool Whip topping
  1. Mix cake mix according to instructions on package and bake in two 9-inch round pans.  Cool completely. (This is enough for two ice-cream cakes.)
  2. Line a 9-inch cake pan with plastic wrap. 
  3. In heavy-duty blender, combine the ice-cream and milk.  This works best doing 1/2 at a time. *
  4. Pulse to blend until thick and uniform.
  5. Add Skor bits and pulse just until combined.
  6. Pack into prepared cake pan, leveling the surface.
  7. Freeze until firm.
To Assemble:
  1. Cut chocolate cake in half horizontally and place bottom on a round base.
  2. Place frozen ice-cream layer on top of cake base.
  3. Center top piece of cake on ice-cream layer.
  4. Pop into the freezer and freeze until firm.
Decorate:
  1. Frost entire cake with a layer of cool whip.
  2. Use additional whipped topping in a pastry bag to decorate as you wish.
  3. Write message on cake with melted chocolate or chocolate icing.
  4. Store in freezer for up to a few weeks.
  5. Let sit at room temperature for about 10 minutes before serving. 
That is the general method for making a yummy ice-cream cake at home.  I made two blizzard cakes at the same time...one with Skor bits and the other with crushed oreo cookies.  Who said ice-cream was only good in the summer?


Bread for the Journey


Luke 12: 34  'For where your treasure is, there will your heart be also.'

There is a time when being a pack rat is a good thing.
Usually we see it as a negative thing because pack rats save everything thinking that one day they may need it. Their living space is filled with stuff.
Now think of being a spiritual pack rat, when you store God's word in your heart and fill every bit of space for the time you need to draw from it.

Psalm 119:11 'I have hidden your word in my heart that I might not sin against you.'

Do not be held hostage by the 'stuff' in your life, let God 'clean out' your heart and fill it up with His word.

Kathy's Kitchen and Whipped Shortbread Cookies

Good Saturday morning to you all. I thought I'd give you a peek into my kitchen.  I love it when our family all come home and pull up a stool, talk, drink coffee, grandkids come for sleep overs and fill the kitchen with a whole lot of chatter and fun, a few spills and sticky marks. It's also here that we love to visit with friends around the table.


We've lived in our home for about 12 years, and the only updates we've made to the kitchen are the appliances. I have a Samsung double door bottom freezer refrigerator, an Electrolux slide in style range with a lower oven that I use more for warming than baking, and a Kenmore stainless steel tub dishwasher. I'm happy with them all. My microwave is an old Panasonic that still works like a charm.

About coffee. It's a big deal around here and we have a routine. Every evening I pull out our favourite mugs and in the morning we take turns making the morning coffee. It's a good way to start almost every day together. 

I'm happy to share my kitchen with our grand daughter Summer...and even with the 4 little guys who like to stir and pour, and taste test. 

My favourite cleaning cloths are from Norwex. They clean, disinfect, polish and shine. 
Some of my other favourites are hand knit cotton dish cloths, scrubbies that really don't scratch and 100% cotton tea towels. I purchase these at Winks Home Garden and Gifts in Chilliwack. 


 I love table cloths. I have a closet where I hang my table cloths, table runners and my aprons. Not pictured in that same closet is a vertical shoe rack that works well to hold all my linen and paper napkins. The table cloth that I treasure most, but rarely use was hand crocheted by my grandma Regehr. It was a gift for our wedding 38 years ago. Still white and starched.

Winks is a great place to shop for table linens and beautiful seasonal napkins.


 This fall I found this simply beautiful light grey table cloth with an soft embossed feather pattern.
 Here is a peek inside Winks. Always beautiful and inviting.
 Wendy, the owner of Winks is one of our sponsors, and has supported Mennonite Girls Can Cook right from our early beginnings. She hosted book signings at Winks when each of our cookbooks were published and has continued to sell them. If you are looking for one of our books for a Christmas gift, she's got them both in stock now.

 I love dishes.  For our wedding we were gifted the entire set of Royal Albert, Old Country Rose. I still pull it out at Christmas. Many years ago I purchased a 12 piece place setting and some serving dishes from Mikasa called Belle Terre, and I still use it often. My most recent dishes Portmeirion's Sophie Conran come from Winks. Most of my collection have been gifted to me and some I've purchased. Having a set of white dishes allows me to play with my table scape, and mix and match with my other dinnerware.
Yesterday the sounds, smells and signs of Christmas filled my kitchen. My personal tradition on the first day of Christmas baking is to turn on Handles Messiah, and bake Shortbread Cookies. (not the recipe shown above)
Do you have a cookie press? The only time I pull mine out is when I'm baking Whipped Shortbread(pictured above, recipe below)
Have you started thinking about Christmas baking? I'm starting to prepare for Christmas early this year as we have some early celebrations planned this year and I want to be prepared so that I can spend as much time with everyone as possible. The garland and mini lights will get placed above the kitchen cabinets this coming week, and the Christmas music will begin to play more regularly.

Whipped Shortbread Cookies
(makes 64 small cookies using a cookie press)
  • 1 pound salted butter, room temperature
  • 1/2 cup cornstarch
  • 1 cup powdered sugar
  • 3 cups all purpose flour
  1. Whip room temperature butter well.
  2. Sift together remaining ingredients.
  3. Add dry ingredients to whipped butter and beat together well.
  4. Place dough in cookie press and press onto baking sheets. You can also just roll small balls of dough in hands and press down with a fork if you don't have a press. This dough is not for rolling out. (for a rolled out style shortbread cookie follow link above)
  5. If adding sprinkles or candied fruit to decorate do now before baking.
  6. Bake in 325º oven for 18-20 minutes. The edges will be faintly turning golden when done. Remove to cooling rack immediately after taking out of oven. Store in an airtight container once cooled. These cookies freeze well in a tightly sealed container. 


Old Fashioned Jelly Roll


For this flashback Friday post I'm bringing back one of the first recipes I ever posted. This was one my Mom used the way that one would use a white cake mix today. She'd bake it in a spring-form cake pan, slice it horizontally, fill it with fruit or pudding, and decorate it with whipped cream. It also served well as a jelly roll which she usually filled with chocolate pudding. I checked the Mennonite Treasury of Recipes and found about 8 variations of jelly rolls, obviously a favorite of days gone by. I believe traditional jelly rolls got their name because of the jam/jelly filling, but in our family we have always used a custard pudding such as vanilla, coconut, lemon or as already said, chocolate.

Ingredients:
  • 1 c sugar
  • 4 eggs, separated
  • 4 Tbsp water
  • 2 Tbsp lemon juice
  • 1 tsp vanilla
  • 1 cup flour
  • 1 tsp baking powder
  • 1/4 tsp salt

Method:
  1. Prepare 11x17 inch (or slightly smaller) cookie sheet by greasing bottom and sides, lining with parchment or wax paper and greasing again. I use shortening  Preheat oven to 350 F.
  2. In small bowl, beat egg whites until very soft peaks form when lifting the beater (turned off). Set side.
  3. In mixing bowl, beat sugar and egg yolks well, (I use a wooden spoon) until pale yellow in color, then stir in water, lemon juice and vanilla. 
  4. Stir in combined dry ingredients, then fold in the beaten egg whites (with a spatula) until the egg white is blended in and the batter has a very light and airy consistency.
  5. Pour into prepared baking sheet.
  6. Bake at 350 F for 15 - 20 min. until pale yellow. 
  7. In the meantime lay out a clean tea towel and dust well with confectioners sugar. (1)
  8. When cake is baked, turn hot cake out onto towel, peeling back the paper. (2)
  9. Dust with confectioner's sugar again and roll into a log, along with towel, beginning at narrow end. (3) Let rest to from shape for 15 - 30 minutes.
  10. Unroll, spread with 2 - 2/1/2 cups cooled pudding (4) keeping about an inch away from sides and a few at the end. Roll up again, starting at the same end, leaving the towel underneath. (5) Transfer log onto serving platter, using end of towel to lift, then slide towel out from underneath. Cover loosely with plastic wrap and refrigerate. Can be made day ahead. Dust with fresh powdered sugar before serving.


For coconut cream filling ( a condensed version of Lovella's coconut cream pie filling)
  • 1 1/2 cups light coconut milk (1 can - shake before opening)
  • 4 Tbsp sugar
  • 4 Tbsp cornstarch
  • 1/2 cup milk
  • 3 egg yolks
  • vanilla
  • 1 cup shredded coconut
  • 1 Tbsp butter
In saucepan, heat coconut milk, bringing to a simmer. In the meantime, blend sugar, cornstarch, egg yolks and 1/2 cup milk, using whisk. (add a small amount of milk, then yolks to blend smoothly , then the rest of the milk)
Blend into hot milk as it begins to boil, stirring until it bubbles. Remove from heat.
Stir in vanilla, coconut and butter. Let cool in ice water or cover with plastic wrap (placed right on the pudding) and refrigerate.
Cake pictured is decorated with 1/2 cup whipping cream and 1 tsp sugar whipped, then sprinkled with toasted coconut.

Applesauce Oat Squares


My son has an apple tree on his yard that produces amazing apples that turn a beautiful deep red in fall. We've had a few frosts and yet the apples on the tree are sweet and crisp.
The plate is a gift from my granddaughter, Kayla. She knows I like new plates once in awhile for food photo-ops. I love it.
  • 1 1/2 cups flour
  • 1 3/4 cups old fashioned oats
  • 3/4 cup brown sugar
  • 1/2 teaspoon baking soda
  • 3/4 cup butter
  • 2 cups apples
  • 2 cups applesauce
  • 2 tablespoons sugar
  • 1/2 teaspoon cinnamon
  1. In a medium sized bowl, whisk together first four dry ingredients.
  2. With a pastry blender cut in butter until crumbly.
  3. Press half of this mixture in a greased 9" x 13" pan.
  4. Place apple slices on top of the mixture.
  5. Sprinkle with 2 tablespoons sugar and 1/2 teaspoon cinnamon.
  6. Spread applesauce over the apple layer.
  7. Top with remaining crumbs.
  8. Bake in a 375º oven for 40 minutes or until golden brown in color.
  9. Cut in squares and serve warm with ice cream.  

In Flanders Fields


Two years ago I had the opportunity to cycle along the Danube River.
Breath taking views of poppies lined the pathways, at which I could no longer succumb 
to my mind, to stop and reflect on the poem of John McCrae.
He wrote, what became the most famous Canadian Poem of the First World War, 1915.
 Being a doctor, he knew and saw the pain first hand, at the battle field.
Today, 100 years later we still have doctors and soldiers at war
and how much has or hasn't changed.
Today I asked my grandsons if they had heard of this poem....
I can still hear the echo of their  voices as they recited this special poem.
Let's just take a moment to stop, reflect and pause in silence of those who have gone ahead.

Cream Cheese Appetizer

This is a very simple three ingredient appetizer that you can make in a hurry and watch disappear with your favorite crackers or tortilla chips.

Here's all you need for this sweet and spicy appetizer:

1 small tub of softened cream cheese.
2 heaping tablespoons of Raspberry jam.
2 heaping tablespoons of Rotel (original) diced tomatoes and green chilies.

Mix the jam and the Rotel together and pour over the cream cheese.
Serve with crackers or tortilla chips.


Autumn Vegetable Salad


Our favorite salad in Autumn includes roasted vegetables and crunchy apples with a creamy maple walnut dressing.
 If the apples you use brown quickly, add them at the last minute.


Salad 
  • 2 beets
  • 1 yam
  • 2 tablespoons oil
  • 1 head living butter lettuce 
  • 1 package baby spinach, stems removed
  • 2 cups finely chopped red cabbage
  • 1 red large pepper, diced
  • 1 apple, diced
  • 1/2 cup salted pumpkin seeds
  • 1/2 cup slivered toasted almonds 
  • cubed feta cheese
  1. Peel beets and yam and cut into 1/2 inch cubes.  Arrange beets and yam separately in a single layer on two parchment paper lined cookie sheets and drizzle with oil
  2. Bake at 400 for 30 - 45 minutes or until beet and yam  cubes are tender.  Cool on cookie sheet. This can be done the day ahead and refrigerated. 
  3. Arrange lettuce, spinach, cabbage and red pepper on a large platter.
  4. Top with roasted vegetables, apple, seeds and nuts and feta cheese. 
  5. Place dressing in a small serving jug and serve alongside the salad. 
Dressing
  • 1/2 cup walnuts **
  • 1/4 cup white vinegar 
  • 1/3 cup maple syrup or liquid honey
  • 1/4 cup apple juice * 
  • 1 clove garlic
  • 1 teaspoon mustard powder
  • 1 teaspoon salt
  • 1/2 teaspoon pepper
  • 1/4 cup  walnut or canola oil
  1. Place all ingredients in a blender jar and process until smooth.  Refrigerate.  Shake well just before serving.  
  2. *Dressing will thicken in the refrigerator.  If using immediately, cut back apple juice to 2 tablespoons.  Add additional juice if necessary for leftover dressing.
  3. **Walnuts must be fresh tasting.  I buy a large bag and keep it in the freezer.  Taste the walnuts before making the dressing to ensure they are fresh tasting.

Thank you to everyone who shared your stories of learning to cook on Saturday's Back to Foods Class post. It was so interesting and I think that like many of you, reading those stories took me down my own memory lane.  I had a Mom that was willing for me to learn as long as I cleaned up after myself and there were no dishwashers back then. I'm sure I used every measuring cup and every spoon she had.  


The randomly selected winner is Jane and her comment is pasted below.  Jane, please leave your contact info (name, email address and mailing address) in a comment on our Contact Page. It won't be published.  

Learning to cook wasn't very high on my list of things to do growing up. But I had to learn fast when I got married to a man, that liked to eat meat & potatoes for supper every night. In the nineteen years since I've learned a lot and now teach home ec. class for eighth grade girls at our small Mennonite School. I think your cookbook would be a great resource. jane


Bread for the Journey


This week, while we remember the price paid for the freedom 
we enjoy in this land,
we can't help but also remember the sacrifice
paid for the ultimate gift of peace in our heart.

Jesus said:
Peace I leave with you; my peace I give you. 
I do not give to you as the world gives. 
Do not let your hearts be troubled and do not be afraid.
John 14:27

Do not be anxious about anything, but in every situation, by prayer and petition, 
with thanksgiving, present your requests to God. 
And the peace of God, which transcends all understanding, 
will guard your hearts and your minds in Christ Jesus.
Philippians 4:7

Lord, today 
with thanksgiving for Your love and power,
we present our requests to You for help 
in the working out for Your good in our life.
We  give you the things that put fear and worry into our very being, 
and we ask You for this unbelievable peace
that is able to guard our hearts and minds in Christ Jesus.
Amen

Back to Foods Class


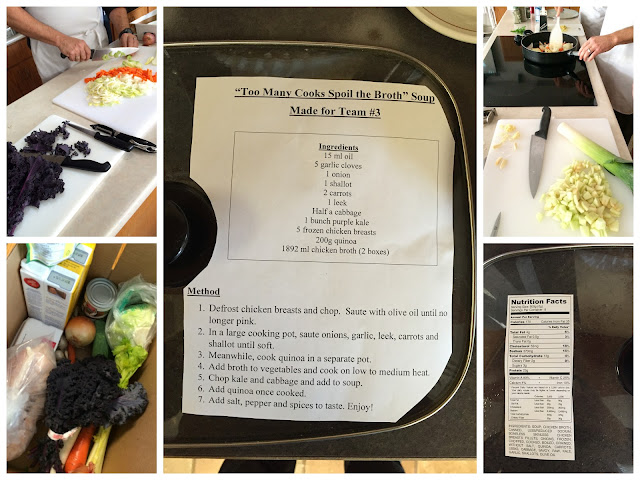
Thirty-one years ago I was a student in a Highschool Foods Class.  My friend Becky who teaches at our local Mennonite High School recently invited me to be the "expert" at a Professional Development day teachers learning class.  I jumped at the opportunity to see how Foods is now being taught in high schools.

The school staff became the class of students in learning how to teach project based learning.  The class I attended happened all in a few hours and moved very quickly to understand the full approach.  The high school students will do similar projects over the course of several days.


The class was divided into teams and were assigned mystery boxes holding ingredients to make a soup.


Instead of teaching only how to follow a recipe, students are taught to think how the ingredients in their box are best used to make a product that is pleasing to the palate and also to the eye. 


It was fun to peek into their boxes and see how they worked together as a team, brainstorming on which methods should be used as they created their recipes.


As they completed their recipes on chart paper, they were encouraged to move around the room to offer encouragement or observations on how certain methods of preparation might not have the desired effect.  There was time given for feedback and more team thinking.


After the recipes were developed, one from each team moved to the computers to work out and print the Nutritional Facts and their recipe while the rest of the team went to the Food Labs and began to prepare the soup that they would later share with each other for lunch.


As they worked, there were times that the class was paused to hear about Food Safe tips and also they were asked to stop what they were doing to watch a teaching video of how to properly use a sharp knife.


The teaching staff essentially practiced how to teach project based learning by participating in a project based class.

I have often thought of how I was taught the love of cooking by my high school food teachers.  If the energy and enthusiasm that I witnessed in the project learning class is any indication, there will be great foodies coming out of highschool equipped to provide nutritious and delicious meals in their own kitchens. 

I'd love to hear your experience of learning how to cook.  Let's get a conversation going.  To celebrate the love of teaching others to cook,  I'll select one name from the comments on today's post and send one of our cookbooks out to the winner. 

Winner will be selected on Sunday and will be announced on Monday's recipe post. 


Flashback Friday ~ Hot Taco Dip


I have chosen a family favorite that I collected years ago from a good friend, Hilda who is always fixing a large meal for her family and grandchildren. She has used this as a staple for years, especially on Sunday as it is easy to prepare in advance and one is not scurrying in the kitchen. I love this recipe and it's so easy to freeze and take on a family ski vacation or camping trip. I can guarantee there will not be many leftovers.
So this year I knew the family was dropping in just prior to 'trick or treat' and I was told to make sure there were adult treats. I knew immediately what to serve.

Taco Dip
  • 2 lbs. hamburger - browned and drained
  • 1 cup salsa
  • 1/2 cup taco seasoning
  • 1 cup sour cream
  • 1 or 2 tomatoes chopped
  • 1 or 2 onion greens chopped
  • 1 C grated cheddar or mozzarella cheese
Method
  1. Brown hamburger and drain.
  2. Add salsa and taco seasoning.
  3. Simmer on low heat for 5 minutes.
  4. Place mixture into casserole bowl.
  5. Spread sour cream over the meat mixture.
  6. Add chopped tomatoes and green onions
  7. Then sprinkle cheese mixture on top.
  8. Add chopped tomatoes and green onions
  9. Bake at 350 degrees for 30-40 minutes.

Tip:
I often double the hamburger mixture, cook it and freeze the mixture for a later date.

I added the recipe of Judy's Riverwalk Guacamole as a complimentary side dish. Yummy!
Don't forget to add a large bowl of tacos.  At the end of the meal my eldest son, leaned over and said, "Mom, you know that this is my favorite meal." (2009)
So here we are today, six years later, and I, without knowing and remembering his last statement, realized that I made his favorite treat again.  That's when you know your kids' favorites. It's simple and I always have the staples in my home.