Mennonite Girls Can Cook is a collection of recipes which were posted daily for a period of ten years from 2008 to 2018. We have over 3,000 delicious recipes that we invite you to try. The recipes can be accessed in our recipe file by category or you can use the search engine.

Recipe Search

Parmesan Crusted Salmon


Here's a deliciously simple recipe for salmon.
 Using chopped rather than grated Parmesan ensures a satisfying crunchy coating.
The dill sauce is optional
  • about 2 pounds salmon filet
  • 1 tablespoon soft butter
  • 2 tablespoons chopped fresh parsley
  • 2 tablespoons chopped fresh dill
  • 1/2 cup finely chopped (not grated) Parmesan cheese
  1. Preheat oven to 325º F.
  2. If using dill sauce, prepare that first and set in refrigerator to blend flavours.
  3. Place salmon, skin side down, on a parchment or foil covered pan.
  4. Place a piece of parchment paper loosely over salmon and bake for about 8-10 minutes.
  5. Meanwhile, combine parsley, dill and Parmesan cheese in a small bowl.
  6. When the 10 minutes is up, remove salmon from oven.
  7. Spread the soft butter over the salmon and pat on the herb/cheese mixture.
  8. Place back in oven and bake uncovered until fish flakes with a fork. This will not be long.
  9. If you like you can brown the salmon under the broiler for a minute or so but watch it closely!!
  10. Remove salmon to serving platter, leaving the skin on the baking pan.
Dill sauce (optional):
  • 1/3 cup sour cream
  • 1/3 cup mayonnaise 
  • 1 tsp. minced garlic
  • 1 tablespoon lemon juice
  • 1-2 teaspoons honey
  • a bit of lemon zest 
  • 1 tablespoon of fresh dill
  1. Combine all ingredients and mix well. Refrigerate until serving time. 

Almond Jam Bars


Sometimes I get carried away and cook too much jam and don't know how I'll use it all. These jam bars are the answer, great to pack in lunches too. You can make these with any jam you have on hand. You can mix a few different kinds of jams, a berry combo would be good. For this recipe I used peach and apricot jam mixed together.
  • 3/4 cup butter
  • 3/4 cup sugar
  • 1 egg
  • 1 teaspoon vanilla
  • 2 cups flour
  • 1/2 teaspoon baking powder
  • 1 1/2 cups of jam
  • 1/4 cup almonds, sliced
  1. Cream butter and sugar. Add egg and vanilla, mix well.
  2. Whisk together flour and baking powder, add to creamed mixture and mix until well blended.
  3. Press 2/3 of the dough into a greased 9" x 13" pan. Spread evenly with jam. Crumble remaining dough on top.
  4. Sprinkle with almonds.
  5. Bake in a 350º oven for 35 minutes until golden in color.
  6. Cool and cut into bars.
  7. Serve warm or cold.
  8. Yield: 24 pieces 

Baked Risotto / Arroz con Queso


I can remember the first time I had a rice similar to this when my husband and I were traveling in South America. I enjoyed it so much I tried to replicate it without too much success, it never felt creamy enough like I remembered. Well I finally got it with tweaking a recipe I got from a friend and my own ideas. I hope you give this easy version a try and like it as much as we do. I can't stress enough that the taste of a dish very much depends on the quality of ingredients you are using. If at all possible use fresh parmesan cheese and not the stuff out of a shaker can. If you like the white wine you drink, save a little and use it in the recipe. If you have a bottle of wine you don't enjoy, then don't use it in cooking either, you won't like the taste of it in the recipe. Use a very good quality chicken stock instead of chicken broth. It gives a richer and deeper flavor in soups and in recipes. I like to use Kitchen Basic Chicken Stock if I don't have any homemade stock available, in Winnipeg this product is readily available in most stores.

  • 1 1/2 cups of short grain rice (Arborio)
  • 5 cups of hot stock
  • 1 cup freshly grated Parmesan cheese
  • 1/2 cup of dry white wine (optional, but nice), or more chicken stock
  • 2 tablespoons butter
  • salt and pepper to taste
  • 1/2 cup of fresh parsley, chopped
  1. In a casserole dish put in the rice with only 4 cups of the stock saving 1 cup for the end of the cooking time. 
  2. Season to taste.
  3. Bake at 350 for 45 minutes. 
  4. Remove from the oven and add the remaining ingredients except parsley, stir very well for 2 minutes til it is thick and creamy. 
  5. Stir in parsley. 
Absolutely delicious served with Lemon Pork Piccata  or Easy Bake Chicken 

Apple Cherry Crisp (naturally gluten free)


This is a great dessert that is naturally gluten free, so easy to make and so delicious.  The crisp crumbs are a great topping for any fruits of your choice. 

Crumb Topping
  • 1/3 cup brown sugar
  • 1 cup rolled oats (certified gluten free)
  • 1/2 cup almond flour (ground almonds)
  • 1/3 cup chopped walnuts
  • 1/3 cup melted butter
Apple Cherry Filling
  • 3 large apples, cored and sliced
  • 1 cup fresh or frozen sweet cherries (pitted and quartered)
  • 2 tablespoons sugar
  • 1 tablespoon cornstarch
  1. Preheat oven to 350 F.
  2. Stir together crumb topping ingredients in order listed and set aside.
  3. Stir together sugar and cornstarch from the filling ingredient list. Add the fruit and stir to combine until everything is evenly coated.
  4. Sprinkle 1/2 cup of crumbs at the bottom of a 9 inch pan (square or round).
  5. Arrange fruit evenly over crumbs and sprinkle with remaining crumbs.
  6. Bake 45 minutes, until apple pieces are tender and topping is toasty brown.  Cover with foil if necessary during baking if the topping is browned but apple pieces are not quite tender.

Bread for the Journey - Easter Joy

Praise be to the God and Father of our Lord Jesus Christ!
In His great mercy he has given us new birth into a living hope
through the resurrection of Jesus Christ from the dead.
1 Peter 1:3

Year after year, I'm amazed at the miracle of life as I observe the first signs of buds appearing and then, maybe a week or so later the lime green hue creating a natural arbor, as leaves begin to open over the path I walk. It is an amazing sight to see bare trees and straggly, lifeless bushes planted in a mulch of rotten leaves come to life again. I marvel at the birds flitting about and the ducks pairing off, all creating their little nests for life to go on. 

And if seeing is not enough, in God's written Word I read,

In the beginning God created the heavens and the earth. Now the earth was formless and empty; darkness was over the surface of the deep, and the Spirit of God was hovering over it. Genesis 1:1

We know what happened next. God created out of nothing. He spoke and it came to be. That's the kind of God we have. What's more, not only did and does He reveal His power in nature, He showed His love by sending His Son to take the penalty of death for us. And from the dead, He raised Him up! 

Just like He will raise up all who believe in Him. The One who is able to make something out of nothing. The One who makes life out of death because He is the author of life. In Him we have everlasting hope. Isn't that just the best news to celebrate on this Easter Sunday?

"Our Lord has written the promise of the resurrection, not in books alone, 
but in every leaf in the spring-time."    ~ Martin Luther


Good Friday in Jerusalem

We all know that this is the day, that Jesus walked his final footsteps to his crucifixion. 

Was it really possible to have a reenactment of the Biblical story?  We were in Jerusalem this past year and I had anticipated walking down the Via Dolorosa to see the 14 'stations of the cross' but as usual, there were political tensions and we were forbidden to enter through the gates.  The words "Jerusalem, lift up your voice and sing," were ringing through my mind while I  walked through those days.


I had never experienced so many traffic jams in one day. The  Via Dolorosa, where everyone wanted to pass through, was closed.  Stones were being thrown at our bus.  The bus driver was tense but he knew how to quickly navigate around the city to find another entrance.  The stations represented significant events during Jesus' last hours.  But for me ... I did not know what to expect ... I soon realized that expecting to see the three crosses on a hill, as depicted in Bible Story books, was far from reality.  I soon realized that many of these sacred places have been protected and preserved in churches and basilicas over centuries to allow us to visit and touch and experience the event in our hearts.


We came to the place known as the Church of the Holy Sepulcher.  This is the sacred place where Jesus was stripped of his garments and then finally nailed to the cross.  Through a small door that looked like a tomb, we quietly entered. Here we were, standing in the place where Jesus, who came as a King of Peace on a donkey, was going to be crucified. Is there anything more challenging than the thought of truly  'following in the footsteps' of Jesus?'  (Stations 9-14)
'If anyone would come after me, he must deny himself and take up his cross daily and follow me." Matthew 16:24  Have I ever been persecuted for my faith?  What crosses have I taken up lately?


And there we stopped and gazed at this incredible sight ... where it is believed that Jesus was crucified. We stopped and paid homage to this incredible event of a heart-wrenching glimpse of the 'Man of Sorrows', bloodied by a crown of thorns, sweating under the weight of both His cross and mine.
  

This is the slate that they believe Jesus was laid on when they took him off the cross.  Throngs of people were gathered together as they knelt down, wept and touched the slate prayerfully.
Today we can look at Jesus to meet our  needs.  He asks us not to be religious, but rather to have a relationship with him.
Do we question when things go wrong for us, or we feel we have been treated poorly?  Do we tend to distance ourselves from him when things go well?  Is Jesus really enough for us?  Do we trust him? Jesus trusted God and obeyed him to the bitter end.  He heard the cries of Hosanna, Save Us! And he heard the cries of Crucify Him!  He obeyed both.

Must Jesus bear the cross alone,
And all the world go free?
No, there's a cross for everyone
And there's a cross for me.
                Thomas Shepherd

Red Curry Thai Soup


Our family enjoys eating a variety of food from different cultures and ethnicities Thai being on the top of the list. I have posted other Thai recipes on the blog such as Thai Mango Chicken, Thai Pizza (which is likely not authentic but inspired by Thai flavors), as well as Judy posting Thai Curry Chicken. There are other great options posted on our blog so feel free to browse around.
It is always soup season in our family and this soup is sure to warm you through and through. The red curry has a real nice kick to it, so I toned it down a bit because I served it to company and not all people enjoy a kick in to their taste buds the way my son and I do. Feel free to adjust the heat accordingly. I serve this with either a bowl of basmati rice or rice noodles to add to each individual bowl of soup and Rice Rolls on the side.
  • 1 package Rice Noodles, cooked or 6 cups of cooked rice
  • 6 boneless, skinless chicken thighs, cubed
  • 1/2 lb of shrimp, deveined and peeled 
  • 1 large onion, chopped
  • 4 cloves garlic, minced
  • 1 large red pepper, chopped
  • 2 teaspoons fresh ginger, grated
  • 1 head cauliflower, chopped 
  • 2 cups broccoli, chopped (I didn't have any this time)
  • 3 carrots, sliced
  • 2 tablespoon red curry paste, (reduce if you leary about the heat, it is always easier to add a bit of you want more spice, start with 2 teaspoons)*
  • 8 cups of chicken broth
  • 2 cans of unsweetened light coconut milk
  • 1/4 cup cilantro, chopped
  • fresh bean sprouts
  • 2 limes, served on the side
  1. Saute the cubed chicken in a tablespoon of oil. 
  2. Add onion, garlic and red pepper and saute a 3 or 4 minutes
  3. Add the ginger and curry paste and stir fry that for another minute. 
  4. Add remaining ingredients except the shrimp and cilantro, simmer until the vegetable as barely tender but still have a bit of bit to them. 
  5. Add shrimp and cook until the shrimp is pink. Now add the cilantro.
When serving add the rice noodles to your individual bowl, add the soup, top with fresh bean sprouts for that added crunch and squeeze with fresh lime juice. Amazing! 

*The curry paste is sold in a rather large quantity and I don't use it that often so I freeze the curry paste in 1 tablespoon portions and store them in zip lock bags. 

'Mennonite' Spring Rolls - gluten free


My granddaughters commented on how they missed having Spring Rolls on their 'gluten free' diet and I got to thinking -- why couldn't I just use the Mennonite pancakes (crepes) instead  of the wheat wraps.   I tried it, and my girls love them - they said they actually prefer them to the 'real' thing.
So here is the recipe ..

For the wraps ...

  • 4 eggs 
  • 1/2 cup milk 
  • 1/4 cup water 
  • 3/4 cup Julie's flour mix 
  • 1/2 tsp salt 
  • 1/4 tsp xanthan gum 
  1. Put all ingredients into a bowl or large measuring cup and whisk thoroughly until perfectly smooth. 
  2. Heat skillet -- I used an 8" -- Melt a dab of butter tilting skillet to coat bottom. 
  3. Pour just enough batter into the skillet to cover the bottom, again tilting skillet. 
  4. Brown on one side , them flip to brown the other side. 
  5. Stack on plate. 

Filling 
  1. I didn't carefully measure my ingredients ... you could use your favorite spring roll filling ingredients. I used a mix of chopped fine, cooked chicken breast, green cabbage, grated carrots, onion greens, garlic and salt. 
  2. Toss ingredients in skillet with a bit of oil, cooking for a few minutes. 
  3. To create wraps ...  place a generous tablespoon on the wrap... turn up the bottom over it, fold in the sides, and then roll to edge. To make sure the edge sticks I sprinkled a little grated Parmesan cheese along the edge before rolling. See photo below. 
  4. Place wraps close together in baking pan and bake at 350 degrees for about 15 minutes. 
  5. These freeze well to reheat or put in lunches. 
Serve with your favorite dipping sauce or use below recipe.


Dipping Sauce 

  • 1/2 cup soy sauce 
  • 1/4 cup rice vinegar 
  • 2 tbsp peanut oil 
  • 1 tsp crushed garlic 
  • 1/2 crushed red pepper 
  • 1 tbsp. honey

    Mix all ingredients, pour into a jar and shake well to blend. 

Farmer's Loaf Dip


The first time I had this appetizer, it was pretty well devoured by the time I got to it, but breaking off the crust with even just a hint of the dip on it was so good I had to make it myself  not long after. The recipe comes from Dorothy who hosts many a party at the B&B she and her husband run. You can use a purchased French bread loaf or make your own, in the shape you like.

Dip ingredients for 1 loaf:

  • 1 long or round loaf of French bread (homemade recipe here - makes 2 loaves)
  • 2 - 8 oz pkgs cream cheese
  • 1 cup mayonnaise
  • 1 can crab meat
  • 1/2 cup bacon bits
  • 1/4 cup green onion, chopped
  • 1 cup cheddar cheese, grated
  • 2 tsp dill weed
serve with
  • 1 box bacon dipper crackers
  • bread, cubed
Method:
  1. With mixer, beat cream cheese and mayo well, then add the rest of the ingredients.
  2. Trim top layer off bread, then cut around inside crust, leaving about 1 inch rim, to create a boat or bowl. Scoop out bread all in one piece with your hand.
  3. Fill hollow with dip mix and put the lid back on. 
  4. Wrap in foil and bake 1 1/2- 2 hours at 350 F. 
  5. Unwrap and serve with crackers and bread. I had extra bread. Serves 12 (maybe more if the bowl gets cleaned up.

Chilled Raspberry Soup


We recently took an Alaskan Cruise and I really enjoyed the Chilled Raspberry Soup. There were a few culinary classes offered during our cruise and I couldn't resist taking them in. I asked the chef if I could share this recipe and she said: "of course...many people take this one home to share". 
It's a perfect hot summer's day soup to serve before the main course. 
  • 2 pints fresh raspberries, (or frozen and thawed) 
  • 2 cups sour cream
  • 1 cup whole milk
  • 1 cup ginger ale
  • 1/4 cup sugar
  • 2 tablespoons triple sec (or 2 tbsp orange juice if you want a non-alcoholic choice) 
  • 2 tablespoons freshly squeezed lemon juice
  1. Reserve 6 raspberries for garnish. 
  2. Use a blender or food processor to puree raspberries until smooth. 
  3. Over a non-reactive bowl strain pureed fruit through a cheesecloth or fine sieve to remove seeds. Discard seeds.
  4.  Whisk together remaining ingredients, and add in the pureed and sieved raspberries.
  5. Pour soup into a glass jar or bowl. Cover well and refrigerate until very cold.
  6. I like to place individual serving bowls in the refrigerator for about an hour before serving soup. Add chilled soup to chilled bowls. Garnish with remaining raspberries and serve immediately. 


Parmesan Crisps


I have seen these crisps in a magazine and on pinterest. And I remember trying something like this a long time ago. Now that I've made them again they will be appearing on my menu more often. This hardly is a recipe, it only has 2 ingredients.
You can leave them plain or add pepper or herbs to spice them up a bit. They could also be formed into different shapes. To save time you can spread the Parmesan on a pan and when baked and cooled you can break them up in smaller pieces. We really enjoyed them served with a salad. They would be good with tomato soup as well. They look like pretty lace. Your dinner guests will be impressed.
What shape would you form the cheese and what would you serve with them?
  • 1/2 cup Parmesan cheese, finely grated, you can do this in the food processor so the cheese is finer in texture.
  • 1/2 teaspoon black pepper, freshly ground (and/or herbs of your choice)
  1. Scoop Parmesan, 1 tablespoon per crisp, and place on a parchment lined pan. 
  2. Spread each mound of Parmesan to a 3 1/2" size round shape, making sure they are at least 1" apart.
  3. Bake in a 400º oven for 3 to 5 minutes until golden. Ovens vary so start checking your crisps at 3 minutes, keep careful watch. Mine were done at 4 minutes.
  4. Yield: 6 crisps

Bread For The Journey


Spring is here. It's a season of new growth, as we watch grass sprouting and blossoms bursting forth.
New life is exciting and that's just what we want to reflect upon today as we think of the new life that Jesus has promised each and everyone of us.

This past week I walked along the ocean shoreline alone, and I stopped many times to pause and ponder what Jesus would of  encountered on his last final walk to Jerusalem?
How would you respond to life if you knew you had one week to live?  Where did Jesus make his final stop? Jesus spent his last week in Bethany, located on the eastern slopes of Mount of Olives, a few miles from Jerusalem.  Mary, Martha and Lazurus were His best friends.  This was his favorite place of rest and refuge, just like any other human being He needed a safe spot,
While Jesus was in Bethany, he raised Lazarus from the dead.  Mary seemed to understand Jesus' words about his future death. Here we see Mary's extravagant gesture for Jesus as she poured her perfume over him.  What does that tell us?  Let's not miss the opportunity to share our affections for others.  Write that letter, make that apology, purchase that gift. Seize that moment.

This week while reading the story to my grandchild of Jesus' triumphant march into to Jerusalem on a donkey, I was once again reminded of the word pictures that have been used to illustrate His triumphant victory to all ages.  Why did he use a donkey?  A donkey is known to be of most insignificant of animals.  I've pondered over this, thinking whether it was difficult to give up a donkey?  Did the owner know that Jesus was to ride this lowly animal? What is God asking of us? We each have something that God wants from us.  Will it be significant?   Maybe we can make a meal, or write a cheque, or create a computer program.  Our gifts belong to God and how can we visually use these gifts for God in a daily way.  After all this donkey knew that Jesus needed a ride. And as Jesus rode down the path, crowds threw their coats on the ground, they cut branches from the trees and spread them on the road. They showed honor and respect as they cheered, just as you would welcome home any athletes returning from major sporting events, by participating in parades and honoring them by waving flags and cheering.


"Hosanna to the Son of David!,
 Blessed is he who comes in the name of the Lord!  
Hosanna in the Highest."  
Matthew 21:9

And how quickly those that had been there to welcome him, as King of the Jews, now turned on him and quickly demanded his death penalty. They believed that Jesus was there to save and rescue them. Many believed that he was going to overthrow the Roman empire.  They believed he would become their earthly king, but he had other plans. Jesus wanted to become King of their Hearts.
As we continue to walk along the journeys of our families and friends let's continue to share the stories of Jesus's heart for all those little ones.  Have we been hand-picked to care for someone who is empty and lost?  You may be their only source of HOPE!  We know that the heart of Jesus will never never give up on his children until they are found.  Jesus wants to become King of our Hearts.  Jesus came to bring new life for every man.  Let's embrace him today. 
  

How would you respond to life if you had one week to live?


Waldorf Slaw


Do you like a good coleslaw?  We sure do in our family.
This is a bit different take on coleslaw with more fruit, chopped pecans and
a vinaigrette dressing

  • 1/2 cup /toasted pecans,  coarsely chopped
  • 1/2 head of a small cabbage, finely chopped
  • 1/4 head of a small red cabbage, finely chopped
  • 2 apples, cored and finely chopped - we like Ambrosia or Gala
  • 2 ribs of celery, sliced
Dressing:
  • 7 tablespoons olive oil
  • 4 tablespoons white balsamic vinegar (I used an apple balsamic)
  • pinch of salt 
  1. Toss pecans in a dry frying pan, over medium heat, stirring until lightly toasted. Set aside.
  2. Combine all ingredients except pecans in a glass bowl so the pretty colours show through.
  3. Mix dressing until emulsified and pour just enough over coleslaw to coat the ingredients.
  4. Toss to mix.
  5. Just before serving, add pecans and toss again.

serves 8

Roasted Smashed Potatoes


These potatoes are crispy on the outside and amazingly tender on the inside...a great twist on the classic baked potato.  They are the perfect side dish for any meal and easy to prepare. 

  • 1 1/2 pounds small new potatoes (yellow or white potatoes work best)
  • 3 Tablespoons olive oil (use garlic-infused olive oil for added flavour)
  • coarse salt, to taste
  • black pepper, to taste 
  • 1 Tablespoon fresh herbs, minced (chives, rosemary, dill or whatever is growing in your garden)
  1. In a large pot, bring potatoes to a boil in salted water. Reduce heat and simmer until tender (about 15 minutes).
  2. Drain potatoes and cool slightly.
  3. Place on prepared baking sheet (lined with parchment or foil and brushed with olive oil).
  4. Gently flatten potatoes with the back of a lifter/spatula or a potato masher.
  5. Drizzle or brush tops with olive oil and season with salt and pepper.
  6. Sprinkle with fresh herbs.
  7. Roast in a 450° oven for 20 minutes or until golden brown and crisp. 
  8. Serve just as they are or top with sour cream and your favorite potato toppings.
Serves 4


Chicken Stromboli


These little pockets are so delicious. Once your family has tried these you'll be sure to have requests again and again.
  • enough pizza dough for 2 12" pizzas, divide all of this dough into 8 pieces.
  • 3 baked chicken breasts, cut into small bite size pieces
  • 2 cups grated mozzarella cheese
  • 8 tablespoons pesto sauce, from a jar
  • 8 tablespoons Alfredo sauce, from a jar
  • 1 egg, whisked to brush over pockets before going into oven.
  1. Using your favourite pizza dough or purchased dough divide into 8 equal pieces.
  2. Roll each into a ball and then roll out onto 6" rounds.
  3. Leaving at least an each around the edges free of filling spread each dough round with 1 tbsp of each the pesto and Alfredo sauce. 
  4. Divide the chicken pieces between the rounds and top with cheese.
  5. Pull up on dough and crimp edges together and place filled pockets onto a parchment lined baking sheet. 
  6. Brush tops with whisked egg, and slit tops several times with small pairing knife. 
  7. Bake at 375ºF for 20-25 minutes until browned nicely and filling is bubbly...and may be 'oozing' out a bit. 

Potato Carrot Mash


This is such a delicious way to serve mashed root vegetables. They are a perfect addition to roast beef. Use leftovers for a pretty shepherd's pie.
  • 5 medium sized potatoes, peeled and cut in 1" cubes
  • 3 large carrots, peeled and sliced
  • 2 tablespoons butter
  • 2 tablespoons cream cheese
  • 3/4 teaspoon salt
  • 1/4 teaspoon pepper
  • 1/2 cup milk, heated
  1. Boil potatoes and carrots in the same pot until fork tender.
  2. Drain and mash potatoes and carrots.
  3. Add butter, cream cheese, salt, pepper, and hot milk. Keep mashing until well combined.
  4. Yield: 8 servings

Pistachio-Coconut Cookies

These cookies are easy to make and would be fun for St. Patrick's Day as they turn out light green in color. It's a recipe that uses packaged cake mix and pudding mix.

Ingredients:
1 package white cake mix
1 package (4 serving) Jell-O instant pudding-pistachio flavor
1/2 cup oil
3 tablespoons water
2 eggs
1/2 cup chopped pistachios or nut of your choice
1/2 cup angel flake coconut (sweetened)

Preheat oven to 350 degrees.
Combine all ingredients in bowl.
Blend well.
Drop onto greased baking sheets or parchment lined sheets.
Bake at 350 degrees for 10 minutes or until lightly browned around the edges.
Store in tightly sealed container.
Makes about 3 dozen cookies.

Because of the size I chose for the dropper I only yielded 31 cookies from this recipe. It also took longer to bake them at the larger size and because I put two trays in the oven to begin with. My cookies were soft (the way I like them) with a nice blend of flavors. If you prefer a crispy cookie cook them a little longer.


Bread For the Journey


"Today I know that such memories are the key not to the past, but to the future.
I know that the experiences of our lives when we let God use them, become the mysterious and perfect preparation for the work He will give us to do."


As I read this quote recently, I paused to think of the wonderful and sometimes difficult memories that I have of days gone by and wonder how God will use my life my experiences from the past to do his work in days to come.  

The Hiding Place begins on such a celebratory note. They could not have imagined on the day that the Clock shop turned 100 years old that things would begin to change for them in terrible ways.    The ten Boom family were a Dutch Christian family that helped Jews escape from the Nazi Holocaust of WWII. 

What amazes me is how beautiful Corrie and Betsie remained in their faith with the Lord.  Though they lived through incredibly difficult, painful experiences in the concentration camp, they were rich  in wisdom and kind throughout their days.  God used them in ways they couldn't have ever imagined. After all these years, the wisdom of those two dear souls continues to challenge and encourage many people.

Whatever you are experiencing today, be rest assured that God uses all our experiences, both good and difficult for greater purposes and good, beyond anything we could imagine.

Psalm 119:114
You are my hiding place and my shield; I hope in Your word.


Ambrosia Trifle

This coconut and fruit filled trifle would make a lovely dessert for Easter. The cake turns our light and airy and can also be used as a sheet cake, layer cake or jelly roll. Using the cream mixture as the filling and frosting.
I'll let you in on a little secret. I was to bring a dessert to a friends 60th birthday tea and thought a spring like jelly roll would be a perfect choice. I baked this cake in my jello roll pan and had all the fillings ready to go. It's turned out perfect other times...but on this occasion the cake began to really crumble and rolling became impossible. Whatever you do, don't panic when this happens. Grab your trifle bowl, or any pretty glass bowl and turn your crumbling cake into a trifle masterpiece. It's your secret...unless you tell....as I did.

Cake:
  • 1 white cake mix
  • 3 large eggs
  • 1/2 cup coconut milk
  • 1 cup water
  1. Add all ingredients to a mixing bowl and mix well. 
  2. Pour batter into greased and parchment lined 9x13 pan.
  3. Bake as directed on cake mix box.
  4. While cake is cooling make the following filling.
Filling and Cream:
  • 1 8 ounce tub cool whip dessert topping
  • 1 cup sour cream
  • 1 1/2 cups fine sweetened coconut
  • 2 284ml cans mandarin orange segments, drained well
  • 1 398ml can crushed pineapple, drained well
  • 3 cups whipping cream
  • 1 teaspoon coconut extract (or vanilla extract)
  • 2 tablespoons white sugar
  1. Stir together cool whip, sour cream, coconut, oranges and pineapple. 
  2. Whip cream together with extract and sugar until stiff.
Assembling trifle:
  1. Cut cooled cake into cubes. 
  2. Layer the cake, filling and cream alternately into trifle bowl ending layers with the cream.
  3. Decorate with more sweetened whipped cream, a sprinkle of fancy coconut and mini coloured marshmallows, or decorate with fresh fruit. 
  4. Cover well and place in refrigerator for at least 6 hours or over night. 


Avocado Breakfast Bake for Two


We love breakfast at our place and with it being Flash back Friday I thought I'd bring back one of our favourites. The creamy texture of the hot baked avocado is complimented by the bacon and egg, that when cooked is almost the texture of a poached egg. Since posting this recipe back in 2012 I've had a few people say that they have a hard time tucking the bacon between the avocado skin and the meat of the avocado as shown in the first photo above. No problem! As shown in the second photo just bake the avocado with the egg in it as directed below, fry the bacon separately while the eggs bake, crumble and top the avocado and egg once baked. 

Ingredients: 
  • 1 ripe avocado, (but not overly soft)
  • 4 pieces of bacon
  • 2 eggs
  • 1/8 teaspoon paprika
  • salt and pepper to taste
  • green onions, thinly sliced, optional for garnish
Method:
  1. Cut avocado in half and remove seed.
  2. Fry bacon until lightly crisp, but still pliable. 
  3. Place avocado halves on the underside of a muffin tin, resting it between the inverted cups. This will hold it in place so it does not roll. (Cleaver guy!)
  4. Lightly salt and pepper avocado.
  5. Using a sharp knife separate the meat from the skin of the avocado, but still leave it in tact. 
  6. Cut bacon into 2" pieces and gently slide it between the meat and skin of the avocado and around the top edge.
  7. Break one egg over each bacon topped avocado, filling the hole.
  8. Sprinkle with the paprika.
  9. Bake in oven preheated to 375º for 20 minutes or until egg is cooked to your liking.
  10. Garnish with green onions and serve immediately with a slice of toast. 

Impossible French Apple Pie


As I explained last week when I posted Impossible Taco Pie....'impossible pies' are simply a combination of simple ingredients (usually including Bisquick) which are poured into a pie plate, and then form a magic crust during the baking process. Very easy. And delicious.  Today I am posting a sweet version of the impossible pie...and again I am using the biscuit mix recipe featured on this blog.

  • 5-6 cups tart apples, peeled and sliced (such as Granny Smith)
  • 2 eggs
  • 1/2 cup milk
  • 1/2 cup sugar
  • 1/2 cup 'biscuit mix' (or Bisquick)
  • 1 teaspoon cinnamon
  • 1/4 teaspoon nutmeg
  • 1 Tablespoon butter, softened
Streusel Topping:
  • 1/2 cup biscuit mix (or Bisquick)
  • 1/2 cup chopped pecans or walnuts
  • 1/3 cup brown sugar
  • 2 tablespoons butter
  1. Place apple slices in greased 9-inch pie plate. 
  2. Combine eggs, milk, sugar, baking mix, spices and softened butter in blender.  Blend until smooth...about 15 seconds. Pour over apple mixture in pie plate.
  3. In small bowl, mix all streusel ingredients until crumbly; sprinkle over filling.  
  4. Bake at 350°F for 45 minutes or until knife inserted in center comes out clean.  
  5. Serve warm with ice-cream or whipped cream.

Serves 8.  

And that is my 'throwback Thursday' contribution...a recipe from yesteryear!
 

Chocolicious Cookies


I opened my cookbook to check out my chocolate chip cookie options, when I took note of one called, Great Chocolate Cookies but decided to give it  a makeover. In reading it, you will probably guess at the changes. When the grands came over after school, and I told them the cookies needed a name, one of them responded with "Chocolicious!" So, hence the name, by a nine-year-old! I like that they come out a little like a brownie bite. These are nut free and great for school box lunch treats.

Ingredients:
  • 1/2 cup butter, soft
  • 1 cup brown sugar
  • 1/4 cup white sugar
  • 3 eggs
  • 1 teaspoon vanilla
  • 1 cup unbleached flour
  • 1 cup multigrain or whole wheat flour
  • 1 pkg (113 g/ 4 oz) instant chocolate pudding
  • 1 cup oats
  • 3/4 teaspoon baking soda
  • 3/4 teaspoon baking powder
  • 1 cup chocolate chips
Method:
  1. In large mixing bowl, cream butter and sugar well, then beat in the eggs and vanilla. 
  2. Add combined flour, pudding mix, baking powder, soda and oats;  then chocolate chips. (I use a stand mixer with hook attachment for quick, easy stirring)
  3. Drop by rounded teaspoons onto greased cookie sheets. They do not spread much. 
  4. Bake at 375° F for 8 minutes. Bake slightly longer if you make them larger, but do not overbake. Flatten slightly with spatula as soon as you remove them from the oven.  Let cool on sheets. Yield: 48 cookies

Honey Glazed baked Chicken Thighs

On a recent trip to Winnipeg to visit my sister Rhoda she made these delicious chicken thighs, and I think you'll love this simple, economical and flavourful recipe. 
  • 10-12 bone in, skinned chicken thighs
  • salt and pepper
  • 1/4 cup liquid honey
  • 1/4 cup brown sugar
  • 1/4 cup lemon juice
  • 1 tablespoon soy sauce
  • 11/2 teaspoon curry powder
  • 1 teaspoon cayenne
  1. If you have thighs with skin still on remove the skin and discard.
  2. Place thighs in a roasting pan and salt and pepper all sides.
  3. Combine remaining ingredients, stir and pour over chicken thighs.
  4. Bake covered in 350ºF oven for 50 minutes. Remove lid or foil cover and bake another 30 minutes.

Bread for the Journey

"Lighthouses don't fire cannons to call attention to their shining - they just shine."
        Dwight L. Moody

Jesus' life here on earth always pointed people to his Heavenly Father, who sent Jesus into the world as a light. In John 12:46 Jesus said, "I have come into the world as a light, so that no one who believes in me should stay in the darkness."

In the same way we who have seen the light and have received Jesus as our saviour are called to be like Him. We are not to conceal our faith, but to shine in this dark world, not to be noticed for who we are or what we do, but rather that others will see the True Light shining in and through us and be drawn to Him. Matthew 5:16 says, "In the same way, let your light shine before men, that they may see your good deeds and praise your Heavenly Father."

The ultimate purpose in being a light in this dark world is that our Heavenly Father be glorified.

Saturday in Lovella's Kitchen ~ Coconut Tarts


For my Saturday kitchen tip today I want to share these sweet little coconut tarts can come together in a few minutes if you have tart shells tucked into your freezer and a package of coconut pudding in your pantry.

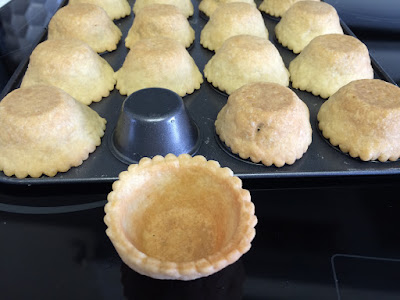
If you don't have time to make your own pastry you can use purchased tart shells.  Simply remove the little foil tart pans and drape  and shape them over your own upside down mini muffin pan as shown below.  It's a quick little trick to keep your tarts a perfect size for filling. 


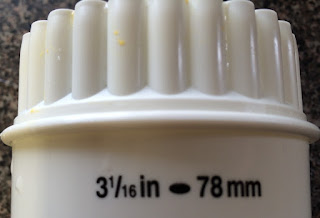
Use a 3 1/16 in / 78 mm cookie cutter, shape them over the back of a mini muffin pan and bake them.  Allow them to cool completely before removing them to fill.


  1. Bake empty shells  at 375 for about 10 minutes or until golden brown.
  2. Cook filling according to package directions or make Kathy's filling.  
  3. Stir for 10 minutes to cool and to avoid a skin from forming on the top.  
  4. Divide filling between tarts.  Chill.
Whipped Cream
  • 1 cup whipping cream
  • 1 package whipping cream stabilizer or 1 tablespoon instant vanilla pudding
  • 1 teaspoon vanilla (omit if using vanilla pudding to stabilize cream)
  • 2 tablespoons sugar
  1. Whip cream until soft peaks form.
  2. Add whipping cream stabilizer or instant pudding, vanilla and sugar.
  3. Beat until stiff peaks form.
  4. Using a piping bag, garnish each tart and then sprinkle with toasted coconut.
  5. Serve chilled.
  6. Best served the same day they are filled.  The cream filling will soften the shells.


Poppy seed Muffins - Gluten Free

For Flash-Back-Friday, I choose to re-post these poppy seed muffins with a few tweeks that improve the recipe - and a new photo.


Poppy seed for me triggers a childhood memory.
My grandparents lived in the adjoining farm to the one owned by my parents. Countless times I ran the length of the path connecting our two homes.
One of the flowers that immediately reminds me of my grandmother, is the poppy.
She always grew an abundance of the beautiful flowering plants.
I loved to watch the process of the flower forming the pod that grew and matured until the little holes formed around the rippled edge that allowed the ripe seed to shake out into my hand. I would beg Grandma for just one, please ! and usually I started begging before they were fully ripe!
I can still taste them!

I love these tasty muffins with a lemony poppy seed flavor.


Poppy Seed Muffins

  •  1 1/4 cup Julie's Flour mix  - or your own gluten-free mix.
  •  1/2 tsp xanthan gum
  • 1/2 tsp soda
  • 1 tsp. baking powder
  • 1/4 tsp salt
  • 2 rounded tsp. of poppy seed
  • 1/3 cup butter, softened to room temperature
  • 2/3 cup sugar
  • 1 egg 
  • 1 tsp vanilla 
  • 1 tsp. grated lemon rind
  • 2/3 cup yogurt or milk 
  • fresh lemon juice
  1. Mix dry ingredients and set aside.
  2. Place butter, sugar, egg, vanilla, lemon rind and milk in mixer bowl and beat well. 
  3. Add dry ingredients and beat until smooth 
  4. Pour batter into 12 muffin tins and bake for 25 min. at 350 degrees, or until test done.
  5. Remove from oven ..  cool slightly, then with a wooden skewer poke three holes in each muffin and using a teaspoon drizzle lemon juice over each muffin. 
  6. Serve warm or cooled, plain or with butter. 
****

Impossible Taco Pie


Do you remember the 'impossible pies' that were all the rage many years ago?  These could be sweet or savory, and were a combination of simple ingredients (usually including Bisquick) which were mixed together and poured into a pie plate, and would form a magic crust during the baking process. At the time, I had a basic biscuit recipe that I used as the base for many of these 'impossible pies'. I've recently tried a few of those recipes using the biscuit mix recipe on this blog with great results.  I'm sharing the first one with you today...on this 'throwback Thursday'!

  • 1 pound ground lean beef
  • 1 medium onion, chopped
  • 1 envelope Taco seasoning mix
  • 1/2 cup salsa (we prefer hot)
  • 1 - 12 oz /340 ml can sweet corn, drained
  • 1/2 cup red or green sweet peppers, chopped
  • 3/4 cup 'basic mix' (or Bisquick)
  • 1 1/4 cup milk
  • 3 eggs
  • 1 cup Monterey Jack or Cheddar cheese, grated
Instructions:
  1. Preheat oven to 400 degrees F.
  2. Brown ground beef and onion in a heavy skillet; drain off any fat. Stir in taco seasoning.
  3. Add salsa, corn and peppers and simmer for a minute or two.
  4. Spread in bottom of greased deep dish pie plate or 10" cast iron skillet.
  5. In a small bowl, combine the baking mix, eggs and milk. Beat well to combine and pour over meat mixture in pie plate.
  6. Bake for 30 minutes or until knife inserted at the center of the pie comes out clean.
  7. Top with cheese and bake an additional 5-10 minutes. Let stand 5 minutes before slicing.
  8. Serve with shredded lettuce, tomatoes and a dollop of sour cream. 
  9. Serves 4-6

What are your memories of the 'impossible pies' of yesteryear? I'll be posting another version next week.

Peanut Butter Cheesecake


I just love peanut butter.  I love it even more with a bit of chocolate.  This cheesecake will be sure to please the peanut butter lovers in your home.

Crust Ingredients
  • 2 cups Graham Cracker Crumbs
  • 1/4 cup sugar
  • 1/4 cup unsweetened cocoa
  • 1/3 cup butter, melted
Filling Ingredients
  • 4 packages (250 grams / 8 ounce) Cream Cheese, softened
  • 1 1/4 cup sugar
  • 3/4 cup smooth peanut butter (not natural)
  • 2 teaspoons vanilla
  • 4 eggs
Topping Ingredients
  • 1/2 cup mini peanut butter cups (cut into half)
  • 1/2 cup mini snicker bar bites (cut into half on the diagonal)
  • 1/4 cup peanut butter
  • 1/4 cup chocolate chips
  • 1 cup whipping cream, whipped to soft peaks with 1 tablespoon sugar

  1. Preheat oven to 350.
  2. Combine crust ingredients in order listed. Press into the bottom and onto the sides of a 9 inch springform pan. Set aside.
  3. In a stand mixer, beat cream cheese and sugar until smooth.  Add peanut butter and vanilla and beat together to combine.
  4. Add eggs one a time, beating on low speed until they are all combined.
  5. Pour filling into prepared crust.
  6. Bake for 50 - 60 minutes.  Filling should still be jiggly in the center. 
  7. Remove from oven and cool to room temperature.  Refrigerate until thoroughly chilled.
  8. Remove the sides and base from the cheesecake and place on a serving plate. (It helps to use a cookie sheet that has no sides to slide under the cheesecake to transfer to serving plate)
  9. Place the peanut butter and chocolate chips into separate zip loc bags and melt in the microwave.
  10. Cut the tip of the bags and drizzle over cheesecake. Let set in refrigerator
  11. Cut into serving pieces.  (wash sharp knife off between each cut to keep it neat)
  12. Pipe whipped cream on each piece of cheesecake.
  13. Arrange chocolate bar pieces over each piece.
  14. Chill


Spicy Black Bean Flautas


Ideas for this recipe come from Peas and Crayons. I had to try them, as I love anything with black beans and corn. Even though I ended up making them quite spicy (posted recipe is calmed down) we loved them! Flautas is the given name for these tightly wrapped and filled flour tortillas. If you wrap them as corn tortillas they would be called taquitos.  Traditionally they would be deep fried, but these are baked. Tell me you didn't learn something new. 

Ingredients:

  • 10 - 12 small flour tortillas (7 inch)
  • 1 cup black beans
  • 1 cup steamed corn
  • 2 Tbsp parsley, chopped fine
  • 1/2 fresh jalapeno, chopped fine (optional) 
  • 1/2 tsp cumin
  • 1 1/2 cups Mexican blend cheese, divided
  • 3 Tbsp mayonnaise
  • 1 - 3 tsp Sambal Oelek chili paste (depending how much spice you like)
  • oil for spraying and brushing
Method:
  1. Preheat oven to 400 F
  2. Line a baking sheet with foil or parchment paper and spray with oil
  3. Combine beans, corn, parsley, jalapeno, cumin and 11/4 cups cheese
  4. Mix mayonnaise and Sambal; spread about a rounded tsp on each tortilla. 
  5. Spoon about 2 rounded tablespoons of bean mix on each tortilla, then wrap. I fold over in half, tuck tight and roll. Lay side by side on prepared pan. You can stick a toothpick in them if that makes it easier.
  6. Brush with olive oil and sprinkle lightly with cheese.
  7. Bake for about 12 minutes until golden. 
  8. Serve with guacamole, salsa and sour cream.


These can be cut in half and served as appetizers, but for us they serve as a meal. Serves 4 - 6 as an appetizer