Mennonite Girls Can Cook is a collection of recipes which were posted daily for a period of ten years from 2008 to 2018. We have over 3,000 delicious recipes that we invite you to try. The recipes can be accessed in our recipe file by category or you can use the search engine.

Recipe Search

Apple-Raspberry Bars

Today is Halloween and I'm sharing a treat instead of a trick. These bars have a nice shortbread like base with an almond flavor. I saw this recipe in my grocery store flyer and cut down on the sugar and spices from the original recipe.

Ingredients:
  • 1 cup all purpose flour
  • 1 cup almond meal
  • 1/2 teaspoon salt
  • 1/2 teaspoon baking powder
  • 2/3 cup + 1 tablespoon sugar
  • 1/2 cup butter, melted and cooled
  • 1 egg
  • 1 teaspoon lemon zest
  • 1/4 teaspoon almond extract
  • 2 large apples, cored, peeled, and sliced very thin
  • 6 ounces raspberries
  • 1/4 teaspoon cinnamon
  • 1/8 teaspoon nutmeg

Method:
  1. Preheat oven to 375 degrees F.
  2. Grease a 9x9 inch baking dish.
  3. In large bowl, whisk together the flour, almond meal, salt, baking powder and 1/3 cup of the sugar.
  4. In small bowl, whisk melted butter, egg, lemon zest, and almond extract until smooth.
  5. Pour this mixture over the flour mixture and work with hands to make a soft dough.
  6. Pat 2/3 of the dough in pan, pricking it all over with a fork.
  7. Bake until browned, 15-20 minutes.
  8. In large bowl, toss fruit with spices and 1/3 cup sugar.
  9. Drop the sugared fruit evenly over the bottom crust that has just browned.
  10. Crumble remaining dough on top of the fruit.
  11. Sprinkle with remaining 1 tablespoon of sugar.
  12. Bake until top is golden brown, 30-35 minutes.
  13. Cut into bars.
  14. Store any leftovers in airtight container.
Yield: 9-12 bars


Beef Cabbage Stew


It's the season for comfort food and cabbage is one of those foods. This is a hearty stew that is wonderful served with fresh rolls on a cold day. This stew is a little spicy although I found it just right for my palate. I think this recipe would work well in a crock pot too.
  • 1 pound lean ground beef
  • 2 celery stalks, chopped
  • 1 small onion, chopped
  • 1 1/2 cups beef broth
  • 4 cups green cabbage, chopped
  • 1 large carrot, chopped
  • 1 can 540 ml / 19 oz kidney beans
  • 1 can 398 ml / 14 oz diced tomatoes
  • 1 cup tomato sauce, I used a hot and spicy sauce
  • 1 tablespoon chili powder
  • 1/2 teaspoon salt
  • 1/4 teaspoon pepper
  1. In a large sauce pan over medium heat cook beef, celery and onion and cook until lightly browned. 
  2. Add the rest of the ingredients and bring to a boil. Reduce temperature to low and simmer for 1 1/2 hours or until cabbage and carrots are tender. 
  3. Serve with warm rolls.
  4. Serves: 6 - 8 

Bread for the Journey


Trust in the Lord with all your heart,
do not depend on your own understanding.
Seek His will in all you do and
He will show you which path to take.
Proverbs 3: 5,6 (The New Living Translation)


I am sure these verses are familiar and a favorite for many of you as well.
I used this passage when I got baptized many years ago,
and still find great comfort in those words, but also challenging at the sametime. 
As I look at the picture I see a path I have never been down before
and I can't help but wonder what unknowns await me as I walk down it. In many ways it is just like the paths we choose in life. We don't know what lies ahead.  
Regardless of what awaits me, I need to completely rely upon God's wisdom, truth, goodness, grace and power for direction to help navigate that path. 
 I still lean too much on my own understanding more often than I care to admit to myself which leads to confusion and self doubt. I can't possibly navigate through life on my own strength and power. I have tried that and it leaves me feeling weak and at times barely able to stay afloat. I am still learning after all these years of being a Christ follower to actively seek His will in my life. That is a daily choice I must make.
Isn't it is just better to do that from the start, to follow His wise counsel through scripture and prayer believing He is able to to what is best for me?

Lord, create in me a heart that desires you more than it desires my own 
selfish understanding of things. May I always seek you in 
all I do to glorify only you and not myself.  Amen

Caramel Chocolate Sheet Cake - Flashback Friday


For Flash Back Friday, I'm featuring a cake I've made for two events in the past few months.
Both times it's proved so popular that I've had numerous requests for the recipe.
After all, a cake with a dense chocolate base, creamy caramel filling
 and topped with whipped cream and crunchy candy - what's not to love?
Please read the recipe through before making it.

For the Cake:
  • 1 cup margarine
  • 6 tablespoons cocoa
  • 1 cup hot water
  • 2 cups sugar
  • 1 teaspoon baking soda
  • 1/2 teaspoon salt
  • 1 teaspoon vanilla
  • 2 cups flour
  • 2 eggs beaten
  • 1/2 cup sour cream
For the Caramel Sauce:
  • 3/4 cup margarine
  • 3/4 cup brown sugar
  • 3 tablespoons. corn syrup
  • 1 can sweetened condensed milk
For the Topping:
  • 1 1/2 cups Whipping Cream
  • 2 tablespoons instant vanilla pudding (to stabilize the cream)
  • 2 or 3 Skor Chocolate Bars or another crunchy brittle style chocolate bar.
  1. Melt margarine, add cocoa and hot water and bring to a boil.
  2. Remove from heat and set aside.
  3. Measure sugar,baking soda, salt, vanilla and flour into a large mixing bowl.
  4. Add hot mixture to dry ingredients and beat until smooth.
  5. Add beaten eggs and sour cream and mix well.
  6. Spread in a  greased and floured 10x15 inch pan - or line with parchment paper.
  7. Bake at 350 degrees F for 20 minutes or until done. 
  8. Meanwhile prepare Caramel sauce.
  9. Melt margarine.
  10. Add brown sugar, corn syrup and sweetened condensed milk.
  11. Stir constantly as you bring it to a boil.
  12. Cook for 2 minutes while continuing to stir. Watch carefully as it scorches easily.
  13. Remove cake from oven, let sit for 5 minutes. 
  14. Poke holes in cake with meat fork about 1/2-1 inch apart.
  15.  Spoon about 1/2 of the caramel sauce over the cake, filling all the holes.
  16.  Let remaining sauce cool to spreading consistency. Then spread remainder of sauce over cake.
  17. When cake is completely cool, whip 1 1/2 cups heavy cream,
  18. Spread over caramel layer.
  19. Crumble  Skor bars and sprinkle over cream layer.
  20. Store in refrigerator until serving. Serves 15. Don't plan on leftovers!
**Both times, I baked the cake well ahead of time and froze it.
Freeze the cake after spreading the caramel mixture.
Leave in Freezer until a couple of hours before serving time.  Whip cream, spread over caramel and sprinkle the Skor bar crumbles just before serving.
** Note: If you freeze it with the Skor bits on it, they will not be crunchy when thawed.

   Bev

Christmas Cake


Some things take time and Christmas cake is one of those things.
I remember my mom gathering all the ingredients for Christmas cake and stirring together a big bowl of jewel like glazed fruits. This usually took place during October. Once baked and well wrapped the little cakes were put into a cool place until the Christmas season. Mom would sometimes wrap up a cake in brown paper, tie it with a ribbon and give it as a gift.
This recipe has no nuts in it and there is no brandy in the cake, but there is a step in the directions that calls for dipping cheesecloth in apricot brandy and then wrapping each cake it the cheesecloth. The brandy helps to preserve the cake, but you can omit this step.
You still have time to bake Christmas cake.

  • 2 3/4 pounds raisins (approx. 7 cups)
  • 2 pounds glazed cherries, cut in half (I like to use the mixed red and green ones)
  • 2 3/4 pounds glazed mixed fruit
  • 1/2 cup pineapple juice
  • 1 1/2  cups flour
  1. In a large bowl stir together all fruit.
  2. Drizzle pineapple juice over fruit.
  3. Add flour and stir to dredge the fruit. 
  4. Set mixture aside.
  • 2 1/2 cups margarine, room temperature
  • 1 cup golden corn syrup
  • 1 cup apricot jam
  • 12 large eggs
  • 4 1/2 cups flour
  • 4 teaspoons baking powder
  • 2 teaspoons salt
  • 2 teaspoons cinnamon
  • 1 teaspoon cloves
  1. Cream margarine. Add syrup and jam and mix well.
  2. Add eggs one at a time and beat well.
  3. Sift dry ingredients together. 
  4. Mix into creamed mixture.
  5. Pour creamed mixture over fruit and stir with a wooden spoon until fruit is well incorporated into the creamed batter. 
Preparing pans:
  1. As you can see in the photo I am using very old cake pans. They are thin with a removable bottom. You can use any pans or even soup tins, but you do need to still follow the instructions for lining pans. 
  2. Line pans with 3 layers of brown paper. I cut clean brown bags for this.
  3. Next cut parchment paper and line the whole pan. The cake will bake on the parchment. The brown paper helps to prevent burning and makes for even baking.  
  4. Divide the batter between the pans. Level with the back of a spatula. 
  5. Heat oven to 275ºF. Place a pan of water on the bottom shelf of oven. This is very important as it helps to keep the cake moist. 
  6. Place cakes on middle rack in oven. Bake for 5 hours. 
  7. After 2 hours in the oven, lay a piece of brown paper, or parchment paper with tin foil over it to prevent over browning. 
  8. Add more water to water pan if it dries out during baking.
  9. Once baked, cool cakes in pans.
  10. When totally cool, remove cakes from pans. Remove brown paper and parchment.
  11. Cut each cake into 4.
  12. Optional step: cut a sheet of cheese cloth into pieces that will wrap around each cake. Pour enough apricot brandy over the pieces of cheese cloth and let soak. Wrap each piece of cake in a single layer of brandy dipped cheese cloth. Wrap as you would a gift. 
  13. Now wrap each cake in saran wrap. If you have used the cheese cloth wrap saran right over it. If not just wrap cake. Now wrap all cakes once more in saran.
  14. After double wrapping in saran, wrap each cake in foil. 
  15. Store in a container (I used cookie tins, but you could use a box or Tupperware) Place in a cool place where temperature stays even, or in the refrigerator. 
  16. Allow cake to 'rest' for at least 6-8 weeks. After this freeze or keep in refrigerator. 

Cakes wrapped in cheesecloth. 


Meringue Rhubarb Squares - Gluten Free


I froze my rhubarb this year following a 'trick'  told to me by my aunt who heard it from a friend who grows a field of rhubarb. Instead of cutting up the rhubarb before freezing, I froze the whole stalks.  I found that following this method the rhubarb did not have the tendency to form ice around the pieces and cutting up the frozen rhubarb just before using was like it was fresh!

I adapted this recipe from my friend Gwen's recipe. It is indeed a delicious dessert and while it has three steps/layers it is not difficult to make, nor does it take long. It is so good!!

For the base ...
  • 1 1/2 cups Julie's flour 
  • 1/2 teaspoon xanthan gum 
  • 3/4 cups butter 
  • 2 teaspoons sugar 
For the filling ...
  • 4 cups chopped rhubarb 
  • juice of one orange
  • 1/4 cup potato starch or cornstarch 
  • 1 1/2 cups sugar
  • 4 beaten egg yolks
For the meringue ...
  • 4 egg whites 
  • 1/4 teaspoon cream of tartar
  • 1/4 cup sugar  
  1. Prepare the crumb base. Since my wrist is often painful (rheumatoid arthritis) and using a blender difficult,  I put my flour and butter in my mixer and mix it until it forms fine crumbs.  So painless! 
  2. Press crumbs firmly into a 9 x 12 pan and bake at 350 degrees F for 15-20 minutes. 
  3. Put rhubarb pieces, sugar, starch , orange juice into saucepan and cook, stirring until mixture thickens. 
  4. Remove from heat, and add the beaten egg yolks. 
  5. Cool slightly and spread onto baked base. 
  6. Whip egg whites with cream of tartar and sugar until stiff, then spread over filling 
  7. Return to oven for 15 minutes (If meringue isn't golden,  turn on the broil element for a few minutes but watch dessert carefully. It won't take long for it to brown) 
  8. Remove from oven and cool - the base firms up nicely after it is cooled.  My husband likes this dessert warm , but I find the base crumbles before it is cooled  - my husband doesn't mind that., but I prefer the pieces to lift out nicely from the pan.  

Beef Stroganoff ~ easy and economical


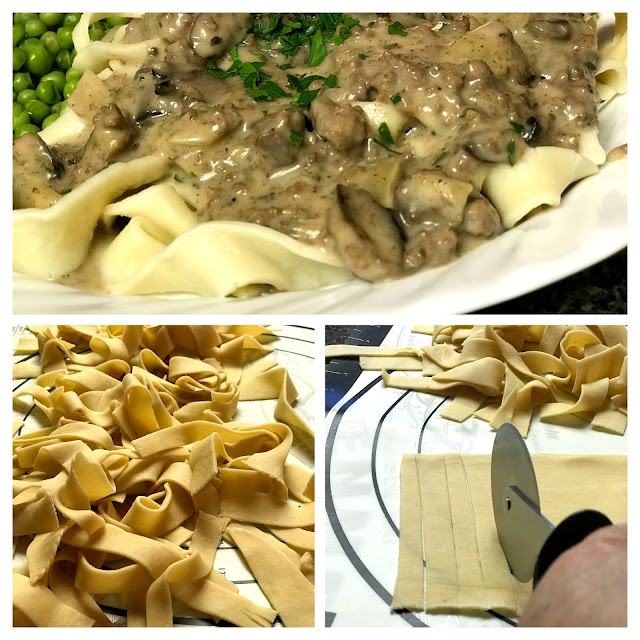
This easy hamburger stroganoff has been a favorite in our home for many years.  I typically make it when the weather changes in Autumn. It is a comfort meal for us.  You can buy your own noodles or try your hand at making rustic random sized noodles that really are delicious and very inexpensive to make. If you buy your noodles the dish becomes quick and easy! 

Noodles
  • 3 large eggs
  • 2 cups flour
  • 1/2 teaspoon salt
  1. Combine the flour and salt in a large mixing bowl.  Make a big well in the center of the flour and crack the eggs into the well.  Stir with a fork, incorporating the flour until you have a shaggy dough.
  2. Turn the dough onto a counter and knead the dough until it is smooth.  If the flour doesn't quite want to completely knead in, that's okay, just leave the excess flour.  The amount of moisture you will need depends on the size of the eggs and the humidity in the kitchen.  
  3. Wrap the dough in plastic wrap and let rest for at least 30 minutes.  You can make the dough a day ahead and refrigerate it.
  4. If you have a pasta roller, use it to roll the dough thin, starting with a wider setting and running the dough through, changing the setting each time you run it through, making the space narrower until you have the dough noodle thin.  
  5. If you are rolling your dough with a rolling pin, flatten it as well as you can with the heel of your hand, and then roll it with a rolling pin on a floured surface.  
  6. Use a pizza wheel or sharp knife to cut the noodles about 3/4 inch wide or however you prefer.  They do not need to be sliced too uniformly but should be similar so that they cook properly.
  7. Once the stroganoff is started, put a large pot of salted water on to boil.  
  8. When the stroganoff sauce is ready to serve, boil the noodles for about 2 minutes.  Test them in between to cook to your preference. 
Beef Stroganoff
  • 3 tablespoons butter
  • 2 cups sliced mushrooms
  • 1 large onion, diced
  • 2 cloves garlic, minced
  • 1 pound lean ground beef
  • 1/4 cup flour
  • 1 tablespoon Worcestershire sauce
  • 1 1/2 cups unsalted chicken or low sodium beef broth
  • 2 teaspoons beef bouillon base 
  • 1/2 cup chopped parsley
  • 1 cup sour cream
  • salt and pepper to taste
  • additional chopped parsley for garnish
  1. In a large skillet or dutch oven, melt butter over medium heat. Add mushrooms and onion and garlic to the pan and cook until the mushrooms have released their moisture and onions are translucent.
  2. Remove mushrooms and onions from pan and set aside. 
  3. In the same pan, scramble fry the ground beef until browned.  Add the onion and mushroom mixture back into the pan and add the flour, stirring a minute until the flour is well incorporated.
  4. Add the Worcestershire sauce, the broth, bouillon base, and parsley.
  5. Stir occasionally while the sauce comes to a simmer.   Simmer 10 minutes.
  6. Add the sour cream and heat through but do not bring to a boil.
  7. Season to taste.  Garnish with chopped parsley.
  8. Serve over hot noodles. 

Warm Caramel Banana Cake


I was looking for something to make with some over-ripe bananas, when I came across an old recipe in my handwritten notebook, called brown sugar cake. I decided to add the mashed bananas and the rest is history. This moist cake with a broiled caramel and nut topping is quite irresistible and the perfect fall dessert with ice cream or whipped cream.

Ingredients:
  • 1/4 cup butter, soft
  • 3/4 cup brown sugar
  • 1 egg
  • 1 teaspoon vanilla
  • 2 bananas, mashed *
  • 1 cup flour
  • 2 teaspoons baking powder
  • 1/2 teaspoon baking soda
  • 1/4 teaspoon salt
  • 1/3 cup milk or buttermilk
broiled icing
  • 1/3 cup butter
  • 2/3 cups brown sugar
  • 1/4 cup cream (coffee cream or sour cream is fine) 
  • 1/2 cup chopped nuts (I used pecans)
  1. Preheat oven to 350° F. Grease an 8 or 9 inch square pan.
  2. Beat butter and sugar until creamy. Beat in egg and then the mashed bananas and vanilla.
  3. Combine dry ingredients and stir into wet. 
  4. Stir in the milk or buttermilk. 
  5. Spread into prepared pan and bake 30 minutes or until toothpick tests done.
  6. Meanwhile, mix icing ingredients together in a saucepan and bring to boil. Cook 1-2 minutes.
  7. Remove from heat and stir in nuts. Set aside
  8. When cake is done spread hot cake with icing and return to oven on broil setting for 2-3 minutes, watching to be sure it doesn't burn. It will bubble and turn a dark caramel color.  Serve warm or cooled. Serves 9

*So you know, you can omit the bananas and call it Brown Sugar Cake.

Bread For the Journey


In the past few weeks, God has been speaking to me about peace;
in particular, the many times I do not feel peaceful.
Times when I am upset with my husband, when I worry about my children, 
when I am afraid of what the future holds. 

The Bible assures me that through Christ's death I am granted peace with God 
upon my acceptance of salvation. 
I know that in my heart, so why don't I always experience this peace? 

In Ephesians 6 Paul uses the armour a Roman soldier would wear to illustrate how we as Christ followers 
need to prepare ourselves for battle with the enemy.
One part of that armour that I've never paid much attention to until recently is the footwear.  
Paul says, "our feet need to be fitted with the readiness that comes from the gospel of peace." 
Ephesians 6:15 NIV

What part does footwear play in battle?  If we want to stand firm, we need shoes that grip,
if we don't want to lose our balance, our shoes need to provide good support,
when the terrain of a battlefield is rocky and uneven, we need shoes that give our feet protection
and when we are part of a defense line
we don't want to slip and fall thereby providing the enemy a way through our defense.

So what does peace have to do with battling the enemy?
When I am discontented, anxious, or fearful my state of mind and heart is far from peaceful. 
In fact it is a good indication that the enemy is making a successful assault on my life. 
 I may have peace with God but I am not experiencing the peace of God.

Isaiah 26:3 says, 
"You will keep him in perfect peace, 
Whose mind is stayed on You.  Because he trusts in You."

How do I keep my mind stayed on God?  How do I access the peace God promises?

  By always rejoicing in the Lord, by being gentle with others, 
by bringing everything to God in prayer, by trusting Him
 and by thanking Him.( Philippians: 4:4-7)

This brings the Perfect Peace that guards our hearts from Satan's darts,
strengthens us in the most disheartening circumstances,
and  unifies us as believers.

Flash Back Friday ~ Frosted Pumpkin Donuts


For flash back Friday I'm bringing back this recipe for pumpkin donuts. We bought a number of pumpkins from a 'pumpkin farmer' last week. I baked and pureed them. There is nothing like fresh pureed pumpkin. It freezes well, I thaw it in a sieve over a bowl to remove most of the liquid.
 I still have a few pumpkins to bake and puree. I like to be stocked up for winter.
  • 2 eggs
  • 1 cup sugar
  • 2 tablespoons softened butter
  • I cup cooked pureed pumpkin 
  • 1 tablespoon lemon juice
  • 4 cups white flour
  • 1/2 cup whole wheat flour
  • 2 teaspoons baking powder
  • 1 teaspoon baking soda
  • 1/2 teaspoon salt
  • 1/2 teaspoon ground cinnamon
  • 1/2 teaspoon ground nutmeg
  • 1 cup evaporated milk
  • Oil for deep frying
  1. In a mixing bowl beat eggs, sugar, and butter until creamy.
  2. Add pumpkin and lemon juice, mix well. 
  3. Combine both flours, baking powder, baking soda, salt, cinnamon, nutmeg, and add to pumpkin mixture alternately with milk.
  4. Cover and refrigerate for 2 hours or overnight. Turn onto floured surface and knead 5 or 6 times using extra flour as needed but the dough will still be a bit sticky. Only use enough flour to roll out your dough that it doesn't stick to your surface.
  5. Roll dough to approx 3/8" thickness and cut with a donut cutter.
  6.  Place cut donuts on cookie sheets until ready to fry. I like to spray the cookie sheets with cooking oil before placing donuts on them so they don't stick when you lift them to place in your hot oil.
  7. In a skillet heat oil to 375º. I test to see if it's hot enough by putting a 'donut hole' in the oil and if that rises to the top immediately you know the oil is hot enough. Fry donuts, a few at a time until golden, approximately 3 minutes, turn once and remove with slotted spoon and drain on paper towels to soak up excess oil. 
  8. Once cooled spread donuts with your favorite frosting. This time I used buttercream frosting with maple favoring. Top with sprinkles of toasted pecan bits. Crushed peanuts or toffee bits sprinkled on top is also delicious.
  9. Yield: 2 dozen donuts 

Cabbage and Sausage Foil Pack Dinner


Foil packet dinners are easy to prepare and clean-up, and are not just for camping; they can be baked in the oven year-round.  Cabbage and sausage were meant to be paired, and here is a simple and tasty way to serve them up for dinner tonight.

  • 1/2 small head cabbage, cut into 3/4" or 1" wedges
  • 1 pound farmer sausage, sliced (or your favorite smoked sausage)
  • 20 nugget potatoes, cut in half 
  • 1 small onion, sliced
  • garlic butter
  • salt and pepper
  1. Preheat oven to 375°F.
  2. Prepare 4 pieces (12" x 18") of heavy-duty foil.
  3. Divide cabbage wedges, potatoes and sausage slices evenly on the four pieces of foil.
  4. Top each mound with a dollop of garlic butter and season with salt and pepper.
  5. Seal each packet well.
  6. Bake for 1 hour, or until veggies are tender. 
Serves 4


Cheddar Cheese Crisps


It's the time of year where it's nice to bring out a few extra snack ideas.  I received this recipe years ago from a friend and always loved it, but you know how it is, things get shuffled around and l lost it.  Thanks, Hilda for sharing this recipe with me again.   It's tasty, simple and easy to make and I don't think you will have any leftovers.

Cheddar Cheese Crisps
  • 1 3/4 cups flour
  • 1/4 cup yellow cornmeal
  • 1/2 teaspoon baking soda
  • 1/2 teaspoon sugar 
  • 1/2 teaspoon salt
  • 1/2 cup butter
  • 1 1/2 cup cheddar cheese
  • 1/2 cup cold water
  • 2 tablespoons white vinegar
  • coarsely ground black pepper
Instructions
  1. Preheat oven to 375° F
  2. Mix flour cornmeal, baking soda, sugar, and salt into large mixing bowl.
  3. Cut butter into mixture till it resembles coarse crumbs.
  4. Using a fork, stir in grated cheese, vinegar, and cold water just until mixture forms a soft dough.
  5. Shape into a ball and put into a sealed bowl, and refrigerate for one hour or until dough is firm enough to handle. (or place it in the freezer for 30 minutes)
  6. Roll dough out on lightly floured surface, paper thin.
  7. Sprinkle with pepper and roll the pepper into the dough. 
  8. Cut into whatever shape you want. Jagged edges add character.
  9. Bake cheese crisps for about 10 minutes or until brown and crisp.
  10. Remove to wire rack to cool and store in a tightly covered canister.

W.O.W. Raisin/Peanut Cookies


W - wonderful flavor
O - omit gluten and lactose
W - winning chewy texture

I LOVE these cookies. Even my husband who is not a cookie lover reached for the second one!

  • 1 cup Julie's flour mix + 2 tablespoons
  • 1/2 teaspoon xanthan gum
  • 1/2 teaspoon baking soda 
  • 1/2 teaspoon salt 
  • 1/2 cup brown sugar 
  • 1/4 cup white sugar 
  • 1/2 teaspoon cinnamon
  • 2 ounces cream cheese 
  • 6 tablespoons soft butter 
  • 1 egg 
  • 1 1/2 teaspoon vanilla extract
  • 3/4 cup raisins 
  • 3/4 cup peanuts 
  1. Put softened butter, sugars, cream cheese in bowl of mixer and beat until fluffy, Add egg and beat well. 
  2. Mix dry ingredients together and mix into butter mixture. 
  3. Add raisins and peanuts 
  4. Chill for a few minutes - can keep in fridge for a day or two but will then need to be warmed to room temperature to soften again. 
  5. Drop by teaspoon into parchment-lined cookie sheet and bake at 350 degrees F for 11 minutes. 
  6. Remove from pan onto wire rack and cool 
  7. These cookies keep well .

Spaghetti Squash in a Crock pot

If you are anything like me you find cutting into a squash difficult and hope to not get a good cut in the process. This fall my sister Rhoda gave me the wonderful suggestion of baking a spaghetti squash whole in a crock pot. All you have to do is poke a knife into several places as you would a baking potato and place it into your crock pot. Turn it onto high and let it cook for 2-4 hours depending on the size. The one pictured took 2 1/2 hours. 

To test if it's done insert a knife. It will slide in very easily when cooked.
It's very hot so you will have to be careful and lift it out with 2 pot holders as it's also a wee bit soft. Place on cutting board.


Using a long sharp knife you will now we able to easily cut the squash in half.

While it's still hot scoop out all the seeds and pulp and discard.

Take a fork and pull the spaghetti like strands away from skin. You can leave it in the shell to serve or scoop into a bowl. Eat plain, or with a wee bit of butter, salt and pepper, or here is a very tasty way to add some great flavour to spaghetti squash. Spaghetti squash is also a great alternative to pasta, just top it with your favourite sauce and serve. 

Bread For The Journey


Photo Credit: Kayla Krahn

When I read Psalm 23 I like to read it in the King James version. Maybe it's because that is how I memorized it years ago. No matter what version you read these are wonderful words of encouragement and comfort for us in our time of need.

Psalm 23(KJV)

The Lord is my shepherd; I shall not want.
He maketh me to lie down in green pastures: he leadeth me beside the still waters.
He restoreth my soul: he leadeth me in the paths of righteousness for his name's sake.
Yea, though I walk through the valley of the shadow of death, I will fear no evil: for thou art with me; thy rod and thy staff they comfort me.
Thou preparest a table before me in the presence of mine enemies: thou anointest my head with oil; my cup runneth over.
Surely goodness and mercy shall follow me all the days of my life: and I will dwell in the house of the Lord for ever.

Pumpkin Swirl Cheesecake with a Gingersnap Crust


This dessert is perfect for fall, especially if you love pumpkin but can't decide between pie and cheesecake.
The texture and flavor are perfect with the creamy filling and crisp gingernsap crust.

Gingersnap-Walnut Crust
  • 1 cup gingersnap crumbs
  • 1 cup graham wafer crumbs
  • 1/2 cup walnuts 
  • 1/4 cup sugar
  • 1/3 cup melted butter
  1. Combine all the ingredients and press into the bottom and 1 inch up the sides of a 10-inch springform pan.  Bake in a 350 F. oven on the center rack for about 7 minutes or until the crust is fragrant.  
  2. Remove from oven and cool while making the filling. Once cool, wrap the bottom and the edges of the pan in foil to catch any drips that might escape the pan. Leave oven on at 350 F.
Pumpkin Swirl Filling
  • 3  8 ounce/250 gram packages cream cheese, softened
  • 1 1/2 cups sugar
  • 3 tablespoons flour
  • 6 eggs, room temperature (divided)
  • 1 1/2 teaspoon vanilla
  • 1 teaspoon cinnamon
  • 1/2 teaspoon ginger
  • 1/4 teaspoon nutmeg
  • 1/8 teaspoon cloves
  •  15 ounces / 2 cups  pure pumpkin puree
  1. Place a large pan of hot water on the bottom rack in the oven.
  2. Beat cream cheese in a large bowl with a mixer until smooth.  Add sugar and flour and beat until smooth.  
  3. Turn mixer to lowest speed add the vanilla and then five of the eggs one at a time, until all five eggs have been added.  Measure 2 1/2 cups of batter and place in another bowl. 
  4. To the remaining batter add the last egg and all the spices and the pumpkin.  Stir slowly until combined. 
  5. Put 1/2 of the pumpkin cheesecake mixture into the cooled crumb crust, then 1/2 of the vanilla cheesecake mixture and repeat.  Do not swirl until all the filling has been added.
  6. Use a knife to gently swirl through the batter. 
  7. Place the cheesecake on the rack above the water bath, not in the water bath.  
  8. Bake for 20 minutes and then lower temperature to 300 F for about 60 more minutes.
  9. The cheesecake is done with the center is still a bit jiggly but almost set.  I use an instant thermometer to be sure.  Cheesecake is done at 150 F.
  10. Turn off the oven but leave the cheesecake in oven with the door partly open for about 20 minutes.
  11. Remove from oven and run a knife around the edge to help keep it from cracking.  
  12. Cool on a rack completely before chilling.  Once it is chilled, wrap well and refrigerate until ready to serve.  Cheesecake is best made at least one or two days ahead.  

One Dish Dinner - Gluten Free


I'll confess -- I enjoy baking much more than cooking, so if I can cook a meal with as little prep work as possible, I'm happy.
This recipe is written as gluten free, but you can substitute your favourite  pasta as you desire.
  • 2 tablespoons oil 
  • 1 pound ground beef
  • 1 onion - chopped 
  • 4 cups boiling water 
  • 2 chicken bouillon cubes -- gluten free 
  • 1- 14 ounce can crushed tomatoes
  • 1 - 14 ounce can kidney beans 
  • 1 - 14 ounce can corn 
  • 1 teaspoon chili powder
  • 1/2 teaspoon garlic powder - or one fresh crushed clove
  • 1 tablespoon chopped parsley
  • salt and pepper as desired 
  • 1 cup Rice Vermicelli (a thin form of rice noodles) -  I use scissors to cut into pieces
  • 1 cup rice - I prefer converted or brown sprouted rice
  • salt and pepper to taste 
  • shredded  cheddar cheese 
  1. Using large saucepan, brown ground beef and onion in oil 
  2. Add water in which bouillon cubes have been dissolved 
  3. Add tomatoes
  4. Add rest of ingredients and cook until rice is done, about 20-25 minutes. 
  5. Serve immediately with grated cheese topping.
  6. Can be frozen for a quick meal when needed - or desired.

Poblano Boats


These Poblano halves are filled with a mixture of Blue Cheese, diced apples, and walnuts. The heat of the Poblano pepper adds a nice kick to these crunchy boats of goodness. Serve as a salad or an appetizer. You can increase the recipe if you'd like to serve more than two people. You can also leave the Poblano whole, cutting a slit in it when you remove the seed instead of cutting the pepper in half, then stuffing it with the filling.

Ingredients for 2 servings:
  • 1 Poblano Pepper, roasting over open flame, peeled and seeded, some instructions to follow
  • 1 cup finely chopped diced apples
  • 1/2 fresh lemon, juiced
  • 1/2 cup crumbled blue cheese
  • 1/2 cup chopped walnuts
  • 1 cup mixed salad greens 
  • 2 tablespoons extra virgin olive oil
  • 1 tablespoon red wine vinegar

Methods for roasting peppers:
  1. If you have a gas stove top you can turn one burner to medium and hold the pepper over the open flame with tongs, turning until all sides are blackened and blistered, make sure your oven fan is on.
  2. After roasting the pepper place in brown paper bag and seal the bag to keep the steam inside the bag. 
  3. When it cools put disposable gloves on and take the pepper out of the bag. 
  4. The peel should come off easily at this point, you can use paper towels to rub the skin off.
  5. After peeling it, cut a slit down one side and using your gloved hands remove all the seeds. 
  6. At this point place on a paper towel and refrigerate the pepper till you are ready to stuff it.
  7. Another method is to roast the peppers under the broiler of your oven for 5 minutes.
  8. You can also use your outdoor grill to roast the peppers.
  9. Whichever method you use, don't forget step 2.

Method for the filling:
  1. Place the apples in a ceramic bowl and lightly coat them with the lemon juice.
  2. Combine the cheese and walnuts with the apples and toss.
  3. Cut the chilled pepper in half and place on top of a platter of salad greens.
  4. Fill each half of the pepper with the mixture of apples, walnuts and cheese. 
  5. Whisk together the olive oil and red wine vinegar well and drizzle generously over the filled peppers.
  6. Serve immediately.

Tip: If you want to make more of these to serve 4-8 people you could roast 4 peppers ahead of time and keep them refrigerated until you are ready to serve these as an appetizer or salad. Just double the filling portion of the recipe.

Happy Thanksgiving to all Canadians today!


Bread for the Journey


O taste and see that the Lord is good:
blessed is the man that trusts in Him.
Psalm 34:8

On this Thanksgiving weekend our thoughts are on family, those around our tables as well as those far away. I have thought about the benefits of giving thanks, believing that thankfulness turns our hearts to God and acknowledges our dependence on Him. Thankfulness shows we trust Him. A thankful heart strengthens our hope for the future and helps us bear the hard things. A thankful heart improves our well being on every level. 

Do you ever wonder what would happen if we stopped being thankful? If the sunset, the snow capped mountains, the rolling wheat fields or the vast expanse of ocean never touched our soul to whisper in awe? What if we never gave thought to the rhythm of our heart, how we fall asleep and how we wake?

On our maiden cruise ship voyage we could not get over how wonderful everything was, when one morning we shared our breakfast table with a disgruntled guest. We tried to start a friendly conversation with her, but her discontentment about most things came through loud and clear. When we told her that we loved the food, she slowly and maturely told us, "Well, ya see honay, ya don't got notin' to compare it to ... but ... in actuality ... it really ain't good."

Her words haunted me with a certain sadness, because they can be true to life for any one of us. We lose our sense of wonder. We get so accustomed to good things that we begin to compare or focus on wanting more. We can easily forget that what we have is really quite wonderful.

A very long time ago, the apostle Paul wrote a letter to the Christians in Rome, explaining why God’s wrath was being revealed against the godlessness and wickedness of men who suppress the truth. He went on to say, “For although they knew God, they neither glorified Him, nor gave thanks to Him, but their thinking became futile and their foolish hearts were darkened.” (Romans 1: 21) It looks very much like the downward spiral in their quality of life began with ungratefulness. It's not that they did not know God, they just took him for granted.

May our thankful hearts be a covering and blessing to the next generation to do the same.


From all of us here at MGCC
we thank you for your visits and 
we wish you a blessed Thanksgiving!

Florence's Carrot Cake ~ Flashback Friday


I received this recipe from a neighbor of mine many years ago. And I am sharing this with you again today.  Just recently she called me and could not believe that her Mom, Florence's carrot cake recipe was on our blog post. 

It's fall time, and on this beautiful day, you can hear the tractors and machinery tilling up the land, planting winter wheat.  What better treat than to serve a fresh piece of moist carrot cake loaded with almonds and a fresh cup of coffee?  We don't know how long the weather will last.

Florence's Carrot Cake
  • 3 cups of raw carrots, grated, set aside
  • 2 cups white sugar
  • 1 1/4 cups salad oil
  • 4 eggs
  • 1 teaspoon vanilla
  • 2 cups white flour
  • 2 teaspoons baking soda
  • 2 teaspoons cinnamon
  • pinch of salt
  • 1 1/2 cups chopped almonds
Follow normal cake making directions.
  1. Mix sugar, oil, and eggs. Add vanilla and the combined dry ingredients and nuts.
  2. Add the carrots to the batter and stir well.
  3. Bake in a well greased 9 x 13 pan at 350 F for 45 minutes.
Frosting
  • 1/4 cup butter
  • 4 ounces cream cheese
  • 1 cup powdered sugar
  • 1/4 teaspoon vanilla
  1. Soften butter, add cream cheese and blend until smooth. 
  2. Add powdered sugar and spread on cake when cool.  
  3. Sprinkle chopped almonds on top.  
This cake becomes better with age and freezes so well.  This cake will be going along on a road trip to visit family for Thanksgiving weekend.

Plum Fruit Roll-Ups


If you are still able to find some Italian Plums at your local market, and you have kids that love fruit roll-ups, this is a great way to make natural and healthy snacks.  If you have a food dehydrator it is really simple but I also tested it in an oven and it works well there too. 

  • about 35 large Italian plums
  • sweetener to taste (I've used white sugar or honey)
  1. Wash, stem halve and remove pits from plums.
  2. Place the halved plums cut side down on a parchment lined cookie sheet and bake for about an hour at 325F or until very soft.  
  3. Once they are cool enough to handle, transfer to a food processor and process until only flecks of skin are visible.  Sweeten to taste.  This really depends on the sweetness of your fruit and you may choose to not use any sweetener at all.  
  4. I recommend using Silpat mats for the next step if you are using the oven to dry the fruit base,  I have tried it with parchment paper but that tends to stick so if you are going that route, make sure you spray the parchment paper with cooking spray before pouring your plum base onto the sheets. 
  5. Dry in the oven for 6 - 8 hours as low as the oven can go.  Between 170 - 200 F.  
  6. If you have a food dehydrator, line the screen racks with plastic wrap, making sure the edge of the wrap goes over the sides just slightly.
  7. Pour base onto the racks and turn dehydrator to medium.  Check after 5 hours. 
  8. Dry until the center of the fruit is dry to touch.  
  9. Allow to cool completely, remove backing,  slice into strips using a clean scissor or a pizza wheel.  Roll up and store in a covered container.  
Makes about 30 roll-ups   

Pancit..a Noodle Dish from the Philippines


This is a wonderful noodle dish that our friends from the Philippines make. This recipe was given to me by my friend Cathy. We have enjoyed delicious dishes from the Philippines many times and this one is always on the table. I usually see it served in foil pans so I thought I should do the same.
This is a large recipe, you may want to share or you can make half the recipe.
  • 16 oz package of vermicelli rice noodles
  • 4 tablespoons cooking oil
  • 2 teaspoons garlic, minced
  • 1/2 small onion, finely chopped 
  • 1 cup carrots, cut into matchsticks
  • 1 cup celery, finely chopped
  • 4 cups green cabbage, finely chopped
  • 2 cups snow peas
  • 2 cups chicken, cooked and diced or you can use pork
  • 2 cups chicken broth
  • 1/4 cup soy sauce
  • Salt and pepper to taste
  • Lemon wedges
  1. Prepare noodles according to package instructions, drain and set aside.
  2. In a large pot or wok (on medium heat) add cooking oil and saute garlic and onion. 
  3. Add onions, carrots, celery, cabbage, snow peas, and cook until vegetables are tender crisp, 5 to 10 minutes (depending on the size of your cut vegetables).
  4. Add chicken, chicken broth, and cooked vermicelli rice noodles (that were prepared and set aside) to the vegetable mixture until well combined. Stir in soy sauce, salt, and pepper.
  5. Continue cooking until liquid has completely evaporated.
  6. Serve hot. Serve with lemon wedges at the table, you can squeeze a little juice over your serving. Some may also like an extra splash of soy sauce.
  7. Serves: 8 to 10

Banana Bread

This recipe is from my sister. Just how banana bread should be...dark, moist and delicious. 
  • 2 cups flour
  • 1 1/2 teaspoons baking soda
  • 1/4 teaspoon salt
  • 2 teaspoons cinnamon
  • 1 teaspoon vanilla
  • 1 1/2 cups mashed bananas, this will be about 3-4 small bananas
  • 3/4 cups white sugar
  • 1/2 cup vegetable oil
  • 2 tablespoons milk
  • 1/4 teaspoon vinegar
  • 1 egg
  1. Measure first 4 dry ingredients into a bowl and stir to combine.
  2. Measure milk into small cup and add vinegar. Let sit for 2-3 minutes.
  3. In a separate bowl mash bananas and add to them the remaining ingredients.
  4. Stir the milk and vinegar mixture with a fork (it will have turned a bit thick) and add to the banana mixture. Beat until combined.
  5. Add dry ingredients to wet and mix until all the dry ingredients are mixed in well.
  6. Grease one loaf pan. Pour batter into pan.
  7. Bake in 325ºF oven for 60-70 minutes. If toothpick inserted into the middle comes out clean it it done. 
Yield: 1 loaf
Freezes well
I'm not sure why this loaf bakes up with this interesting looking top when baked in a very old style bread pan. When baking it in a glass loaf pan it doesn't take on this look, but it is more smooth and may have a few little cracks on top and just nicely rounded. Good thing is they both taste the same once baked. 


Chicken Noodle Soup with Home Made Noodles


Here in the Fraser Valley, it is starting to look like Fall. 
And with Fall comes the comfort of making soup.  
For my husband, the hands down favourite soup is this one. 
Of course, you can buy your favourite egg noodles for the soup but for Harv, 
the best part is the homemade noodles. 
He is known to make one bowl of broth last for 3 bowls of noodles!

For the chicken broth:
  • 10 cups water
  • Chicken - I often make my chicken broth using the bones from a roast chicken, but on occasion I will I boil a whole chicken, or use chicken necks and backs
  • 1 whole Star Anise
  • 10 peppercorns (more if they are small)
  • 1 onion halved
  • 1 carrot scrubbed but not peeled
  • 1 or two stalks celery
  • 1-2 teaspoons salt
  • several stalks of parsley
  1.  Fill dutch oven or soup pot with water.
  2. Add chicken bones  or raw chicken
  3. Add remaining ingredients.
  4. Bring to a boil.
  5. Turn to low and simmer for 2 hours 
  6. Remove from heat and let cool briefly.
  7. Pour soup through a colander set over a large bowl or another dutch oven.
  8. Remove chicken meat from the bones and reserve 
  9. Discard vegetables and seasonings.
  10. Set in refrigerator until needed. Or divide broth into freezer containers and freeze for use later. 
For the Noodles:
  • 2 cups flour
  • 1 teaspoon salt
  • 1/4 cup water plus more if needed
  • 1 egg
  • 3 egg yolks
  1. Place flour and salt in a mixing bowl.
  2. In a cup, whisk together 1/4 cup water, the whole egg and egg yolks.
  3. Add liquid all at once to flour and mix until a medium stiff dough is formed.  Add more water, one tablespoon at a time if needed.
  4. Divide dough in 2 or 3 portions.
  5. Roll out one portion at a time. Wrap remaining portions and set aside until you are ready to roll them. 
  6. On a lightly floured surface, roll the dough very thin.  Lift the dough occasionally to allow it to relax before continuing to roll it.  Don't worry if you end up with a few holes in the dough.
  7. Transfer rolled out dough to a clean tea towel and allow to dry for several hours. The dough should still be slightly moist for ease of cutting.
  8. Dust dough very lightly with flour and roll up to make a 1 1/2 inch diameter roll.
  9. Lay it on a cutting board and cut noodles as thin or thick as you like cutting across the roll on an angle. Then cut across the roll on the opposite angle. Repeat until the roll is all cut into noodles.
  10. OR you can just cut long noodles by cutting straight across the roll.  My Mother in Law cut her noodles on an angle so that is the way we do it.
For the soup:
  • Chicken broth (see above) 
  • 1 large carrot, diced fine
  • 1 medium onion, diced fine
  • 1 large stalk celery diced fine
  • reserved cooked chicken cut into bite sized pieces (remove all bones)
  • homemade noodles 
  • butter
  1. In large pot, place chicken broth, vegetables and chicken and bring to a boil.
  2. Adjust seasonings if needed with salt and pepper.
  3. Simmer until veggies are tender.
  4. In another large pot, place noodles in boiling, salted water and cook until just tender - about 5-7 minutes.
  5. Strain noodles and place in a serving bowl with a couple of tablespoons of butter. Toss lightly.
  6. Serve soup in a separate serving bowl.
  7. Let each person add noodles and soup to their own bowl as they prefer.
  8. Do not store leftover soup and noddles together in one bowl because the noodles will absorb the soup.

Bread for the Journey

God is Sovereign!
Unfortunately, most of us do not know what comes our way.
Recently, I've been thinking about the devastation left behind from hurricane Harvey and Irma.
We see the ruins of Mexico as they have been hit with earthquakes.
What about the refugees fleeing to Bangladesh?
What about the most recent deaths in Vancouver this week?

Can we still keep trusting in God and giving thanks?

Many times we believe that once we've become Christians, nothing difficult will happen to us.
That's not true...
God is not only there, but it's His plan - whether good or bad.
During my difficult times, I keep thinking "God what are you trying to teach me?"
There are times in our lives we've all experienced things we never imagined or expected.
Can we really trust God in the midst of life's storms?
Can we gain perspective that all of these things have been
woven into the tapestry of God's sovereign plan?
I have definitely found myself in difficult situations, not knowing how to give thanks.
I'm thankful today for a unique blessing that the Lord has brought individuals into my life to walk alongside me, who can understand my specific pain and bring comfort from God that they've also received in a similar situation.
Thank you God for your mercy and comfort and continue to help me rest in your
strength and comfort, trusting you.

"Blessed be the God and Father of our Lord Jesus Christ, the Father of mercies and God of all comfort, who comforts us in all our affliction so we may be able to comfort with which we ourselves are comforted by God."  2 Corinthians 1:3-4 (ESV)

This piece of music continues to give me strength, as I meditate on God's sovereignty.

You were the Word at the beginning
One with God the Lord Most High
Your hidden glory in creation
Now revealed in You our Christ

What a Beautiful Name it is
The name of Jesus Christ my King

You didn't want heaven without us
So Jesus, You brought heaven down
My sin was great, Your love was greater
What could separate us now

How sweet is your name, Lord, how good You are
Love to sing in the name of the Lord, love to sing for you all?
Death could not hold You, the veil tore before You
You silenced the boast, of sin and grave
The heavens are roaring, the praise of Your glory
For You are raised to life again.

You have no rival, You have no equal
Now and forever, Our God reigns
Yours is the Kingdom, Yours is the glory
Yours is the Name, above all names

What a powerful Name it is 
Nothing can stand against
What a powerful Name it is 
The Name of Jesus