Mennonite Girls Can Cook is a collection of recipes which were posted daily for a period of ten years from 2008 to 2018. We have over 3,000 delicious recipes that we invite you to try. The recipes can be accessed in our recipe file by category or you can use the search engine.

Recipe Search

Roolyet (Russian Nut Roll)

Roll the "R" when you try to pronounce the name of this nut roll that is a family favorite from my childhood and adult life, too. Our mom's Roolyet was the best. We've just managed to perfect a recipe that brings back the memory of our mom's roll. I think she would give us at least an A maybe not an A+ yet. Our pop got teary eyed when he bit into his piece because it reminded him of his beloved bride who died four years ago.

Ingredients:

For the Dough:
  • 2 teaspoons sugar
  • 1/8 cup milk, scalded
  • 2 1/4 teaspoons active dry yeast (1 packet)
  • 1/2 cup milk
  • 2 egg yolks (set aside egg whites)
  • 1/2 cup unsalted butter melted and cooled slightly, reserve 1 tablespoon 
  • 3 tablespoons sugar
  • 1/2 teaspoon vanilla
  • 1 3/4 cups flour
  • 1/4 cup flour

For Rolling Surface:
  • 1/4 cup powdered/icing sugar

For Filling:
  • 2 1/2 cups ground walnuts
  • 1/2 cup sugar
  • 1/2 teaspoon vanilla
  • 2 egg whites

Method:
  1. In a small bowl dissolve the 2 teaspoons sugar with the scalded milk, add the yeast and mix well.
  2. In medium bowl mix the 1/2 cup milk, egg yolks, melted butter minus the tablespoon you set aside, and vanilla then add in the yeast mixture and mix well.
  3. Sift the 1 3/4 cup flour, salt, and 3 tablespoons sugar together.
  4. Add sifted ingredients to the wet ingredients slowly while mixing, the dough will be sticky.
  5. Prepare kneading surface with a light dusting of flour.
  6. Knead the dough adding as much of the 1/4 cup of flour needed during this process to make the dough less sticky, knead the dough for 10 minutes then form into a ball.
  7. Place the dough into a lightly greased stainless bowl that is 3 times the size of the dough and cover the bowl with a kitchen towel and place in a warm spot without drafts.
  8. Leave the dough to rise to double its size, 1-2 hours.
  9. While dough is rising prepare the filling by mixing the 2 1/2 cups ground walnuts, egg whites, 1/2 cup sugar and 1/2 teaspoon vanilla, mixing well.
  10. Divide the filling into two equal portions.
  11. Once the dough is doubled in size prepare the work surface where you will be rolling out the dough, dusting it with the powdered/icing sugar. 
  12. Preheat the oven to 350 degrees.
  13. Punch down the dough and divide it into 2 equal portions.
  14. Roll each portion of the dough separately into a rectangle approximately 1/4 inch thick.
  15. Spread the filling evenly over the rectangle of dough leaving 1/2 inch free of filling along the edges.
  16. Starting at the long edge fold over the dough carefully and keep rolling into a tight roll.
  17. Pinch the seam well and pinch the ends to prevent the filling from leaking.
  18. Place the roll seam-side down on a baking sheet lined with a Silpat or parchment paper.
  19. Repeat the process for the second roll and add it to the baking sheet keeping the rolls at least 3 inches apart.
  20. Use the reserved tablespoon of melted butter to brush the tops and sides of the rolls evenly.
  21. Bake in a 350 degree oven for 25-30 minutes or until golden brown.
  22. Let cool and cut into slices to enjoy.
Yield: 2 twelve inch long rolls

Notes: We found that 3 cups of whole walnuts make 2-1/2 cups of ground walnuts.
We used a slightly warm oven to let the dough rise in.
Use a serrated/bread knife to cut the roll.


Peas with Celery


This is a simple and tasty way to dress up peas.

  • 1 tablespoon butter
  • 1/2 onion, chopped
  • 2 stalks celery, chopped
  • 1/4 red pepper, chopped
  • 4 cups fresh or frozen sweet peas
  • 1 teaspoon sugar, if desired
  • more butter to glaze
  1. Melt butter in frying pan and saute' onion, celery, and red pepper.
  2. Microwave peas with sugar (if using) until tender, or heat in a small amount of water on the stove.
  3. In serving bowl, toss peas with saute'ed vegetables and a bit more butter and serve.


Bread For The Journey

Proverbs 3:3
Do not let kindness and truth leave you; Bind them around your neck, Write them on the tablet of your heart.
When you're kind to others they get that warm fuzzy feeling and want to pass on a kindness to others. And that kindness benefits us too as we know that we have also helped make someone's life better.
God sent us Jesus so that he could free us from our pain and suffering. That is kindness shown to us when we don't deserve it. Concentrate on being a blessing to others. You will be blessed.
Who will you be kind to today?

Bavarian Apple Torte


When we do a Flashback Friday we go back to a recipe that we posted closer to when we first started. (This one posted here in 2008.) What we found is that we can't delete the old one because there are dear readers who have pinned it. So now we've been posting a second one, the same as the old, but clarified and cleaned up a bit. Some of us keep the old photo up and some of us are happy to take it off. I'm always happy to change up old photos. 
This recipe has a story that I posted about here. When we visited our daughter and family in Indonesia (2011), she hosted a lunch with friends who all brought something they had made from this blog. Needless to say I felt honored, especially when one of them brought this apple cake even though it was quite the feat to get cream cheese where they live. It was wonderful!

Ingredients:

base:
  • 1/2 cup butter, room temperature
  • 1/3 cup sugar
  • 1/4 teaspoon vanilla
  • 1 cup flour
filling:
  • 2 – 8 ounce packages cream cheese, room temperature
  • 1/2 cup sugar
  • 2 eggs
  • 1 teaspoon vanilla
topping:
  • 2 - 3 thinly sliced apples
  • 1/3 cup sugar
  • ½ teaspoon cinnamon
  • ½ cup sliced almonds
Method:
  1. Cream butter, sugar and vanilla. Add flour a little at a time and beat until crumbly to resemble a graham wafer type crust.
  2. Press crumbs out on bottom and a little up the side of a 8 1/2 - 9 inch spring-form pan. 
  3. Beat cream cheese and sugar. Add eggs and vanilla, beating until smooth. 
  4. Pour into pastry-lined pan.
  5. Arrange apples on top of cream cheese layer and sprinkle with sugar/cinnamon mixture
  6. Top with almonds.
  7. Bake at 400° F for 10 minutes. Reduce temperature to 375° F and continue baking for 50 - 60 minutes. Cover loosely with foil for last 10 minutes if almonds get too dark. (shorter baking time is if using a larger pan, because the cake will not be as high)
  8. Allow to cool 15 minutes. Run a knife around the edge before removing the rim. 

Trail Mix Cookies


These cookies are perfect to take along on a hike, picnic, or road trip. They are filled with a delicious blend of nuts, coconut, and dried fruit. The addition of molasses and orange zest adds a nice touch. I found the recipe here . I adapted it to my liking.
  • 3/4 cup butter, softened
  • 2/3 cup sugar
  • 1/4 cup molasses
  • 1 egg
  • Zest of a medium sized orange
  • 2 1/4 cups flour
  • 1 teaspoon baking powder
  • 1 teaspoon baking soda
  • 1/8 teaspoon salt
  • 1 teaspoon cinnamon
  • 1 teaspoon ginger
  • 1/2 cup large flaked oatmeal
  • 1 1/4 cups trail mix, you can purchase trail mix or make up your own favorite mix.
  • Coarse sugar for sprinkling on top of cookies.
  1. Cream butter and sugar until light and fluffy. Add molasses and mix.
  2. Stir in egg and orange zest until well blended.
  3. In a separate bowl whisk together flour, baking powder, baking soda, salt, spices, and oatmeal. Stir into creamed mixture.
  4. Add trail mix and stir until combined.
  5. Scoop rounded tablespoon sized balls of dough and place on parchment lined pans.
  6. Using the bottom of a glass dipped in coarse or granulated sugar, press down on each ball of cookie dough to flatten slightly. I sprinkled extra coarse sugar on top.
  7. Bake in a 375ยบ oven for 10 minutes. Don't over bake, you want soft and chewy cookies. If you want them more crisp bake them a few minutes longer.
  8. Yield: 28 cookies

Yellow Butter Cake with Chocolate Frosting


A little while ago one of our commenters asked if we had a recipe for a yellow cake from scratch with chocolate frosting. I was reminded of the recipe I got from my high school home economics class that I had not made in a few years.  I remember the teacher being big on sifting and sifting again before measuring the flour. She wasn't a fan of vanilla extract, but I think real vanilla extract is a must. She also taught us how to make our own cake flour that I will share with you in step 5 in the instructions. This recipe makes a two 9 inch layer cakes, or 24 cupcakes, or one 9x13 inch cake pan.
This cake or cupcakes are moist and not too sweet, neither is the icing. I prefer to make cupcakes over a cake so I can freeze them easily and pull out only as many as needed.

  • 3 cups cake flour *(check #5 in the directions)
  • 3 1/2 teaspoons baking powder 
  • 1/2 teaspoon salt (omit if using salted butter)
  • 3/4 cup unsalted butter, softened to room temperature
  • 1 1/4 cup white sugar
  • 6 large egg yolks, room temperature
  • 1 cup full-fat milk (use whatever you have) room temperature
  • 2 teaspoons pure vanilla extract
  1. With a mixer beat the butter until light and fluffy for two minutes
  2. Add the sugar and beat for another two minutes
  3. Beat in the egg yolks three at a time (in two additions) to incorporate the eggs into the butter sugar mixture better. It is the egg yolks that give this cake the yellow color, so use free range eggs or Omega 3 eggs with the deep yellow color if possible. 
  4. Add the pure vanilla.
  5. *Sift 3 cups of regular flour, remove 6 level tablespoons, and replace it with 6 level tablespoons of cornstarch to make the cake flour replacement. Add the baking powder and salt, if using.
  6. Add the 1/3 of the sifted dry ingredients to the wet mix, mixing it in well. Add in half the milk, again mixing it in well, followed by another 1/3 of the flour mixture, followed by the rest of the milk and the last of the remaining flour. 
  7. Bake in two well greased and floured 9-inch cake pans for 25 - 28 minutes at 350 F for a double 9-inch cake, or in 24 regular muffin tins for 20 minutes or in a 9x13 inch pan for 30-35 minutes, until golden brown and a toothpick inserted in the center comes out clean. Each oven temperature varies slightly so check yours at the lower time. You don't want to dry out your cupcakes by over baking them.
  8. Cool in the pan for 10 minutes. Remove from pans and cool the cake completely on wire racks before frosting.
Chocolate Frosting:
  • 1 cup unsalted butter, softened to room temperature
  • 2 cups sifted icing sugar
  • 1 teaspoon pure vanilla extract
  • 6  1 ounce squares of unsweetened chocolate melted* (I used unsweetened)
*If you don't want dark chocolate frosting you can use semi-sweet or milk chocolate. However, if you use milk chocolate the icing becomes sweeter. (too sweet for me)
  1. In a heatproof glass or stainless steel bowl, place your coarsely chopped chocolate over a simmering pot of water to melt, stirring often. Cool completely to room temperature before adding it to the butter mixture.
  2. Beat the butter until creamy for about a minute. Add the sifted icing sugar and vanilla. Beat another three minutes.
  3. Add the chocolate and beat until smooth, about two minutes. 
  4. Frost the cake or cupcakes as desired. 

Blueberry Pie


Thanks to my sister Rhoda for sharing her blueberry pie recipe with me. It's delicious!
For the crust just use your favourite recipe or go to our recipe index and try one of ours.

Filling:
  • 5 cups frozen blueberries
  • 3/4 cup white sugar
  • 1/4 cup flour
  • 1 tablespoon lemon juice
  • 1 very small piece of bread, grated (enough to just barely cover bottom pie shell)
  1. Place berries in a large bowl. 
  2. Add the sugar and flour and stir to coat berries. 
  3. Let this mixture sit on counter for about 1 hour so that the blueberries thaw. OR, you can place this mixture in the microwave until the blueberries are no longer frozen solid. They can still be a little frozen but if you don't do this step the crust bakes too fast for the berries to fully cook. 
  4. Line pie plate with bottom crust. 
  5. Top with grated bread crumbs. The bread helps to absorb some of the extra juice berries that may otherwise soak into crust, giving you a soggy bottom crust. You won't taste the bread, but you will have a really nice crust. 
  6. Fill pie shell with blueberry filling.
  7. Drizzle with lemon juice.
  8. Lay top crust over. Cut and pinch edges of dough. Slit dough. Blueberry pie often has the signature circle cut out in the centre of the pie. 
  9. Sprinkle the top crust with a little dusting of granulated white sugar.
  10. Bake in 350ยบ F oven on lower rack for 45 minutes, or until filling is bubbly and bottom and top crust are a nice golden colour with a flaky texture. 


Philly Cheesesteak Sandwich


We always add a few extra steaks to the grill when beef tenderloin is on the menu so we can enjoy this quick meal during the week.

  • 2 large beef tenderloin steaks

Marinade
  • 2 tablespoons soy sauce
  • 2 tablespoons oil
  • 1 teaspoon steak spice
  • 2 tablespoons balsamic vinegar
  • 1 clove garlic, minced

  • 2 tablespoons oil
  • 1 large onion, sliced
  • 1 green pepper, sliced
  • 1 jalapeno pepper, finely chopped
  • 8 large button mushrooms, sliced
  • salt and pepper to taste. 
  • 6 crusty buns 
  • 6 slices Provolone cheese
  • horseradish mayo spread (optional) or regular mayo
  1. Combine marinade ingredients in a zipper plastic bag.  Add the steaks, squeeze out as much air as possible as you seal the bag and refrigerate a few hours.  
  2. Sear steaks on both sides on a hot grill.  Grill to medium rare.  Remove from heat, cover with foil and allow to sit 20 minutes. Steaks can be refrigerated overnight at this point.  I find it easier to slice the steak if it is chilled but it is optional.
  3. Slice steaks across the grain into bite-sized pieces, as thin as possible.  Set aside while you prepare vegetables.
  4. Heat oil in a large frying pan over medium-high heat. Add onion, green pepper, and mushrooms and stir-fry until vegetables are tender and onions begin to caramelize.   Add steak to the frying pan and stir until the steak is heated through.  Season with salt and pepper to taste. 
  5. Slice buns, add a slice of cheese to each half and toast under broiler.  Top half the buns with steak and vegetables.
  6. Add horseradish mayo or regular mayo and top with the other half of the bun. 


Bread for the Journey


Whoever finds their life will lose it, and whoever loses their life for my sake will find it.
Matthew 10:39

This is one of those verses that can make us stop and wonder about its meaning, especially seeing it is quite contrary to our world view. We live in a time where so much of what we do is to be about ourselves; from thinking about how we can make life the most comfortable to putting the best of ourselves out there for everyone to see.  Our thinking is deeply rooted in what we think is best for us and what will give us the most present happiness.

Jesus taught us by example to serve and to put others first.  Our life in Christ is not about trying to find ourselves, nor is it about fitting in with other people's expectations. It's about spending our life for what is to come and laying up treasure in heaven. It's about being willing to humble ourselves and to take up our cross to follow Him. Loosing our life in service to honor our Lord is how we find fullness of life.

It's not who you are, but whose you are that counts.
Joel Osteen


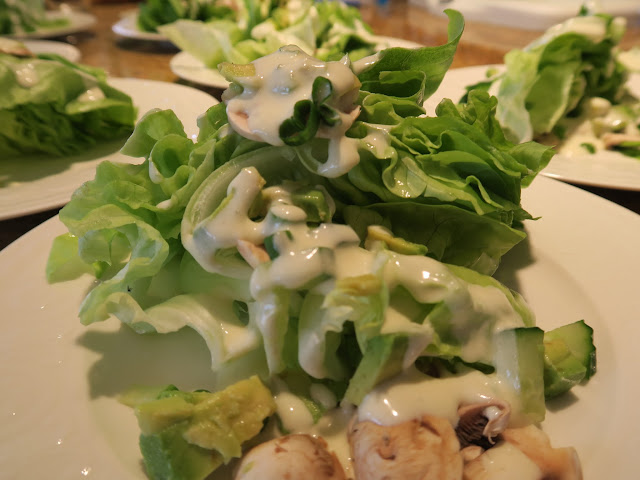
Butter Lettuce Salad ~ Flashback Friday


There's nothing that tastes better than a fresh homemade salad on a hot summer day.  Our summer has finally arrived.
Here's a flashback recipe and this time I changed it up by cutting the butterhead lettuce into quarters.
This recipe was introduced to us by a European chef, while he was a guest in our home and offered to cook for us.  I could not resist. Over the years I have planted my own fresh butter lettuce.
It's simple and delicious.

Salad:
  • 1 head butter lettuce
  • 2 onion greens
  • 1/2 cup fresh sliced mushrooms
Dressing:
  • 1 egg *
  • 1 tsp mustard
  • 1/2 cup whipping cream
  • 1/2 tsp salt
  • 3 Tbsp lemon juice
  • 3 Tbsp oil
Method:
  1. Wash and clean your butter lettuce; drain the water off and pat it dry. 
  2. Quarter the head of lettuce and plate this for your guests.
  3. Add onions and mushrooms and I've added avocados, cucumbers, and celery.  
  4. Whip the cream till medium thickness; add egg and mustard, whipping some more. The texture should be smooth.
  5. Add salt, lemon juice, and oil.
  6. Pour over chilled butter lettuce leaves.
young children, pregnant women, and people with compromised immune systems should avoid raw egg

Lemon Fluff Cheesecake


Light and fluffy and full of lemony goodness, this is the perfect spring dessert.  It is actually a new twist on a very old recipe.  I'll share the recipe with you as we have enjoyed it recently and then I'll tell you the story of its origin...my first-love with cheesecake.

  • 1 (3 ounce) package lemon Jell-O
  • 1 cup boiling water
  • 1 package (8 ounces) cream cheese
  • 1 cup sugar
  • 1/4 cup lemon juice
  • 1 can 12 oz / 354 ml evaporated milk, well chilled (Carnation)
  • 1 1/3 cups graham wafer crumbs
  • 1/4 cup butter, melted
  1. Combine cracker crumbs and cutter.  Press into bottom of a 9" x 13" pan. Refrigerate until needed.
  2. Dissolve Jell-O in boiling water. Cool until slightly thickened.
  3. Beat cream cheese, sugar and lemon juice with mixer until smooth and creamy. Add thickened Jello and beat well.
  4. In a separate bowl, beat the chilled evaporated milk until it is thick and forms soft peaks. Add cream cheese/Jell-O mixture and beat until combined.
  5. Spread filling over graham wafer crust.
  6. Chill overnight.
  7. Serve with fresh fruit of your choice.
 

Now let me tell you about my introduction to this delightful dessert. Cheesecake was not something that appealed to me when I was a teenager. But after going to our local Woolworth's store with friends and trying the famous lemon dessert in their restaurant, that all changed. It was not your typical cheesecake, but a light and fluffy ice-box dessert. Hubby remembers me dragging him there to sample this dessert as well, and he decided he could learn to like cheesecakes too. Woolworth's stores across North America closed several decades ago and their cheesecake is all but forgotten.  I have a friend who once worked at the Woolworth's restaurant, and gave me a copy of their cheesecake recipe many years ago.  I was recently reminded of that recipe, and thought I would try it...for old times' sake! Woolworth's served it without fruit and sprinkled with additional wafer crumbs. Their famous cheesecake got a 'thumbs up' review from all those around our table. Do any of you have memories of having this dessert at Woolworth's back in the day?  It's throw-back Thursday.  Feel free to share your memories.


Loaded Chocolate Chip Cookies

Our family enjoys the original Toll House Cookies with some extras added. This time I reduced the sugar content, too.

Ingredients:
  • 2-1/4 cups all-purpose flour
  • 1 teaspoon baking soda
  • 1 teaspoon salt
  • 1 cup (2 sticks) butter, softened
  • 1 cup packed brown sugar
  • 1 teaspoon vanilla extract
  • 2 large eggs
  • 1-1/2 cups semi-sweet chocolate morsels
  • 1-1/2 cups chopped nuts
  • 1-1/2 cups rolled oats
  • 1 cup sweetened coconut flakes

Method:
  1. Preheat oven to 375 degrees F.
  2. Combine flour, baking soda and salt in small bowl.
  3. Beat butter, brown sugar, vanilla in large bowl of mixer until creamy.
  4. Add eggs, one at a time, beating well after each addition.
  5. Gradually beat in the flour mixture.
  6. Beat in the oats and coconut.
  7. Stir in the morsels and nuts.
  8. Use cookie scoop to drop dough onto ungreased baking sheets.
  9. Flatten each cookie scoop slightly with a fork.
  10. Bake for 10 to 12 minutes or until golden brown.
  11. Cool on baking sheets and then transfer to wire racks to continue cooling.
Yield: 48 cookies using medium cookie scoop.


Variations from a Pancake Mix


The main reason I keep a pancake mix in the pantry is so that my husband can keep waking me up to pancakes on Saturday mornings. I realize this mix could be purchased or homemade, but if he is going to make them, I'll take however he makes them. He usually adds grated apple to the mix. While we were on vacation, I thought, why not add some oatmeal to the mix too? They turned out so good that I started trying other variations and they each turned out wonderful! Scroll down for more. 

Apple Oatmeal Pancakes

Ingredients:
  • 1 cup pancake mix
  • 1 cup rolled oats (quick cooking)
  • 1 cup buttermilk (or milk)
  • 1 egg
  • 1 teaspoon vanilla
  • 1 grated apple 
  • 1 - 2 apples, thinly sliced, for topping (optional) 
Method:
  1. Preheat griddle between low and medium heat setting.
  2. In mixing bowl, add rolled oats to measured pancake mix. 
  3. Stir in buttermilk, egg and vanilla. Do not over mix.
  4. Add grated apple.
  5. Cook between low and medium heat until tiny bubbles form on top. Flip and continue cooking until golden brown. Keep pancakes warm on oven proof plate at 175 F. 
  6. Serve with steamed apples or berries. Yield: 8 pancakes
  7. To steam apples, thinly slice 1 - 2 apples and cook in saucepan with 1 - 2 tablespoons butter and 1 - 2 tablespoons brown sugar, until tender (5 - 10 minutes) while cooking pancakes.

Coconut Pancakes


These are truly for the coconut lover! Delicious with slices of mango or any canned or fresh fruit.

Ingredients:
  • 1 cup pancake mix
  • 1 cup shredded coconut (sweetened or unsweetened)
  • 1 cup canned coconut milk
  • 1 egg
  • 1 teaspoon almond flavoring
Method:
  1. Pre-heat griddle between low and medium heat setting.
  2. In mixing bowl, add coconut to measured pancake mix.
  3. Stir in milk, egg and flavoring until combined.
  4. Cook between low and medium heat until tiny bubbles appear. Flip and continue cooking until golden brown. Serve with fruit and a drizzle of syrup. Yield: 8 pancakes
Blueberry Ricotta Pancakes


Deliciousness without a lot of sweetness! I've been trying to cut down on syrup and found this topping just what was needed on these.

Ingredients:
  • 1 cup pancake mix
  • 1 cup ricotta cheese
  • 3/4 cup milk
  • 1 egg
  • 1 cup blueberries
  • zest from half an orange
Sauce:
  • 1 cup blueberries
  • 1/4 cup water
  • juice from one orange
  • zest from half an orange
  • 2 tablespoons sugar
  • 1 tablespoon cornstarch
Method:
  1. If you are using frozen blueberries, put them in a sieve and run cold water over them for a  minute or set in bowl of cold water and then drain.
  2. In a small bowl mix ricotta, milk and egg.
  3. Add to measured pancake mix in a mixing bowl. 
  4. Gently stir in blueberries and orange zest. Do not over-stir. Wait for griddle to heat.
  5. Cook with setting between low and medium, closer to low if your element tends to get very hot, until tiny bubble appear on top.
  6. Flip when golden brown and continue to cook until done, maybe another 5 minutes. You may hear a tiny sizzle from the blueberries. Yield: 8 thick pancakes
  7. While pancakes cook, mix sauce ingredients in a small pot and bring to boil. Simmer for a few minutes.
Tips on cooking thick pancakes with added ingredients:
Be sure the heat setting is not too high, or the pancakes will cook too quickly on the outside and not be done inside. Once they are mixed, do not keep stirring. Keep the first batch of cooked pancakes warm in the oven at 175 F until you are done with the last ones. Leftover pancakes can be frozen to toast later.

Cream Cheese Crumb Cake.

Today would have been my parent's 69th wedding anniversary. 
 Mom left us suddenly on the day after their 60th anniversary. 
 Dad is now 94 and in a care home but still brings us so much joy.
Here is a cake to celebrate their 60 year commitment to each other.
This cake's secret ingredient is cream cheese 
and the crunchy crumb topping eliminates the need for a frosting.


  • 1/2 cup soft butter
  • 1  8 ounce package cream cheese, softened
  • 1 1 /4 cups sugar
  • 2 eggs
  • 2 cups flour
  • 2 teaspoons baking powder
  • 1/2 teaspoon baking soda
  • 1/2 teaspoon salt
  •  1 1/2 teaspoons vanilla
  • 1/2 cup milk
For the crumb topping:
  • 1/4 cup butter
  • 1/2 cup flour
  • 1/2 cup firmly packed brown sugar
  1. Prepare 9 x13 inch baking pan by lining with parchment paper or greasing the bottom of the pan. Set oven to 350ยบ Fahrenheit.
  2. In large mixing bowl, beat butter and cream cheese together until smooth.
  3. Add sugar, beating well.
  4. Add eggs, one at a time, beating well between additions.
  5. Add vanilla to milk and set aside.
  6. Add dry ingredients to butter/cream cheese mixture gradually adding milk/vanilla mixture as the flour is incorporated.
  7. Beat until batter is thick and smooth.
  8. Spread in prepared pan.
  9. Cut together crumb topping ingredients.
  10. Sprinkle topping over cake batter.
  11. Bake at 350ยบ F for 30 - 40 minutes or until toothpick inserted in cake comes out clean.
  12. Cool. Serve with ice cream and berries if desired.

Bread for the Journey


Women Who Loved God

It's always hard to write on Mother's Day.  There are so many hurting women in this world and somehow it's so difficult to know how to address all the issues that surround women today.  So I decided best to share some faith nuggets about our mothers.

These two women were good friends, one being my mother, Mary Schmidt and the other being Kathy's  mother, Louise Janzen.  Even though they left us long ago,  they left us with a significant legacy.  You can tell by their smiles that they had fun and they had spunk.  Not only did they know how to have fun, but both were prayer warriors and they loved God.
I know that these women prayed for us way back then, and I can only imagine them asking the Lord to go before them and their families.  We can continue to thank God for the legacy of our mothers, thank Him for his faithfulness and ask Him to guide and care for the future generations.

I know our mothers would have been praying for our children and our grandchildren, not knowing what life would hold, by putting their trust in the One who holds life together.

Over the past weeks, I've spent time reflecting on some of the women who have spurred us on.

"And let us consider how we may spur one another on toward love and good deeds." Hebrews 10:24.

I've realized that my own days of teaching and parenting are long gone, but I've also realized that our mothers taught us how to keep going through difficult circumstances.  I've also realized that there have been other women in my friendship circles that have now spurred me on when I have found it difficult to move forward. And the beauty of these friendships is that they come in all ages, shapes, and sizes.  This past weekend I had the privilege of spending time with my one and only younger sister.  I was encouraged when she shared with me how she told our mother in her last days, that she would take on the responsibility of being the prayer warrior for the family.   Kathy too, has the heart of a prayer warrior, countlessly praying for family and friends.   How wonderful to be able to honor and cherish our mothers, for a legacy well lived, which continues on in the hearts of their daughters.

Mother's Day is not only a day to honor those who brought us into this world but to celebrate all the women who have challenged, confronted, supported, loved and encouraged us to see the world in a new way and giving true value to others.

Regardless of our age, let's continue to spur each other on just like these two friends, Mary and Louise did.

Lemon Poppy Seed Scones ~ Flash Back Friday


It's Mother's Day weekend and whether you are being treated to breakfast in bed or preparing a special brunch, this is a great recipe that is easy enough for beginner bakers.  

The poppy seeds add wonderful texture but they are optional. 


This scone recipe is easy to prepare because the recipe does not require butter to be cut into the flour.  The recipe takes under 10 minutes to have ready for the oven.
  • 2 cups flour
  • 3 tablespoons sugar
  • 5 teaspoons baking powder
  • 1/2 teaspoon baking soda
  • 1/2 teaspoon salt
  • 1/3 cup canola oil
  • 2/3 cup buttermilk
  • 1 large egg
  • the finely grated rind of 1/2 lemon
  • 1 tablespoons poppy seeds (optional)

  1. Preheat oven to 425 ยบ F.
  2. Combine all the dry ingredients in a large bowl.
  3. Combine all the wet ingredients in a medium sized bowl, egg first and whisking it until light.
  4. Add the poppy seeds and the lemon rind to the dry ingredients.
  5. Make a well in the dry ingredients and pour in all the wet ingredients.
  6. Stir with a fork.
  7. Transfer the dough onto a greased or parchment lined cookie sheet, patting it into an eight-inch circle.
  8. Cut the circle into 6 pieces but don't move the dough to separate.
  9. Bake about 15 minutes or until lightly browned.  Break the scones apart. 

Serve with Glaze, Creme Fraiche, Devonshire Cream,  assorted jellies or Lemon Cheese


 Glaze  (optional)
  1. Combine the juice from the 1/2 lemon with enough icing sugar to make a thin pourable glaze.
  2. Pour over the scones while still warm.

Microwave Rice


I never cook rice any other way than in the microwave. It's just too easy, no mess and perfect fluffy rice every time.
Cooking rice in the microwave rather than on the stove top takes more water, contrary to what you would expect. I don't know the scientific reason for that, but I just know that is how it works and why fix what isn't broken!
  • for 1 cup of rice use 3 cups of water 
  • add salt to taste - about 1/2 teaspoon
  • 1 tablespoon lemon juice 
  • 1 tablespoon butter 
  1. Place all ingredients in a bowl that allows for expansion. 
  2. If you are not using a bowl with a lid, simply cover with a dinner plate. 
  3. Place in microwave at high power ... set for cooking time of 25 minutes and 'forget about it'. 

 * Cooking rice in chicken broth instead of water adds great flavor ... If I don't have chicken broth, adding a chicken bouillon cube is good too. (Make sure it is gluten-free if you need it to be)
I use converted white rice, brown rice or my favorite - sprouted rice.  Sprouted rice is the healthy choice ... you can read about it here. 

NOTE - I know microwaves vary in power, so when cooking the rice the first time take note of time needed.

Dragon Fruit Salad with Citrus Dressing


I offered to bring a fruit and greens salad to a Mennonite Girls Can Cook luncheon last month. My idea was to start with a bed of mixed spring greens and add add a variety of fruit. I wanted it to be fresh with lots of citrus flavour. The variety of oranges and the citrus dressing gave me just the taste I was wanting.


 While picking up the ingredients for my salad at the produce market this beautiful, but odd magenta coloured fruit caught my eye. The skin was thick and felt leathery. I asked someone about it and I found out that Dragon Fruit is the fruit of a cactus plant. The clerk cut one open for me to see and to taste. I added one to my shopping basket.

Inside the Dragon Fruit is a white flesh with little seeds. The texture of the flesh is between a kiwi and watermelon. When cut it holds it's shape well. Dragon fruit is slightly sweet, but does not have much flavour.

To remove skin just slide your thumb under one corner and peel away from flesh. It comes away easily. Slice or cut into small cubes. My cubes resembled dice, and added a unique and pretty addition to the salad.


This citrus dressing is light, tangy and sweet.
Salad Ingredients: (serves 8)
  • 4 cups mixed spring greens
  • 1/2 English cucumber, quartered and diced fine
  • 1 Blood orange, peeled and cut into sections
  • 2 Kiwi fruit, peeled and cut into small pieces
  • 1 Cara Cara orange, peeled and sliced into rounds
  • 1 large Navel orange. peeled and cut into sections
  • 1 cup grapes, sliced
  • 8 strawberries, quartered
  • 1/2 cup blueberries
  1. Wash all vegetables and fruit. Allow to dry.
  2. Lay mixed greens on a platter. 
  3. Top with all remaining ingredients, arranging as desired. 
Citrus Dressing:
  • 3/4 cup grape seed oil
  • 1/4 cup white wine vinegar
  • 1 tablespoon finely chopped shallots
  • 3 tablespoons, freshly squeezed orange juice
  • 3 tablespoons, freshly squeezed lemon juice
  • 4 tablespoons sugar
  • 1 tablespoon liquid honey
  • 1 teaspoon lemon pepper
  • 1 teaspoon salt
  1. Place all ingredients into a jar or shaker and shake well.
  2. Place in refrigerator for at least 4 hours or over night. 
  3. Serve on the side or drizzle over salad just before serving.
Dressing keeps for up to one week in the refrigerator. 

Citrus Tea Punch


This may just be the perfect punch for your Mother's Day luncheon or tea this weekend.  It is made by adding citrus juices to steeped tea and is quite refreshing and delightful!
 
Ingredients:

  • 6 individual tea bags (we prefer Earl Grey)
  • 6 cups boiling water
  • 1 cup sugar
  • 2 cups freshly squeezed orange juice
  • 1 cup freshly squeezed lemon juice
  • 3 cups Sprite (or other citrus flavoured  carbonated beverage)
  • Crushed or cubed ice
  • Orange and lemon slices


Directions:

  1. Steep tea bags in boiling water for 15 minutes. Discard bags. 
  2. Stir sugar into tea until dissolved. Cool.
  3. Add orange juice and lemon juice; mix well. Refrigerate until chilled. 
  4. Add Sprite just before serving. 
  5. Serve over ice. Garnish with orange and lemon slices.
  Yield: 3 quarts. 


Rhubarb Cheesecake Squares


Rhubarb season is here and the rhubarb is growing fast. A number of years ago I saw this recipe in a magazine and tucked it away in my recipe binder. If you like rhubarb and cream cheese you will love this square. It is delicious. A wonderful dessert for Mother's Day.

Crust:
  • 2 1/2 cups flour
  • 1/2 teaspoon salt
  • 1 cup butter, cubed 
  • 4 egg yolks
  • 1/4 cup warm milk
  • 1 tablespoon sugar
  • 1 tablespoon instant yeast 
  1. In a large bowl whisk together flour and salt.
  2. Add cubed butter to flour. Using pastry blender cut butter into small pieces as you would for pie crust.
  3. In a small bowl whisk together egg yolks, warm milk, sugar, and yeast. Pour into dry ingredients and stir until completely mixed. 
  4. Gather dough into a ball, kneading just until it holds together. Divide dough in half.
  5. Roll out each piece to fit a 9" x 13" x 2" pan. Place one piece in pan and cover with filling.
Filling:
  • 2 packages cream cheese (250 grams/8 ounces each)
  • 1 cup sugar
  • 1 teaspoon vanilla
  • 1 egg, separated
  • 3/4 cup rhubarb sauce
  • 1/2 cup pecans, chopped 
  1. Beat cream cheese, sugar, vanilla, and egg yolk until smooth and creamy.
  2. Swirl 3/4 cup rhubarb sauce into the filling.
  3. Pour over first layer of crust. Add the second layer of crust over top of filling.
  4. Slightly beat egg white and brush over top layer of dough and sprinkle chopped pecans over top.
  5. Cover and allow to rise for 1 1/2 hours in a warm place.
  6. Bake in a 350ยบ oven for 35 minutes. 
  7. Cool and cut in squares. Serve with rhubarb sauce if desired.
Rhubarb Sauce
  • 1/4 cup water
  • 1/3 cup sugar
  • 2 1/4 cups rhubarb, chopped
  • 1/8 teaspoon almond extract
  1. Bring water and sugar to boil, add rhubarb and cook for 10 minutes until tender and slightly thickened.
  2.  Remove from heat, stir in almond extract and cool.
  3. Serves: 15

Bread For The Journey


We are encouraged in the Psalms to exalt the Lord together.

During the week, while I walk I listen to praise and worship music and I listen to podcasts where God's word is proclaimed but on the weekend, I go to church with other believers to worship the Lord.

I'm glad that I can view my church messages online when I occasionally am not able to physically be with our church but something is missing when I view it alone.  

The church is the people who come together to greet one another, encourage one another, serve one another, pray with one another, love one another,  study God's word with one another, sing with one another, have communion with one another, instruct one another and even hold one another accountable.  These are things I can't do alone.  I need .... "one another".

God gave us a precious gift when he gave us the church!

May you be blessed today as you worship with one another! 

Pineapple Dessert Squares - Flash Back Friday


I've chosen to bring back this recipe because it's just too good to be forgotten. It's a flashback for me to my mom baking it. She always baked hers in a square pan, which I typically do too, but I thought I'd show you that it can be baked in a tart pan as well. When baking in this style pan I like to serve it cut on the diagonal.

 "Blossom Time" was my Grandma Janzen's china set. The pieces shown here I've added to the few pieces I have from her original set.

Here is the original recipe post.

Crust
  • 1 cup flour
  • 1/2 cup cold butter
  1. Using a pastry blender cut the butter into the flour until you have a fine crumble. 
  2. Press into an 8x8 pan and bake at 325ยบF for 2 minutes. 
  3. Take out and let sit while you make the pineapple filling.
Filling
  • 1 398 ml (14 ounces) can crushed pineapple with juice
  • 1/2 cup sugar
  • 3 tablespoons corn starch
  • 2 tablespoons butter
  1. In a sauce pan stir together pineapple, sugar and cornstarch. 
  2. Stirring constantly bring ingredients to a boil until it thickens. Remove from heat and stir in butter. 
  3. Spread hot mixture over crust.
Meringue Topping
  • 2 egg whites
  • 1/4 cup sugar
  • 1 cup coconut
  • 1/8 teaspoon baking powder
  • 1/16 teaspoon salt
  1. Beat egg whites, sugar, baking powder and salt together until soft peaks form. 
  2. Fold in coconut. 
  3. Spread meringue over hot pineapple mixture. 
  4. Return to oven and bake another 20 minutes until the meringue is a light golden colour. 
  5. It is best to let this square cool before cutting so that all layers set. These do not freeze well.


Raspberry Peek-a-Boo Cookies


This is a lovely soft oatmeal cookie with a raspberry jam centre and
a subtle almond flavour. They freeze well.


  • 1 cup butter, softened
  • 1/2 cup shortening
  • 3 eggs
  • 1 1/3 cups sugar
  • 1 1/2 cups firmly packed brown sugar
  • 3/4 cup water
  • 1 teaspoon almond extract
  • 1 teaspoon vanilla
  • 3 cups oatmeal
  • 3 3/4 cups flour
  • 1 1/2 teaspoons soda
  • 1 1/2 teaspoons salt 
  • 3/4 teaspoon cinnamon
  • 1 18 ounce jar raspberry jam
  1. In large mixer bowl, cream butter and shortening.
  2. Add white and brown sugar and blend well.
  3. Add eggs one at a time, mixing between additions.
  4. Add water and extracts and mix again.
  5. Add remaining ingredients, mixing until blended.
  6. Drop by teaspoonful or medium sized cookie scoop onto cookie pans.
  7. Fill a 1/2 teaspoon measuring spoon, with raspberry jam, press back of a spoon into cookie dough and push jam into the indent you've made.
  8. Repeat until all cookies are filled.
  9. Bake in 400ยบ F oven for 10 - 12 minutes.
  10. Remove to rack or brown paper and cool. 
Yields:  about 6 dozen cookies


Kale Salad with Citrus Dressing and Roasted Shrimp


I often pick up a bag of Kale Salad when I am at the big box store. Not only is bagged salad convenient, it is also versatile when I mix and match the salad and the dressing that comes with it in various ways.  

 The greens in this bagged salad can be stretched by adding in Romaine lettuce or spinach.


Since oranges are so delicious right now, we had this Kale salad for yesterday's lunch with this simple Citrus Dressing and flavourful baked shrimp to make it a meal.  The dressing that came in the bag will be used in a Strawberry Spinach Salad later this week. 


Citrus Dressing  (double for a full large bag of Kale Salad)

  • 2 tablespoons olive or avocado oil
  • the juice of one orange
  • the juice of one lemon
  • 2 tablespoons liquid honey (or to taste)
  • red onion slices (to taste)
  • 1 large navel orange, peeled and sliced
  1. Empty half of a 28-ounce bag of prepared Kale Salad into a large bowl or a Ziploc bag.
  2. Combine olive oil, orange, and lemon juice, and honey in a small jar.  
  3. Shake well and pour over the greens. Toss to coat. At this point, the salad can be refrigerated for a few hours until serving time. 
  4. Arrange on a platter and add the red onion and sliced oranges for garnish.  Serve as it is or with Roasted Shrimp.
Roasted Shrimp
  • 1 pound frozen 17-21 count shrimp, with tails on
  • 1 teaspoon Old Bay seasoning
  • juice of one lemon
  • 2 tablespoons oil
  1. Combine ingredients in a Ziploc bag and thaw at room temperature until shrimp are just slightly icy or thaw in refrigerator for several hours.  
  2. Preheat oven to 400 F.
  3. Drain and discard the marinade and arrange the shrimp, in a single layer on a baking sheet.
  4. Roast for about 10 minutes until shrimp are light pink and opaque.  Serve warm.  

Lactation Cookies

A dear friend of Mennonite Girls Can Cook, Rosella, shared this recipe for cookies that are a packed with good ingredients and especially good for mom's who are breastfeeding their infants. I made them for our daughter in law during her first week home after delivering our first granddaughter. We didn't have enough whole wheat flour on hand so I made them with a mix of whole wheat and all purpose flour. You can use 1-1/2 cups of whole wheat flour instead if you'd like. Thank you Rosella for sharing this recipe.

Ingredients:
  • 3/4 cup whole wheat flour
  • 3/4 cup all purpose flour
  • 1 teaspoon baking soda
  • 1 teaspoon salt
  • 1 teaspoon cinnamon
  • 3/4 cup peanut butter
  • 1/2 cup butter, softened
  • 1 cup ground flax seed
  • 3 tablespoons brewer's yeast
  • 1/3 cup water
  • 1/2 cup brown sugar
  • 1/2 cup white sugar
  • 1 teaspoon vanilla
  • 2 large eggs
  • 1-3/4 cups rolled oats
  • 2 cups chocolate chips
  • 1 cup chopped nuts

Method:
  1. Preheat oven to 350 degrees.
  2. Combine flour, baking soda, salt and cinnamon in medium bowl.
  3. In a large bowl of mixer beat peanut butter, butter, sugars, vanilla, brewer's yeast, ground flax seed, and water till creamy.
  4. Mix in eggs one at a time till incorporated.
  5. Gradually beat in the flour mixture.
  6. Slowly mix in the oats.
  7. Mix in the nuts and chocolate chips.
  8. Place 1 tablespoon sized balls of the dough onto greased cookie sheets.
  9. Press down with fork.
  10. Bake for 12 minutes at 350 degrees.

I used a larger than 1 tablespoon scoop for the cookies I made and my yield was 2 dozen large cookies. Besides my daughter in law enjoying these cookies, my son and husband enjoyed them, too. We found the brewer's yeast in the bulk food aisle of the grocery store.